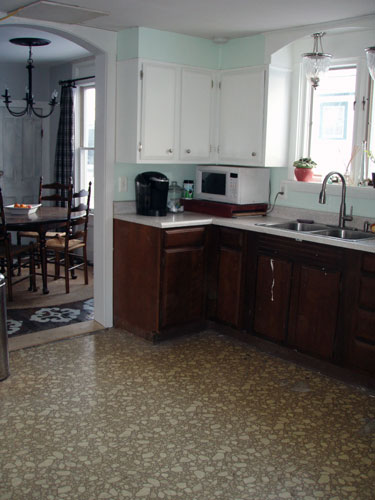
We’re FINALLY coming back to those kitchen cabinets after they’ve spent way too much time two-toned. I started this project back in December…that’s December of 2010 (not 2011). I know. Way to drag this project out. They’ve been looking like this for far too long.
The cabinets have been driving Colby nuts for the last year and it’s high time I kicked my butt into gear and finished painting them all up. I’m not gonna lie, they’ve been driving me nuts too. Mostly because back when I started this project, I removed all of the hardware from all the cabinets. Meaning, we’ve been without drawer pulls and door knobs for over a year now. That makes it awfully difficult to access our pots, pans and silverware on a regular basis. My bad!
But we’re thoroughly sick of our ugly brown cabinets, almost as much as we’re sick of that nasty floor. So this past weekend I bucked up and hammered down on those cabinets. The beauty of waiting so long in between rounds of cabinet painting, is that I’ve learned ALOT about painting in the last year so this round of cabinet painting went much faster and easier than before. First up, cabinet un-assembly.
I removed all the doors and drawers from the cabinets, and then removed all the old hinges. Many of the hinges gave me trouble. There were definitely a few problem children in the bunch that were rusted and disintegrated.
Then I set up all the cabinet doors on top of some scrap two by fours and prepped them for painting.
Because the old door pulls required two holes in the door and the new hardware only required one hole, I had to fill the top hole with putty. I found that layering on a couple of coats of wood filler, letting each coat dry completely and lightly sanding the chunks down, filled the holes the best.
Same thing goes for the drawers. The new hardware wasn’t quite the same size as the old so I had to fill the old holes with putty.
By this time the cabinets were looking a little naked. Welcome to our scandalous, full of nakedness kitchen. The cabinets are blushing. You just can’t tell under all that ugly brown.
After all the wood putty dried on the doors and the drawers, I began sanding. This is one thing I learned last time around. I didn’t sand the cabinet doors down before and found the paint chipped in a few high contact areas. Thus, this time around I gave the doors, drawers, and cabinet bases and nice little scuff up with the orbital sander.
Then I wiped down the cabinets with a damp cloth to remove any dust, let the surfaces dry completely, and began cutting in.
I cut in two coats of primer, rolled two coats of primer, cut in two coats of paint, and then rolled a whopping three coats of paint to get a gorgeous finished product. Normally I would just opt for two coats of paint but after letting the second coat dry, the color didn’t look quite as uniform as I like so I went with coat number three to get the perfect finish.
So now we wait for the paint to dry. I’m a big believer of letting paint fully cure for 48 hours after painting to get the best, durable finish. We’ve been doing this for our last couple of furniture painting projects and have been extremely happy with the end result.
I still have another day to let the paint dry and then Colby and I are going to start re-assembly everything. The reassembly process includes adding drawer pulls, knobs for the drawers, and routing out the doors to install the new door hinges (old hardware and new hardware were unfortunately not compatible).
I’m loving the new, brighter kitchen already and I absolutely can’t wait to put the doors back on and slide in the drawers. I’m really loving how consistent the cabinets are with the dining room. Everything now is all so bright and airy and cheerful.
And in typical Angie fashion, now that the cabinets are looking good, real good, now all I can see is that ugly kitchen floor! Believe me, it won’t be too long until we start installing a new floor, oh happy day! I should also mention that I completely avoided any work on the toe kick, which is still ugly brown (and plastic by the way). My game plan is to rip out the old toe kick when we install the floor and then replace it with painted pine so it’s more consistent with the new, white cabinets.
Pssst…So this was one of the big weekend projects we tackled. There’s still one more to go so make sure to check back later this week. It’s really awesome! Like, “how you doin'” awesome!


Wow, what a difference! I actually kind of liked the contrast in the first photo, but after seeing the last photos, I totally get it. It’s stunning, even without the doors and drawers! Awesome job!
Awww…thanks! I’m beaming right now! Yup…totally beaming! Thanks for the sweet comment. By the way, we started installing the hardware and it looks amazing with doors/drawers! I can’t wait to post the “cabinet reveal”. Stay tuned!