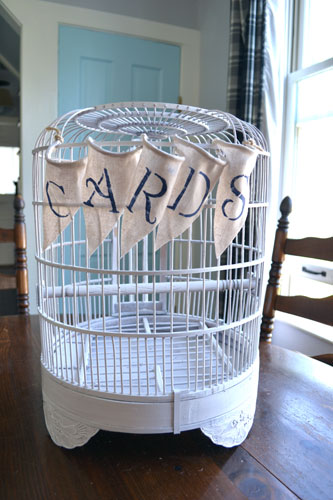
This weekend has been nuts…certifiably nuts. It was our last free weekend before the wedding week festivities kick off and we had ALOT to get done. Most every major task has already been taken care of (minus the final DJ meeting but that’s scheduled for Monday after work) so now it’s down to the little details and touches that make our wedding more us. Honestly, I didn’t accomplish nearly enough as I should of. I cannot confirm nor deny that there may have been a flea market find and a yard sale distraction that side tracked me. More on that post wedding. But one task I did cross off my list was to convert an old bird cage into a wedding card catchall for the reception. Enter the old bird cage.
Colby’s mom found this a ways back in the early days of wedding blogging and planning. I was addicted to bird cages turned card holders early on in the wedding planning and she had found one for me, I believe it came from a thrift store or a yard sale. But it is perfect! I adore all the interesting details like this carved goodness.
But of course, me being me, I had to spray paint it. And I know I’m gonna catch hell for this one. I always do when I spray paint one of the finds from Colby’s mom. Like the wooden bowl that I spray painted turquoise or the pig tray that I painted and lined with fabric. Oy…that pig tray. All I ever hear is “why did you paint over those pigs?!”. Oy with the poodles already! Can’t a girl just paint a tray?! Haha!
But anyway. I had some leftover white spray paint and primer from an old project and used it to spray paint the birdcage, layering on some serious thin and even coats. And I made sure to move the bird cage door up and down pretty regularly so it wouldn’t get spray painted stuck in one position.
And voila…a white and glossy painted bird cage.
But of course I couldn’t stop there. The cage needed a sign. And since I’m 100% addicted to bunting, I opted to make a small banner to label the card cage. I had some linen material already on hand so I opted to use up that rather than buy something new. I used a 45 degree triangle form that I purchased from Jo-Ann’s Fabrics and a rotary cutter and cutting board to cut out the five flags that I would need to make the card sign bunting.
Rotary cutter you are my hero! I later opted to cut about another 200 or so flags to continue the bunting theme and if it wasn’t for the rotary cutter I probably would have stopped after 8. With my flags all cut, out came the glue gun and a role of jute and the gluing process began.
I opted to hot glue the flags to the jute in lieu of sewing them. Sewing takes too long…gluing is fast. Although I did suffer about a gazillion and one third degree burns in the gluing process. Maybe it was because I went all crazy town and thought I needed to fold the linen over the jute, very precisely like, and glue it there for a more finished look.
Totally not necessary. I’m skipping that step when I finish making the other bunting banners, which will probably decorate the head table and the guest book table. After everything was glued together, I started to stencil some letters onto the bunting.
I picked up a 2″ lettered stencil set from AC Moore for about $2 and a bottle of navy craft paint for $0.59. The sponge I had on hand but it would only cost you about $0.10 to pick up one of these basic, small guys. After stenciling, the card bunting, it looked a little something like this:
Pretty! I did learn one lesson during the stenciling process. Either (A) be very, very quiet careful when sponging on paint because it’s not hard to miss and get paint where you don’t want paint or (B) glue the flags onto the jute AFTER stenciling on the letters in case you get paint everywhere and need to replace a flag. Just saying. Lesson learned.
After the paint had dried, on both the bird cage and the lettering, I padded back downstairs (I had been working in the air conditioned craft room all day on this 90+ degree day) to assemble the whole shebang.
Originally, I had wanted to drape the banner across the front of the bird cage, kind of like in the pic two pics ago, but alas it was too big. You had to walk around the bird cage to read the “CARDS” banner. So I got my improv on and looped the banner through the spokes of the cage to eat up some of that slack. And I love, love, LOVE the result. Operation card cage accomplished. And now we’re down to five days to go. Woot woot!
Pssst…Thank you ladies for all your votes during the Great Garter Vote. It looks like garter #3 is the most popular…but I kind of like Heather’s idea of wearing them all. Hmmmm…that’s an option!


then you have options 🙂 hahahah
OMG. I cannot believe that you painted the birdcage.
It looks nice in white.
By the way, I found some earrings and you had better not paint them. I will make you promise before I put them in your hot little
hands!
Christa
Haha! No worries…I don’t paint anything blingy!