So I owe you guys a little tutorial on how we made that rope shelf that we revealed for the Spring Pinterest Challenge. And since I don’t like owing things, here she blows. A full blown tutorial on how we filled that empty wall with a rope/scrap wood/pulley shelf in our bathroom. I would like to say it was easy…but that would be a lie. And if there’s one thing I can’t do, it’s lie. Seriously…try me. My face starts doing weird contortions and I start smirking. There’s a reason I don’t play poker.

Anyway…the project all started with some scrap wood. We ended up recycling our “Angie & Colby” sign from our wedding since there were three boards for the three shelves, they were the perfect width and the (almost) perfect length. For recreation’s sake, you could also use scrap wood or pick up some new wood from your local lumber yard or big box store. And to make this story even more bizarre, we originally found these boards underneath our front porch when we first moved in three years ago. We’re wood hoarders…care to join our club?

After a quick unassembly of the shelves, Colby cut them down to 20″ long (they were already 4″ wide). Since the backs of the boards were painted and we wanted stained wood, we attempted to strip the boards using an orbital sander and 80 grit paper…no luck.

So out came the big dog…a Festool planer.

This was one of those tools that we “inherited” back in the day when we bought our home. A friend of ours was moving and didn’t want to take his tools. Since we only had a drill, circular saw, and a pink hammer (guess which tool was mine) we gladly took on any free tools that came our way, including the Festool planer, which comes out of hiding occasionally for projects like this. The thing essentially eats wood like a woodchuck. When I envision a woodchuck “chucking” and speed gnawing on all that wood (we’re talking one of those cartoon woodchucks) the sound he makes is the same as the Festool planer eating the wood.

Just a couple swipes across each board on each side and five minutes later for a raw wood surface.

Our next step was drilling holes in the shelves for the rope to pass through for hanging. Before drilling the real shelves, we whipped out a piece of scrap wood and drilled a few test holes with the drill and spade bits before deciding on the appropriate size hole for the 3/4″ sisal rope. Ding ding ding…we have a winner…come on down…the price hole is right.

With the correct spade bit size decided upon, Colby lined up all three boards, stacking them on top of each, placed a couple pieces of scrap pine underneath the stack, and clamped them down to the work bench.

When using spade bits to drill holes through boards, having a piece of scrap wood underneath the area where you’re drilling is important. Not only does it protect your work surface from being drilled into, it also creates a cleaner cut on the bottom of your board. If you were to just hang your boards over the edge of the workbench (so you’re not drilling into your work surface) the board would likely splinter on the bottom side as the spade bit broke through.
One more tip before we can move on. The reason for stacking all three boards was to make sure that all the holes in the boards were exactly in the same spot. We didn’t want errant holes to make for an uneven hanging shelf.

With all the cuts and drilling done, I took the boards outside on one of our first nice days of the year for a little staining and poly action. I went with leftover Minwax Classic American stain combined with a Minwax water based poly combo.

Here’s where things start to get tricky…not really…I just made it WAY harder than it needed to be…and took about three too many trips to Lowes for supplies. I started with four pulleys, a pile of 3/4″ sisal rope, and a pair of eye hooks. Then later returned two of the pulleys and purchased o-rings and pulls (which I thought we needed to make the pulley functional but didn’t need in the end), and also S-hooks which we did use.

My initial plan was to make the shelves raise-able and lower-able but ultimately decided that I would never use it AND it was too tricky. So we went with a simpler hang the eye hooks from the ceiling and link a pulley to it with an S-hook (another trip to Lowes) and call it good plan.

We were lucky that when we gutted out our bathroom, Colby installed strapping to help him hang the new sheetrock, and a piece of that strapping was directly above where we wanted the shelf to go. As Wayne (from Wayne’s World) would say “Schwing”!
Then I learned the hard lesson that you can’t thread all the rope through the shelves and then tie all the knots underneath it. Just doesn’t work that way. And then I learned that I needed just two pieces of rope not four because it’s just ONE piece of rope that feeds through the pulley…doh! I had a blonde moment…except I’m a brunette. And then I figured it out.

One shelf at a time, starting at the top, 12″ apart (actually using the tape measure and not just eye balling it), and tie the knots as you go.

I repeated this process, adding shelves and tying knots until I reached the end and had a little bit of rope left to trim.

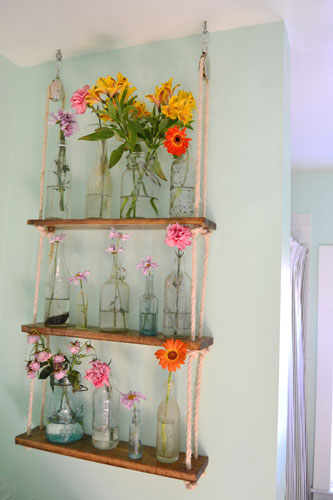
And we were left with a completed rope shelf just waiting for some monkey lovin’ swinging’.

Except that I put found bottles and flowers on it. Sorry monkeys.
So there you have it, a quick and dirty tutorial on how we put together the rope/pulley shelf in our bathroom. And I think now would be the appropriate time to whip out the good ol’ bathroom to-do list:
Find a dresser/buffet to convert into a bathroom vanity(we found a buffet on Craigslist for $75)Hack up said dresser and paint it(vanity hacking post here and here during installation; the vanity is painted Gray Owl by Benjamin Moore which you can read about here)Demo out the old “temporary” vanity that had been in our bathroom for nearly three years and patch the sheetrock(vanity demo go boom…note…Colby challenge me to spoof the KFC “Game Day Bucket Go Boom commercial in every post…challenge accepted)Prime and paint the bathroom wall a cool, minty color(we painted the bathroom Mantis Green by Benjamin Moore)- Add bead board above the built-in shelves and paint the bead board and the shelves glossy white (for shame that we haven’t yet painted the bathroom built-ins…it’s been three years!)
Build a first aid cabinet for the space above the toilet paper holder(we didn’t build it though…we found it…for six bucks…here’s the post)- Organize, organize, organize!
Build shelves for the blank wall space beside the vanity- Build another shelf, maybe one out of driftwood, to hang over the back of the toilet
- Find or DIY some interesting towel hooks (picked these up during our recent Brewer School House Antiques shopping excursion, just need to paint and install them)
- Finish off the space by hanging a little art and accessorizing here and there (I’m sensing some Etsy art I’ve been drooling over in our future!)
- Patch the cracked ceiling (kind of broke it while working in the attic) and paint it
- Replace the light fixture with something fun and less boob-light-like
Do you like how we crossed off one thing (the rope shelves) and added two more things (fixing the ceiling & installing a new light fixture)? Isn’t that the way it goes?
Pssst…Word to your momma! Happy Mother’s Day to all the mom’s out there! Goose was nice enough to bestow upon me a Mother’s Day gift of acting not quite as obnoxiously crazy as normal…and he licked my face…twice…such a good boy!
