When us crazy kids middle aged folks who still act like kids, decided to tackle an entire bathroom remodel (a gut job) in just six weeks for the One Room Challenge, there was one project that was giving me anxiety yet I was uber excited to tackle. The tiling of the shower tub surround with marble subway tile.
I was excited because tiling is one of those projects that I get super excited about. The kind of super excited that you volunteer to spend your weekends helping your friends with their tile projects. The kind of super excited where you beg your husband for a tile saw for Christmas (and a diamond tile saw blade because diamonds are a girl’s best friend after all and what girl doesn’t want “diamonds” for Christmas). The kind of super excited where you keep a running list of all the tiling projects you want to tackle on your iPhone and add to it more often that what seems appropriate.
But yet there was this anxiety because I remembered how long it took me to tile the shower in our first home. Did I really have enough time to tackle the tile in this space and leave enough time to finish up the remaining projects in the six week timeframe? Anxiety no more! A couple of Saturdays later…we have marble subway tile folks!
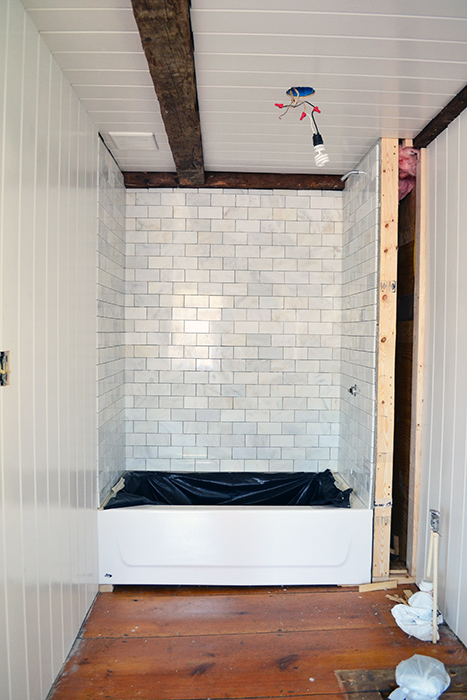
And my heart is singing because not only did I spend some serious time tiling but have you seen how snazzy our bathroom remodel is looking?! It’s almost like a real live bathroom! We still have to grout the tile (another day another project) but the tiling monkey is officially off our backs.
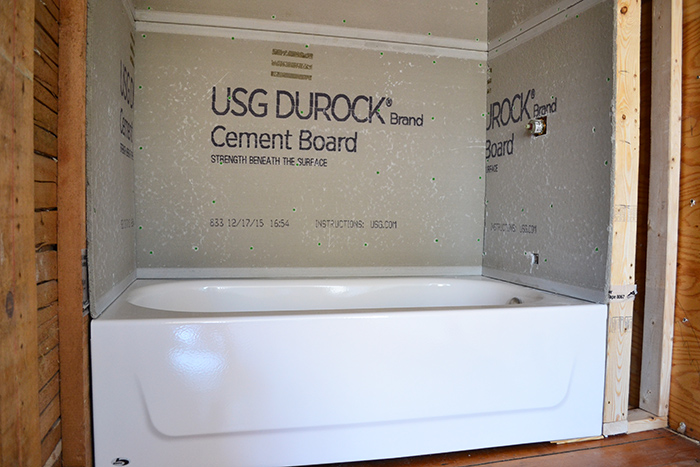
As soon as Colby installed the tub, he also attached cement board as a backer for the tile. In our case, we used 1/2″ Durock which our local lumberyard carries. The Durock is simply screwed to the stud framing behind it using screws coated with a moisture barrier. My screw salesman husband (yes…my husband literally sells screws…and power tools) knew just the right kind of fastener for the job. What would we do without a screw salesman in the family?!
When it came time to prep for tiling, we started by marking all of our guide lines. One thing I learned from our first tile job is that subway tile jobs can get off track if you don’t give yourself guidelines. Use a level, mark your center points (I always like to start in the center with full tiles and move the sides/corners where I make my custom cuts), and mark horizontal guidelines every nine inches or so to keep you on track. You can always fudge a tile here or there to help keep your tile rows level and even.

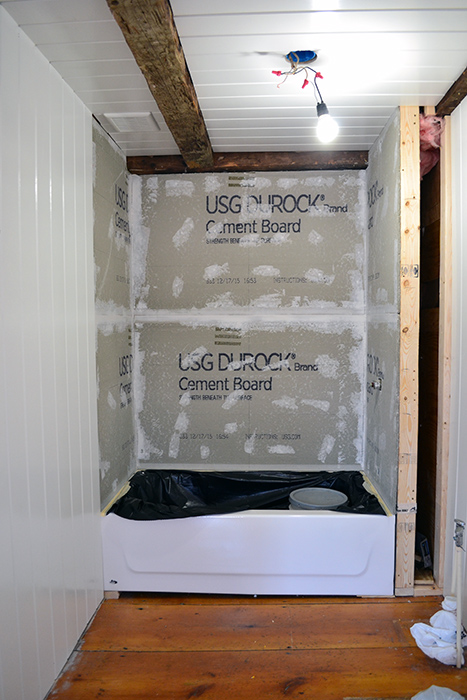
After all the guides were sketched in, I protected the tub from rogue tile adhesive blobs by taping down a couple of contractor bags over the surface to served as a drop cloth. Then, I took a drywall putty knife and applied tile adhesive over all the seams, including the corners, and also covered all screw heads/holes. No moisture shall get behind that cement board.
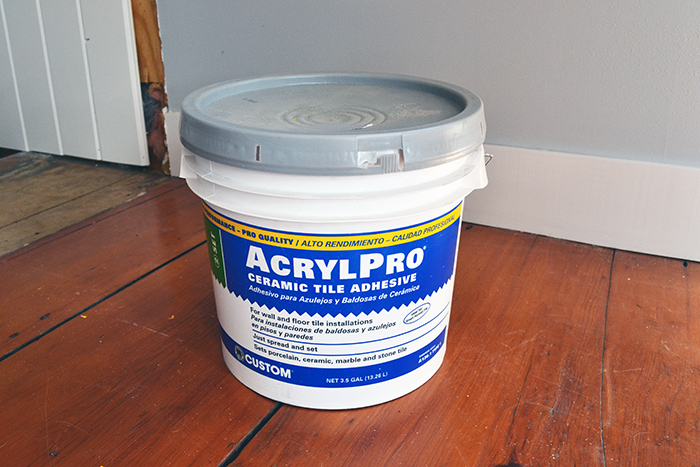
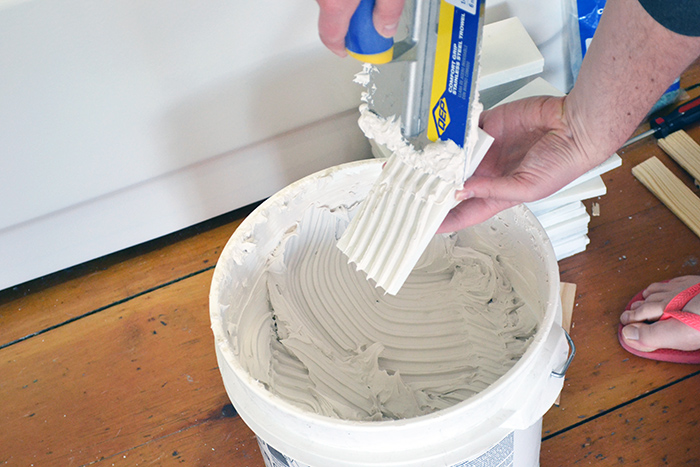
I used an in-stock, pre-mixed, tile adhesive from the Home Depot. I went with the cheaper of the two options that our Home Depot had in stock ($39 vs. $56). The stuff has mixed reviews, like most products these days, but I had no problems using it for the subway tiles. It was easy to cleanup, mixed well and dried super solid in less than 24 hours. A pre-mixed adhesive was important for me. I know it would have been cheaper to mix my own, but I knew I was going to chip away at this project on nights and weekends. I ended up tiling on five separate days. So the convenience of having the pre-mixed adhesive and simply throwing the lid back on the bucket when I was done for the night, was nice. Plus we only used about half of the 3-1/2 gallon bucket so we have our adhesive for the next tile project on that iPhone list.
The tiles we used were boxes of 3″ x 6″ Grecian white polished marble tiles at the Home Depot at $5.69 per box of eight. It was tile love. And fairly affordable, especially for marble, with a grand total of $350 for all the tile. The marble tile is definitely the splurge item in this space. Plain white porcelain tile would have been about half the cost, but the marble is adding so much character here and worth the cost in my book. Besides, we saved a ton of money in here by going the DIY route.
Brick by brick I started laying the marble subway tiles, using 1/8″ tile spacers and a back buttering method for the marble subway tiles.
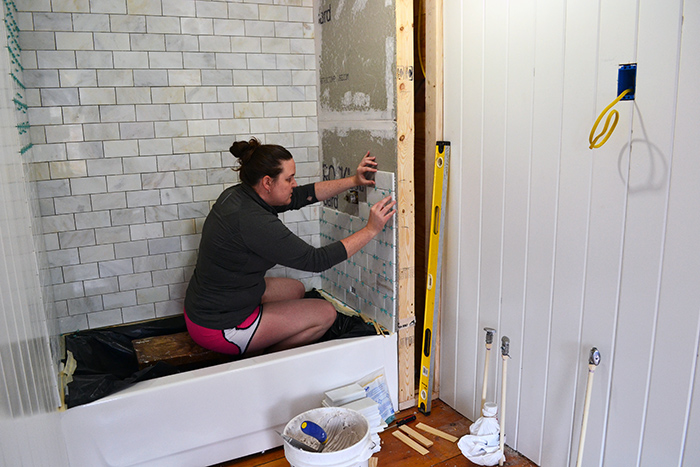
See the concentration? Being ridiculously particular, type A, and a perfectionist pays off in the tiling world.
About the back buttering. I learned this technique when tiling our old subway tile shower. Instead of using your notched trowel to apply tile adhesive directly to the wall, apply the adhesive to the back of the tile piece instead. It’s much less messy as you can contain the adhesive mess to above the bucket. Plus, you can pretty much press pause on the tile job at any moment. Just keep your trowel at about a 45 degree angle as you swipe on and smooth out the adhesive.
We also had to make some pretty particular cuts. Like the tiny angled tiles up against the beam and the shower head hole smack dab in the middle of a tile. Thank goodness for Colby and his measuring skills! Me…not so great in the measuring department. I tend to prefer the eyeball it method. Not Colby. He came. He measured. He cut. Good thing or I may still be eyeballing that last notched tile! The round cut was made possible by a diamond hole saw meant to cut marble.
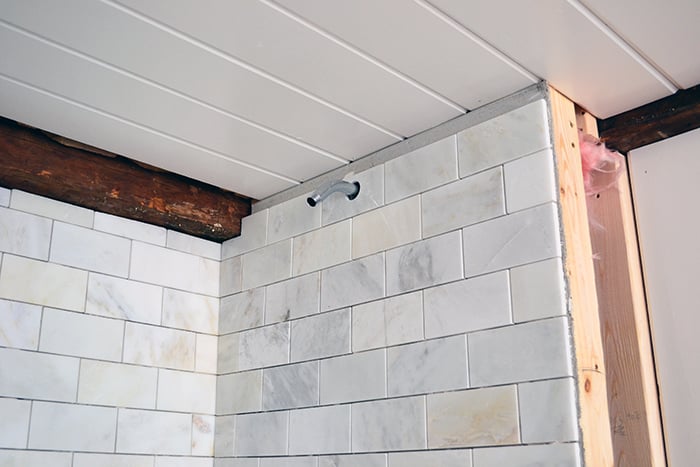
Per the missing last row of tile, don’t fret! We’re adding some painted wood trim pieces to both sides of the shower. We’ll get to that after grouting and during the trim-out-the-bathroom step of the remodel.
I’m breathing a few sighs of relief after getting all the tiles installed. One, because…well…the tile is installed. And two, because I love, love, LOVE the marble subway tile combined with the white planked walls and ceiling.

You know how sometimes you have these great plans but they don’t quite work out? Or something you envisioned starts coming to life and it just looked so much better in your head or on paper but is kind of a flop when it’s in real life? Thankfully, that didn’t happen here. I’m feeling the combo and am overly confident that I made the right choices for this space. Now to grout, seal, and start putting the finishing touches on this bathroom. You know…like build a vanity kind of finishing touches! Oy with the poodles already!
Catch up on our bathroom remodel progress: bathroom demo, bathroom design plan and budget, bathroom wall and ceiling plank installation.

So, last night, I got an email saying you had a new post (squee!!!). While I was reading it, my husband rolled over and asked me why I was reading a blog about tiling a bathroom when we already did our bathroom….as if reading about tiling is only supposed to be done while one is currently tiling. Silly man! Apparently, my love of tiling is not shared by him…but at least it’s shared by you! Plus, it’s always been a dream of ours to renovate an old farmhouse. It’s pretty exciting to be able to follow along on your journey! This is looking pretty spectacular!
It looks amazing, especially next to those gorgeous wood beams and all that pretty planking! We just finished up tiling ours too and I agree, it feels great to have that big job out of the way!!! Here’s to another productive week to come!
This looks amazing so far! I love the mix of marble with the rough wood.
Great job on the tile! It looks amazing!
Oooh, I feel you on the back-buttering; definitely time consuming (I only did about half our tiles that way, and I had a lot less space than you to cover). Good thing you were able to get it all done – looking good 🙂
It’s looking beautiful!