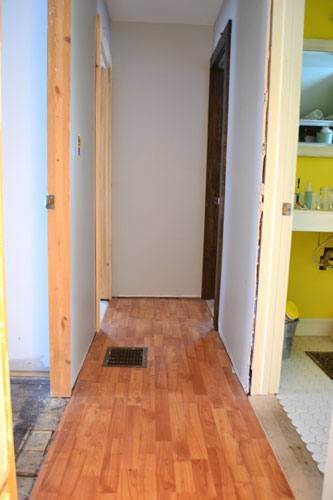
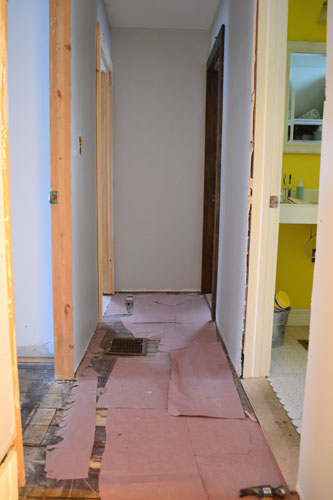
Two things…one…I’ve been watching ALOT of Die Hard lately (hence the blog post title) and two…we’ve laid down the pine flooring in our upstairs hallway and took it from this (a laminate mess):
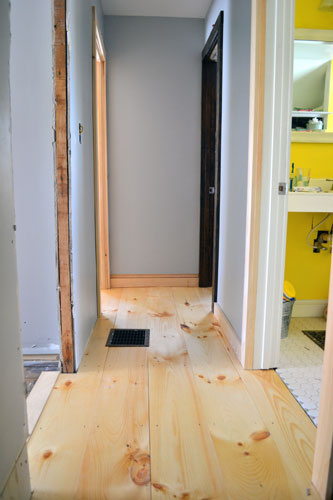
To this (a wide pine masterpiece):
I’m not gonna lie, we tackled this project a couple weeks ago but I’ve been dreading posting about it because it’s kind of a boring “how to” subject. But I’m going to channel my inner John McClain and bring the action to this “how to lay your own wide pine floor” tutorial. PINE HARD!
Okay, let’s do this. We started by bringing home a few 1″ x 10″ x 10′ shiplap pine boards from the local lumber yard for about $7 each. We needed five of them to cover the hall so the flooring cost us only $35.
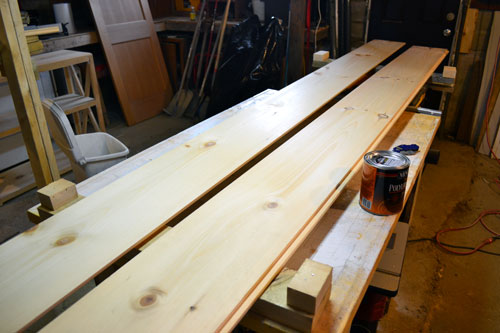
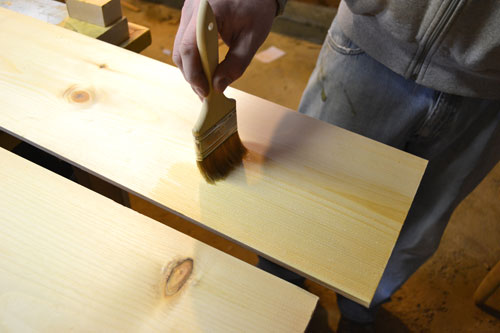
But alas, they were unfinished planks. Random note…this kind of shiplap flooring isn’t necessarily meant for flooring but it’s been gaining some serious popularity lately as the wide pine, old farmhouse style flooring is making a comeback. It may be really cheap, but the wood is also relatively soft. Meaning…lots of poly. Our poly of choice…the Minwax Fast-Drying Semi-Gloss Poly.
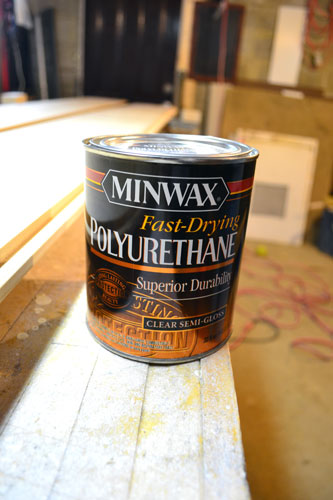
Before we even started to think about laying down the John McClain smack flooring, we layered on three coats of the poly, waiting 24 hours between coats so it had plenty of time to harden. We would still have to layer on a few more coats after laying down the floor, but this would allow us to lay the floor and not worry about staining/damaging it in the process.
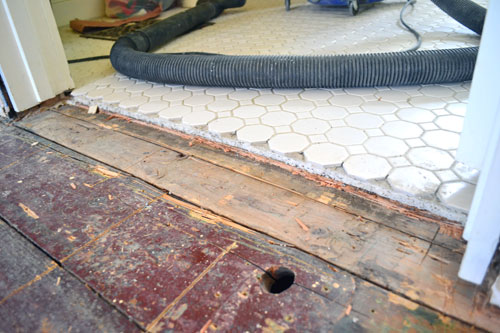
After the pine planks were pseudo pre-finished, it was time to prep the hallway. And by prep the hallway, I mean remove the laminate flooring that we put down temporarily over two years ago. We plan on keeping the flooring just in case we ever need another “temporary” floor again.
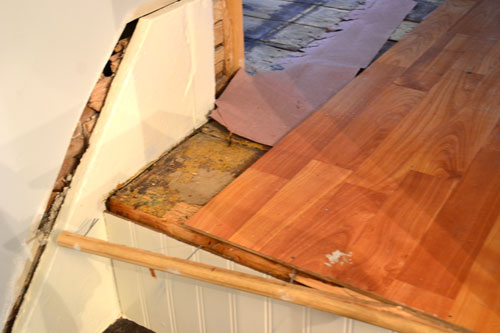
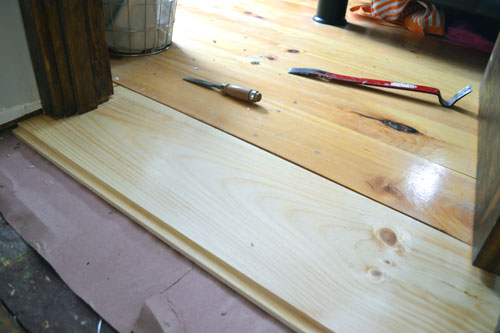
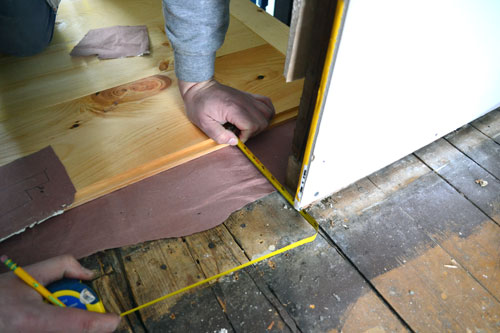
The other hall floor preparations included removing the transition between the bathroom floor and the hall:
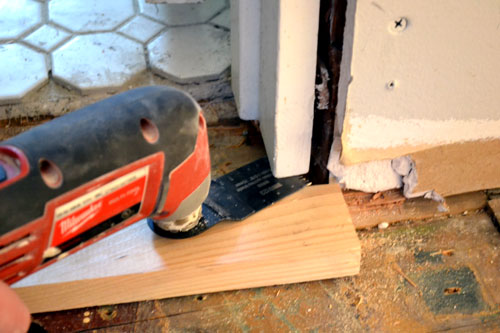
And trimming down the door jams to the bathroom door so the new flooring could slide right under it. To do this, Colby whipped out his favorite tool…well…he is a boy after all so I guess this would be his second most favorite tool (Lord…I apologize…be with the pygmies in New Guinea).
Generally, when you lay flooring you layer a buffer in between the sub floor and the new floor boards. This keeps the two woods from rubbing up against each other and squeaking. We used rosin paper, but tar paper is another option. This was the leftover rosin paper from the laminate flooring, which we just kept for the new pine flooring.
Let the pine laying begin! We had already put down a pine floor in the craft room, and because we wanted a continuous floor throughout the second story, we started right where we left off.
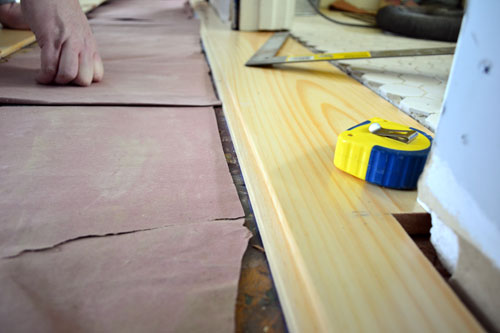
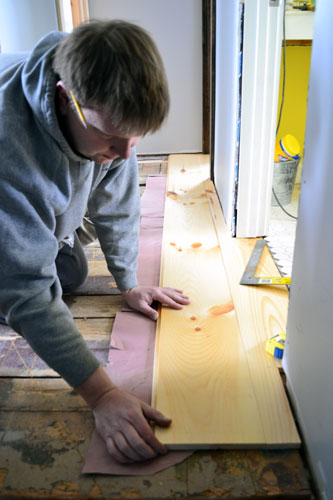
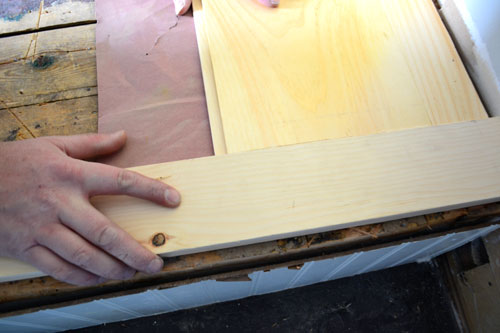
The first board can be a bit tricky. Because we have an old, unsquare and unlevel home, Colby made about a gazillion and a half measurements to make sure all the cuts and doorway notches for the first board were accurate. But if he was a little off, at least the future baseboards would cover any gaps between the floor boards and the wall.
As you lay the flooring, you just “lap it”…aka…put the top groove over the bottom groove. Does that make sense?!
And since the hallway leads to the top of the staircase, Colby trimmed down a piece of pine to make stair tread nosing, and lined the pine planks up against it.
Then it’s just a little tap tap to make sure the boards are tight up against each other.
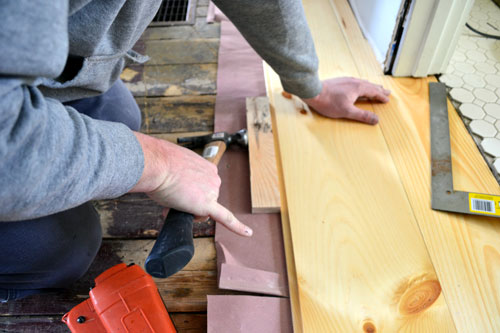
And then tack the boards with a few finish nails:
Colby just repeated that process, measuring and making cuts to go around doorways and vents, until he made it all the way to the guest room and master bedroom side of the house.
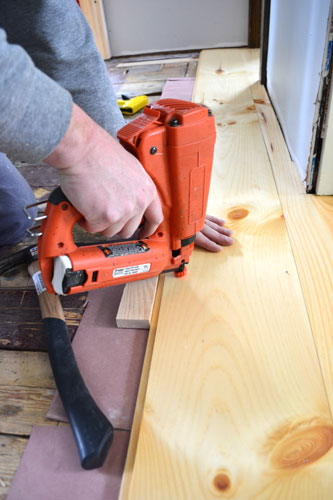
Now…this is where things are going to get old school. So old school that I’m feeling a little Amish over here. Some body get me a horse and buggy. After all the flooring went down, we used cut nails to really secure the flooring. The finish nails were used just to hold the floor in place until we got to adding the cut nails. What are cut nails? These guys.

They have a wide head and a tapered body. They don’t have traditional round nail heads, but a square head. These nails are hardcore nails! Rugged nails! They nail right into the face of the board so they’re 100% visible. Typically when you use cut nails in flooring, you pound them into the wood in a parallel fashion. So using an old piece of trim as a straight edge, Colby first drilled a line of pilot holes.
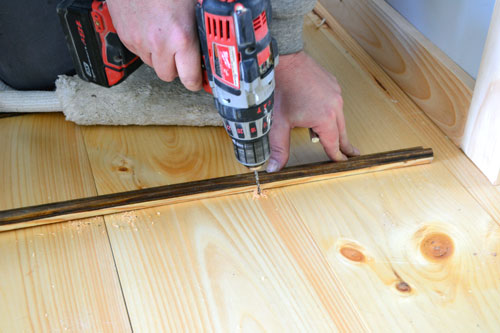
Two nails go in each board all the way across the hall.
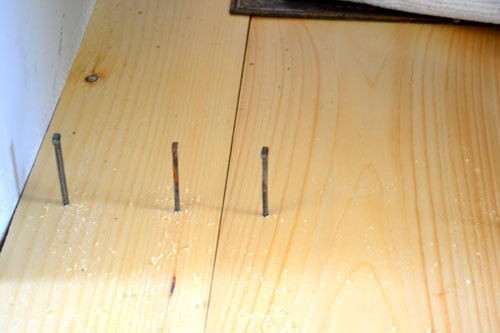
After drilling a line of pilot holes, and setting up the nails, Colby pounded them all in.
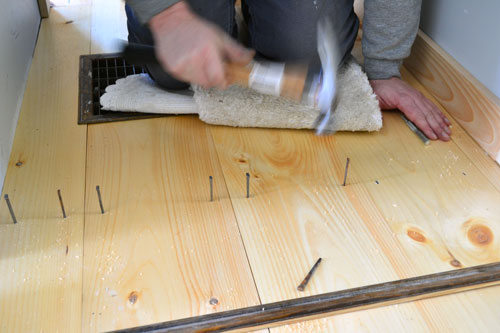
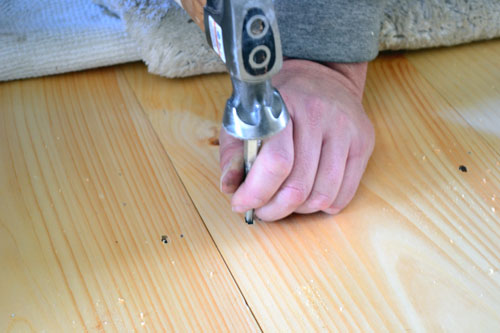
And punched in any nail heads sticking out of the wood so no sock would end up losing it’s life in a battle against a stray nail head.
We worked our way down the hallway, nailing in a row of cut nails every two feet until every board was properly secured. One word of caution…be UBER careful around knots. The knots may be all cute and add that rustic charm to the wide pine floor, but they are deadly! Deadly monsters! We’re talking a real wood splitter kind of deadly. When you nail into a knot, chances are pretty good that you’ll split the wood. So avoid the knots with the nails.
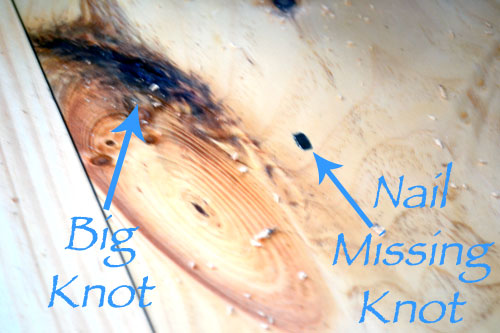
But you never know, you could still split the wood if you’re not careful. Kind of like this.
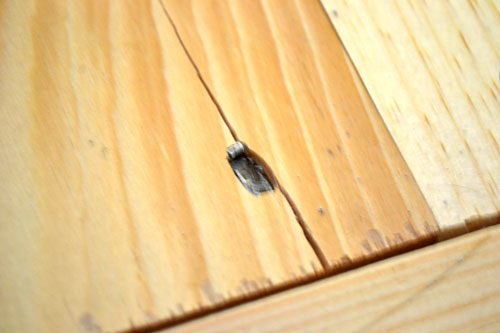
At least the split wasn’t so bad that we would have to replace the board. A few coats of poly will take good care of that.
The thing that I love the most about the wide pine, shiplap flooring is how it ages. Here’s a pic of the craft room floor, which we laid a couple years ago, lined up with the new hallway flooring.
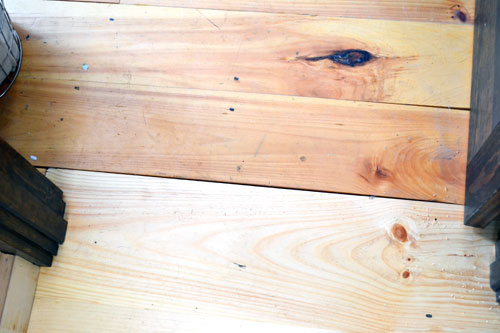
I love how the pine looks when it scuffs up and also how it yellows from the oil based poly. It took about six months for the wood to go from the light colored pine to the yellowed, more intensely colored pine flooring. And alas, we have a REAL floor in the upstairs hallway.
We still have to continue the flooring into the guest room and then the master bedroom, but this is a start. But I love the floor…except for how I keep tripping coming up the stairs because the new pine floor is so much thicker than the old laminate floor.
Pssst…Whew, that was painful to get through. Me and construction, not such a good fit. But me and staining and painting…totally my speed. What projects have you guys been working on lately? Any floor laying? Or polying?

I know you think this was a tedious and boring post, but it was so very helpful for us! It’s perfect. So clear and easy to understand. Thank you sooooo much!
Oh my gosh…I’m so glad you enjoyed this!!! It’s not really a boring subject for us (flooring is fun!) I just didn’t think anyone would read it/would find it useful, so I’m SOOOOOOOO glad you found it helpful! You’re very welcome and happy flooring!
Thank you for the post! I appreciate your efforts in putting this info out there. I am about to start a tongue and groove pine floor and have been trying to find out the best ways to go about it. How do you like the poly coating? I have read that the poly adds a hard plastic-type layer to the top and keeps the wood from patina, where a tung oil will allow patina and keep the natural soft wood feel. Also, since pine is so soft, the poly may crack if the wood gets dented. Any signs of that on the floor you have in your craft room? Also, did the floor require any sanding after the cut nails were installed?
Hey Eric, boy do I have answers for you (and I’ll also email them to you in case you don’t see it here). First, we love the poly coating. We have a rambunctious dog with extra sharp nails so a nice, hard poly on the soft pine was a must for us. And we’ve tried both the water based and oil based poly and no matter the brand or “hardness factor” of the water based poly, it still scratches easily. I highly recommend the oil based if you go the poly route. And the poly does add a plastic-type later to the top, especially if you go crazy and put down four-five coats like we did. But it only looks plastic-ie at first. After you walk on the floor for a little while that plastic sheen goes away and it starts to feel more lived in, like it’s been there forever.
As for cracking, we haven’t experienced any of that on any of the wide pine floors that we’ve put down. The craft room floor has been finished for three years now (the hall and office space are only six-ish months old) and the only cracking we’ve experience was one board which cracked because we didn’t let the wood acclimate long enough and when it dried out it cracked. But it’s easy enough to replace.
The floor didn’t need any sanding after installing the cut nails. All we did after nailing them in was go over with a hole punch to recess them a bit and then filled the void with poly. I suppose if some of the wood splintered a bit as the nails went in, we would need to sand but that would be the only instance. And when we punched them, we made sure that they went down just a bit below the wood (not too deep but further down than the face of the wood) so the nails wouldn’t be sticking out and if we decided to refinish the floor someday, we wouldn’t ruin the sander on nail heads.
I hope this helps and if you have any other questions, let us know! Also, I’m curious if you go the tung oil route how that works out for you. Let me know how it works! I think you’re right and it would REALLY bring out the gorgeousness of the wood!
This was fun to read, even though I should be asleep by now. You are a super writer!
Thank you!
Thank you so much this post is awesome!
How you make the groove in the boards ?
A router? What router bit will do it ?
Thank you
Hi Angie and all,
Very helpful. I have been considering this for a long time. You say you have an old house, like mine, so I have a couple questions:
* I’ve installed a floating floor in one of our bedroom relatively successfully, but on the main floor of our 1885 home, I really want this soft pine. However, like your home, my floor is horribly un-level. Did you find that the finish nailing and the “cut” nails held the floor down in un-level spots? I’m worried the floor will bulge up again.
* Where did you get the cut nails?
* Is the ship-lap pine widely available?
Hey Angie ~ I love your shiplap floor.
I’m wondering how much space, if any, you guys left between the boards and the walls for expansion of the wood floor? You may have said but I missed it. Maybe with nailing wood an expansion space isn’t needed, I just don’t know about such things.
Thanks for the tutorial, and sharing your home projects.
~Jami
Thank you. Just what I was looking for.
Would you mind sharing what the cost per square foot was?
No, I don’t mind at all. I don’t remember exactly, but it was something like $1.60 per lineal foot at our local lumber yard. So somewhere around $1.40 per square foot. That’s just the wood cost. We did end up spending more for the tar paper, nails, and many coats of poly. Hope this helps and let me know if you have any other questions.
I found this post the most helpful of all post that I have come across for pine flooring.And I ordered those nails for crafts and love them and know I have a use for them.Awesome job love the tips.U just made my day .
Yay! Thanks so much and glad we could help out!! Are you installing pine flooring?! So exciting…hope you love it!
Hi Angie, thanks for the great post. How is this flooring holding up? I noticed you didn’t mention anything about acclimating the wood… Did you let it acclimate to the indoors for a period of time before installing? Also, I noticed that although the planks are perpendicular to the wood strip subfloor, it appears that you went parallel to the floor joists (the large 2X8 or 2×10’s on edge that are under the subfloor)… This goes against the grain (pun intended). Most people recommend perpendicular to floor joists… So I’m really curious how the floors are holding up? We are running into a similar situation where we might have to go perpendicular to floor joists… And we’re using this guide for a lot of our instructions! Thanks!!!
We actually don’t live in the house anymore (we sold it last year) but the four years we had the pine floor it held up pretty well. It is a softer wood, so every time we dropped something heavy on the floor, it dinged it. Dog nails also gouges it pretty easy. But layering on extra coats of oil based poly helped alot! We did let the floor acclimate for a few weeks. While we waited for it to acclimate, we pre-polyed the boards. This was one of the first pine floors we installed (in the post) but on future floor installs, we’ve been laying down four or five poly coats on each board face before installing. We did go against the grain (love the pun)!!! We went the direction we did because we wanted the boards in the hallway to run lengthwise (not perpendicular) mostly for the looks. The floor boards we installed were also the third layer of wood (there are actually two subfloors underneath them) so we weren’t so worried about sturdiness. Good luck with your project and let me know if you have any other questions!
Edited:
Hi Angie, thanks for the great post. How is this flooring holding up? I noticed you didn’t mention anything about acclimating the wood… Did you let it acclimate to the indoors for a period of time before installing? Also, I noticed that although the planks are perpendicular to the wood strip subfloor, it appears that you went parallel to the floor joists (the large 2X8 or 2×10’s on edge that are under the subfloor)… This goes against the grain (pun intended). Most people recommend perpendicular to floor joists… So I’m really curious how the floors are holding up? We are running into a similar situation where we might have to go parallel to floor joists… And we’re using this guide for a lot of our instructions! Thanks!!!
Where did you buy the nails from? I’ve seen one company you can order them from but I didn’t know if you found any box stores that carried them? Not that I want to buy from a box store but for time sake. Thanks!
We couldn’t find the nails at either Lowes or Home Depot. We ended up buying them at a local lumber yard who had them in stock but found that only certain local lumber yards carried them. Most would have had to special order them.
Just found this blog, and I think I have found the flooring for an old house (1897) that we have been struggling with what to replace the whole down stairs sheet vinyl. This blog was a wonderful “how to” and not boring at all!
Question: Did you fill your counter sunk nail holes and if so, with what?
What a beautiful floor! I am doing the same in my house. 2 questions:
1- Did you apply poly / varnish on both sides of the boards?
2- Did you install the boards bark up or bark down (to prevent cupping)?
Thanks!
Great questions! I do really need to update this post because we’ve since installed another 1,000 feet of the floor boards and I have updated tips.
Yes, we did apply poly on both sides of the boards. Not nearly as many coats on the bottom side than the top but still at least three coats.
Per cupping, only one side of our boards was planed smooth, the other side was rough, so we installed them smooth side up. Nailing down the boards with the cut nails helps with cupping. Ideally, you would want to run the floor boards perpendicular to the joists and face-nail directly into the joists. We did this in most of our rooms but didn’t in the hallway since we really wanted the look of the floor boards running down the hall. There we still face-nailed the boards into the sub floor, which (old house problems) there were two levels of subflooring.
Hope this helps and good luck with your project!!