So we’ve shown you the progress we made with the bathroom vanity(a Craigslist buffet find, that we modified, and then painted Gray Owl by Benjamin Moore) but we haven’t yet shown you the bathroom progress. Game day bucket go boom:
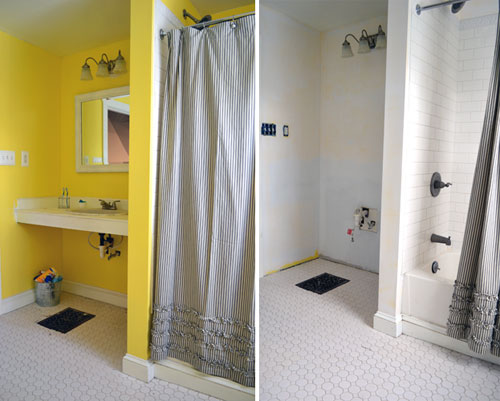
We’ve been busy bees. Can you tell?! We not only removed the “temporary”, been there for three years, painted plywood vanity this past weekend, but we also patched the walls, and primed the entire bathroom. I’m a little sad to see the yellow go, but am uber excited about the new paint color, which is all up. I just need to snap a few pics of it to share with you all. Hint hint, it’s super fresh and clean…some might say it’s “minty” fresh. Did I do that (she says in her best Urkel voice)?! Anyway…while I was busy painting away on the new buffet turned vanity, the Colb-ster was hard at work prepping the vanity area, first by removing the old vanity. The hot tip for vanity removal…turn the water off.

You don’t want to flood your bathroom. I know an indoor swimming pool has always been a dream, but just not on the second floor…directly above the living room tv.
The second hot tip for vanity removal…score the caulking on all the vanity trim/back splash areas before trying to remove them. This makes trim removal easier since it breaks the paint/caulking seal.

Same goes for the sink. Don’t just try to pry it out, score the caulking around the sink first. It’s pretty much the only thing holding that sink in there so scoring it with a utility knife breaks that seal.

Since Colby and I are both big fans of salvaging wood, Colby removed the vanity piece by piece as much as he could. We’re always coming up with new projects and ideas for salvaged wood and love to recycle wood and trim pieces instead of buying new. Who knows, an old bathroom vanity may become new bedroom shelves someday.

Same goes for the baseboards. We had a decent amount of sheet rock repairs to do in the vanity space, which meant carefully removing the baseboards (scoring the caulk line first with a utility knife and then prying it off with a hammer). We’ll later put the baseboards right back where they were, re-caulking, and touching up the paint.

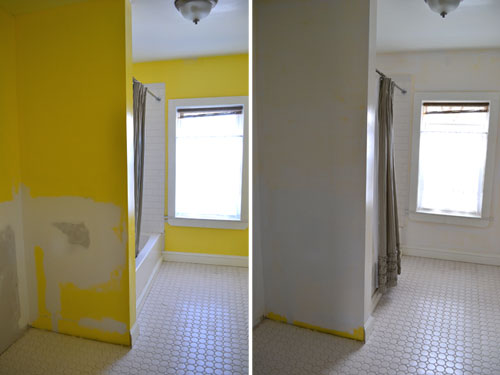
With the vanity and baseboards removed, it was just our usual sheet rocking/mudding/sanding song and dance. We’re getting to be pros at this.

It may be hard to tell in the above pictures, but the reason why Colby sheet rocked right over the lower half of the wall (where the plumbing is coming out of the wall) is because the wall there has always been uneven and adding a level of sheet rock levels it out. Way back when we first demo-ed our pink and ugly bathroom and re-sheet rocked it, Colby installed a piece of plywood behind where the mirror would go, underneath the sheet rock. This provided a nice solid surface to hang mirrors from…good idea. Bad idea…not leveling out the bottom half of that wall. Doh! So we took the vanity removal opportunity to rectify the situation.

After Colby finished the mudding/sanding process, I gave it one final sand, and primed the entire bathroom.
I know I didn’t necessarily have to prime the entire bathroom before re-painting it, but our yellow walls were super bright and I didn’t want to take any chances of the new paint color not covering it. And after all, primer is cheap at about $15 a gallon compared to our favorite Benjamin Moore paint at $45 a can.
So stay tuned for details on our freshly painted, minty bathroom. I should have those pics coming at ya early next week…or maybe tomorrow if I’m on my A-game. Let’s just say…the color doesn’t disappoint and I’m not one to ever choose the lightest shade on a paint chip!
Pssst…So what about you guys? Any painting projects going on in your neck of the woods? Or bathroom makeovers going down? Do share! We LOVE hearing from you all!

Holy cow! You’ve been busy. Bathrooms are so much work, but also such a great reward. Yours is looking great.
Stopping by from Decor and the Dog.
Eeeee…thanks for stopping by and for the sweet comment. Totally agreed about bathrooms and we can’t WAIT to finish ours! It’s been three years in the making…doh!
Visiting from Decor and the Dog! I’m also a Maine blogger!
Yes!!!! A fellow Maine blogger! I have been looking for local bloggers forever and you’re the first! Officially adding you to my reader…Maine-ers represent!!