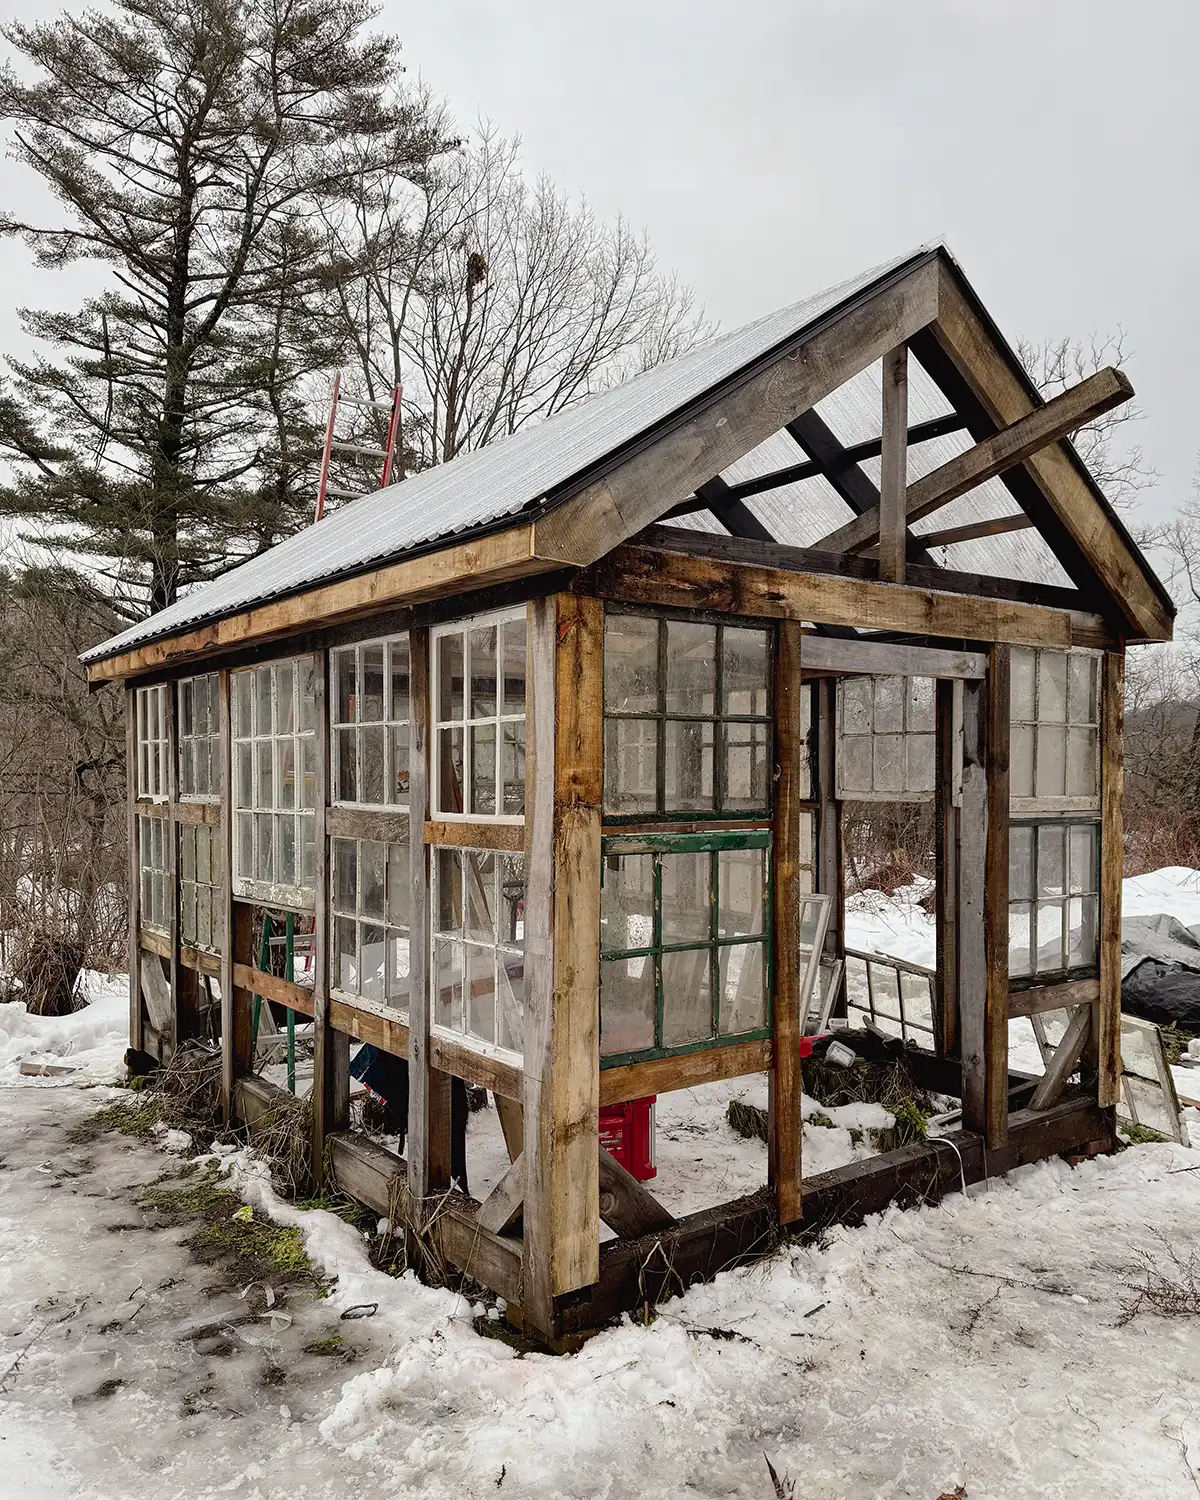
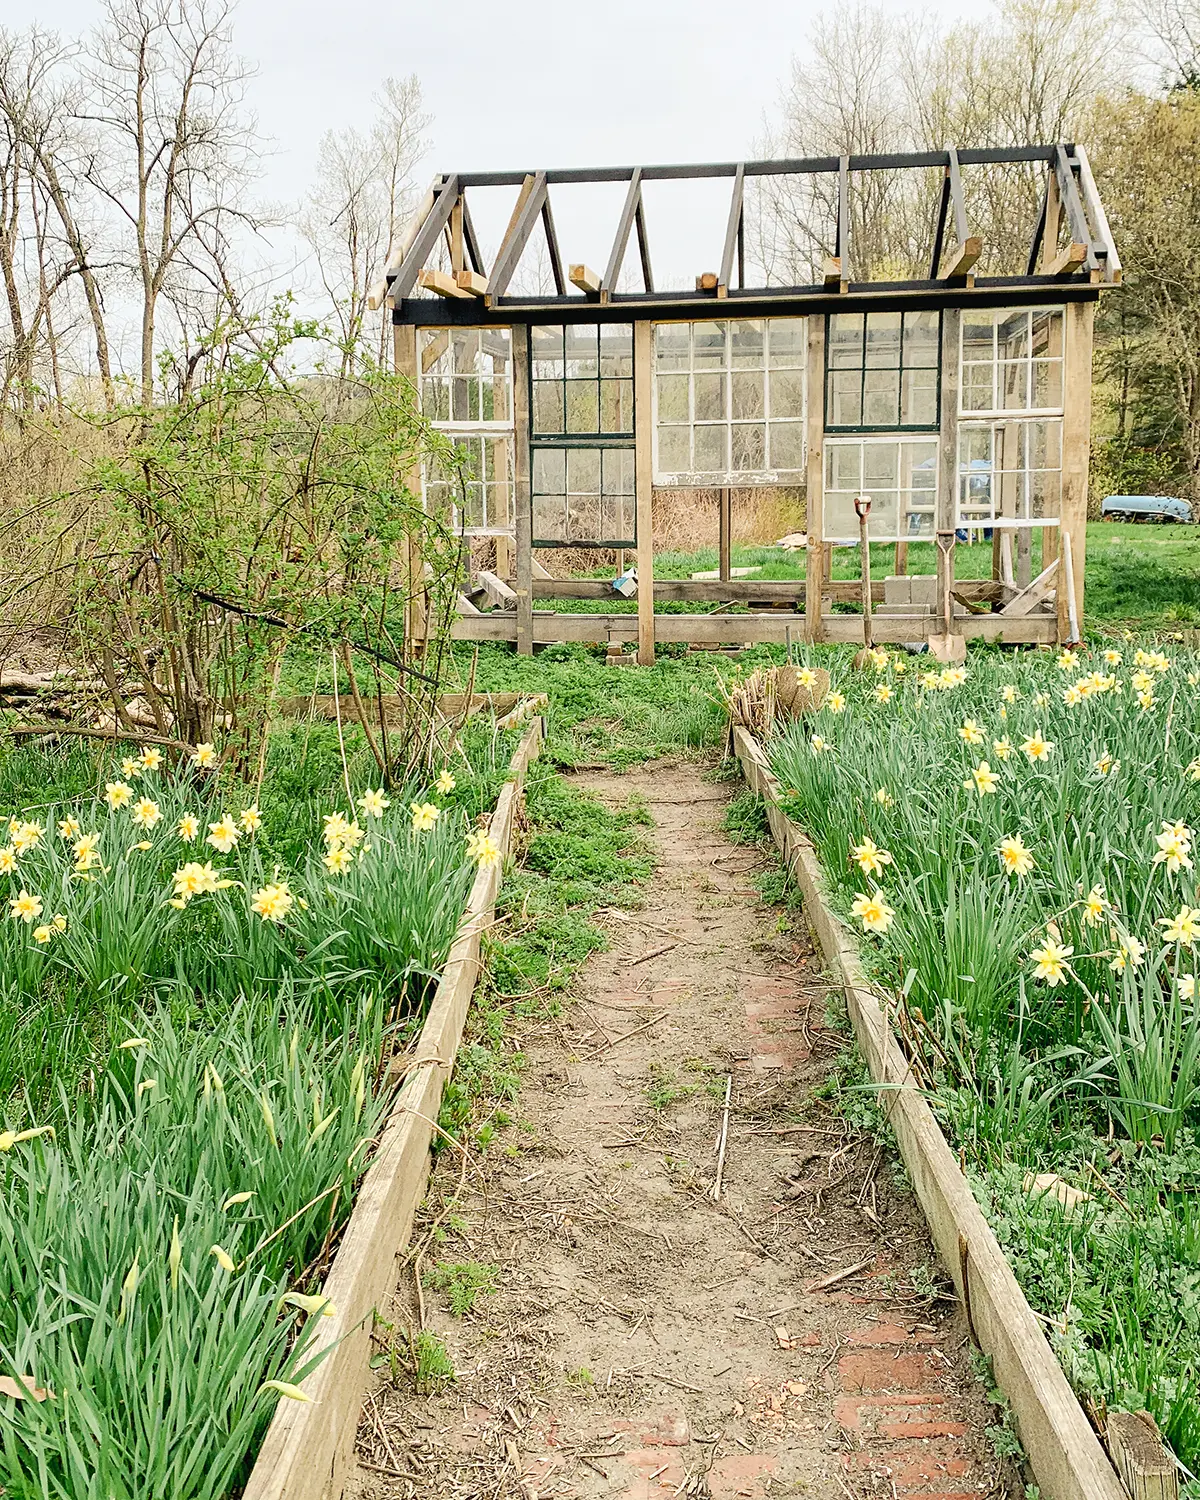
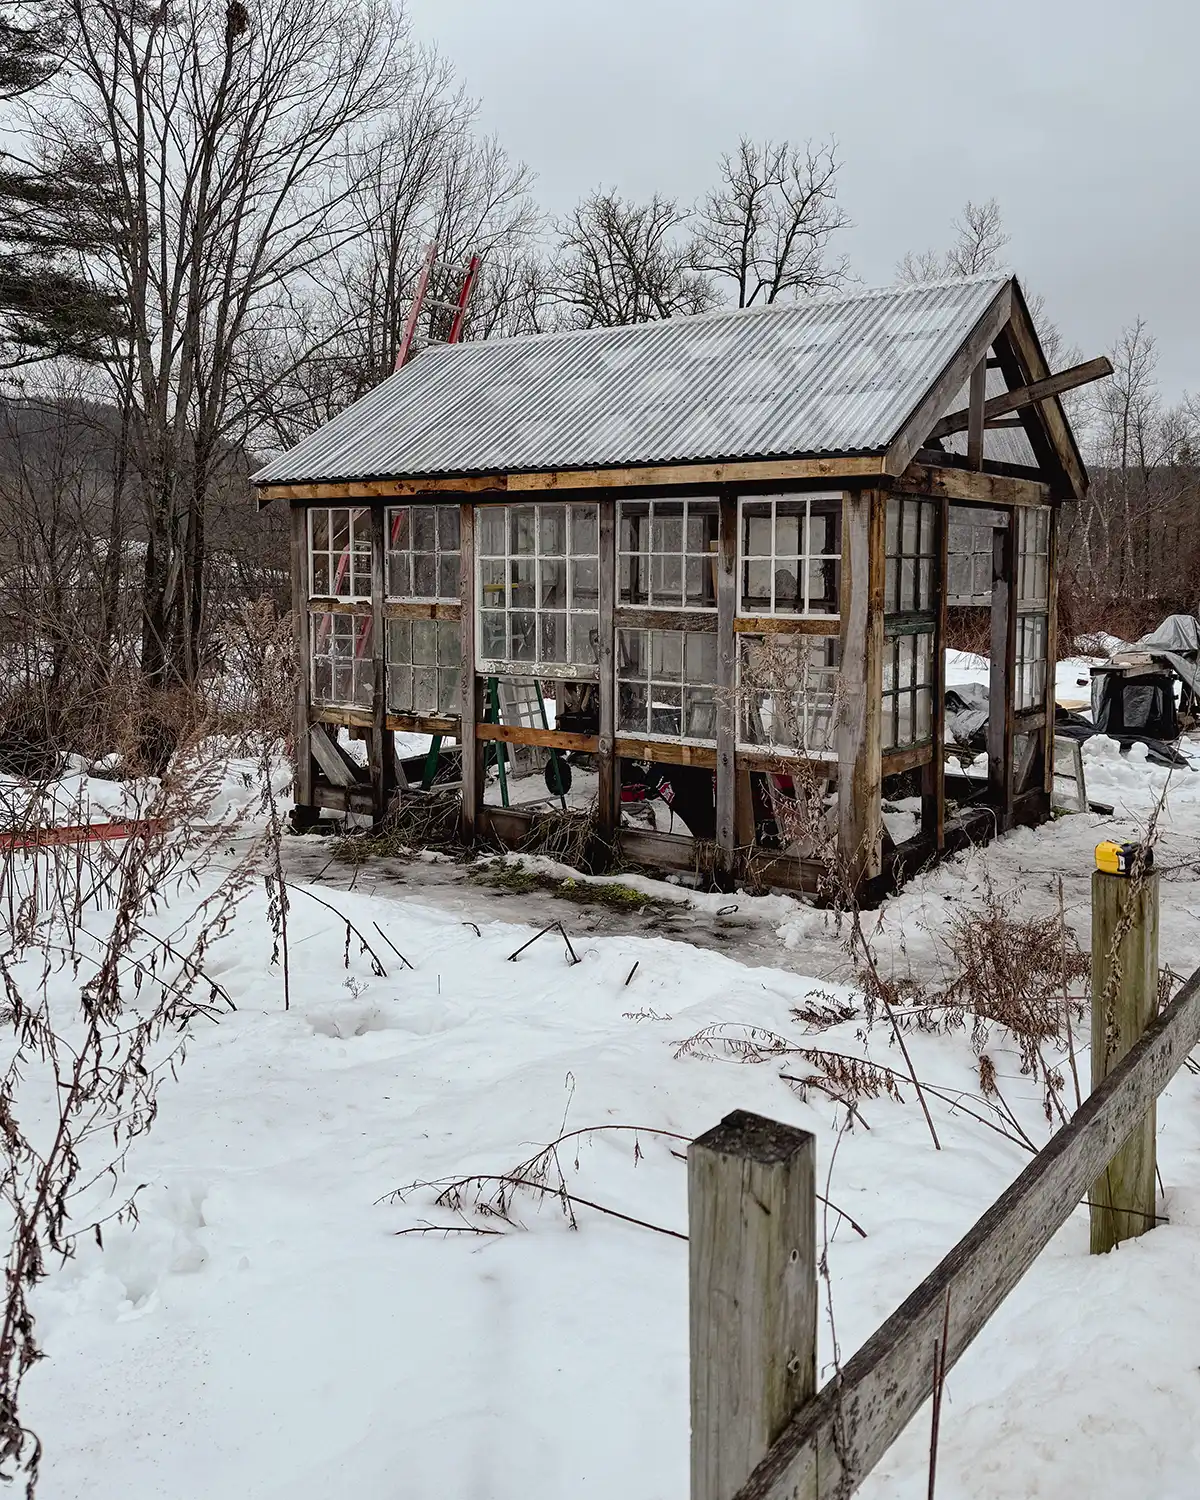
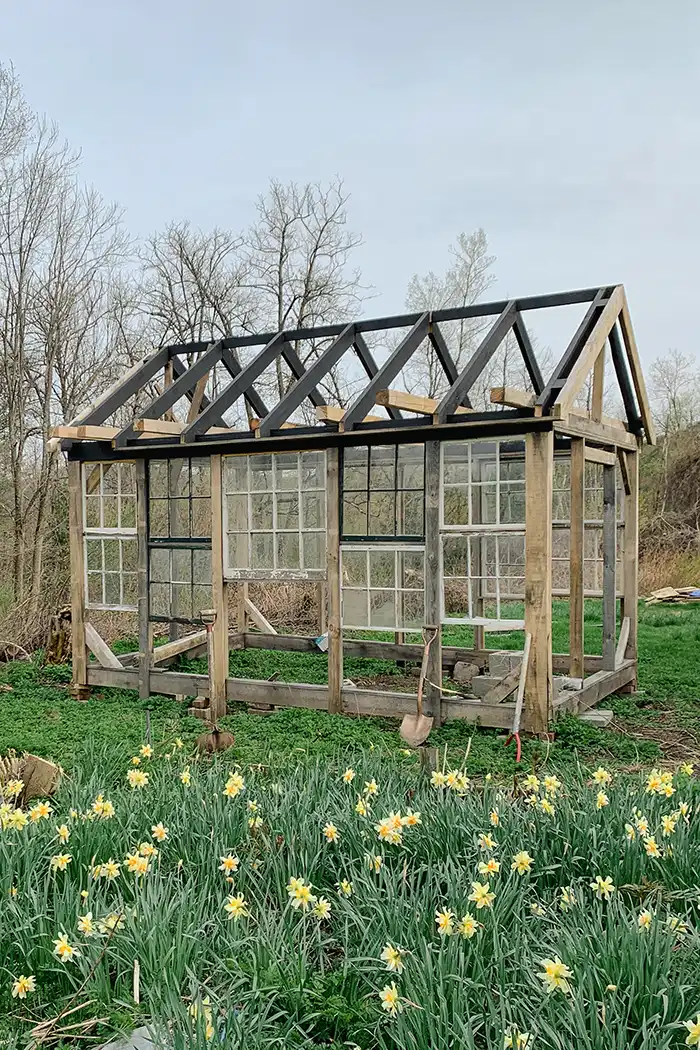
Creating the greenhouse construction plans with old windows was a labor of love. So many decisions! Today, I’m going to walk you through how we made our plans, the free plans with detailed instructions we used to get there, and the framing we did. The current in-progress state of the greenhouse:
Get up to speed on our project with the greenhouse building January update and the greenhouse project intro.
Before We Begin, A Word On Building Codes
My favorite disclaimer for all our projects is that we live in a super rural area with zero building codes. Seriously. It’s like the Wild West here and a buyer-beware place to live.
While we don’t have codes to guide us, we do try to build everything as well and safely as we can. The last thing we want with this greenhouse project is for it to topple in some high winds!
But if you’re tackling your own greenhouse project, it never hurts to check on the building codes in your area. This is especially important in more urban locations with code enforcement offices.
Do your due diligence and research your local codes before you begin.
Free DIY Greenhouse Plans
When we first set out on this project, we were hoping to find some free DIY greenhouse plans that we could use. I scoured the internet looking for a small gable roof greenhouse plan and found an amazing one from Ana White. Seriously, if you want some simple easy-to-follow plans with a materials list for building a basic greenhouse, go with those plans.
But no luck finding just the right plans we needed. Honestly, I’m not surprised. My dream greenhouse design was very vivid in my mind so finding detailed plans on how to make it work was highly unlikely.
So off to the drawing board, we went armed with Ana White’s free greenhouse plans as a starting point. Between the building plan we had found and our knowledge of framing and truss building, we felt pretty confident we could figure out some plans that worked for us and the old windows we’d been hoarding in another garden shed.
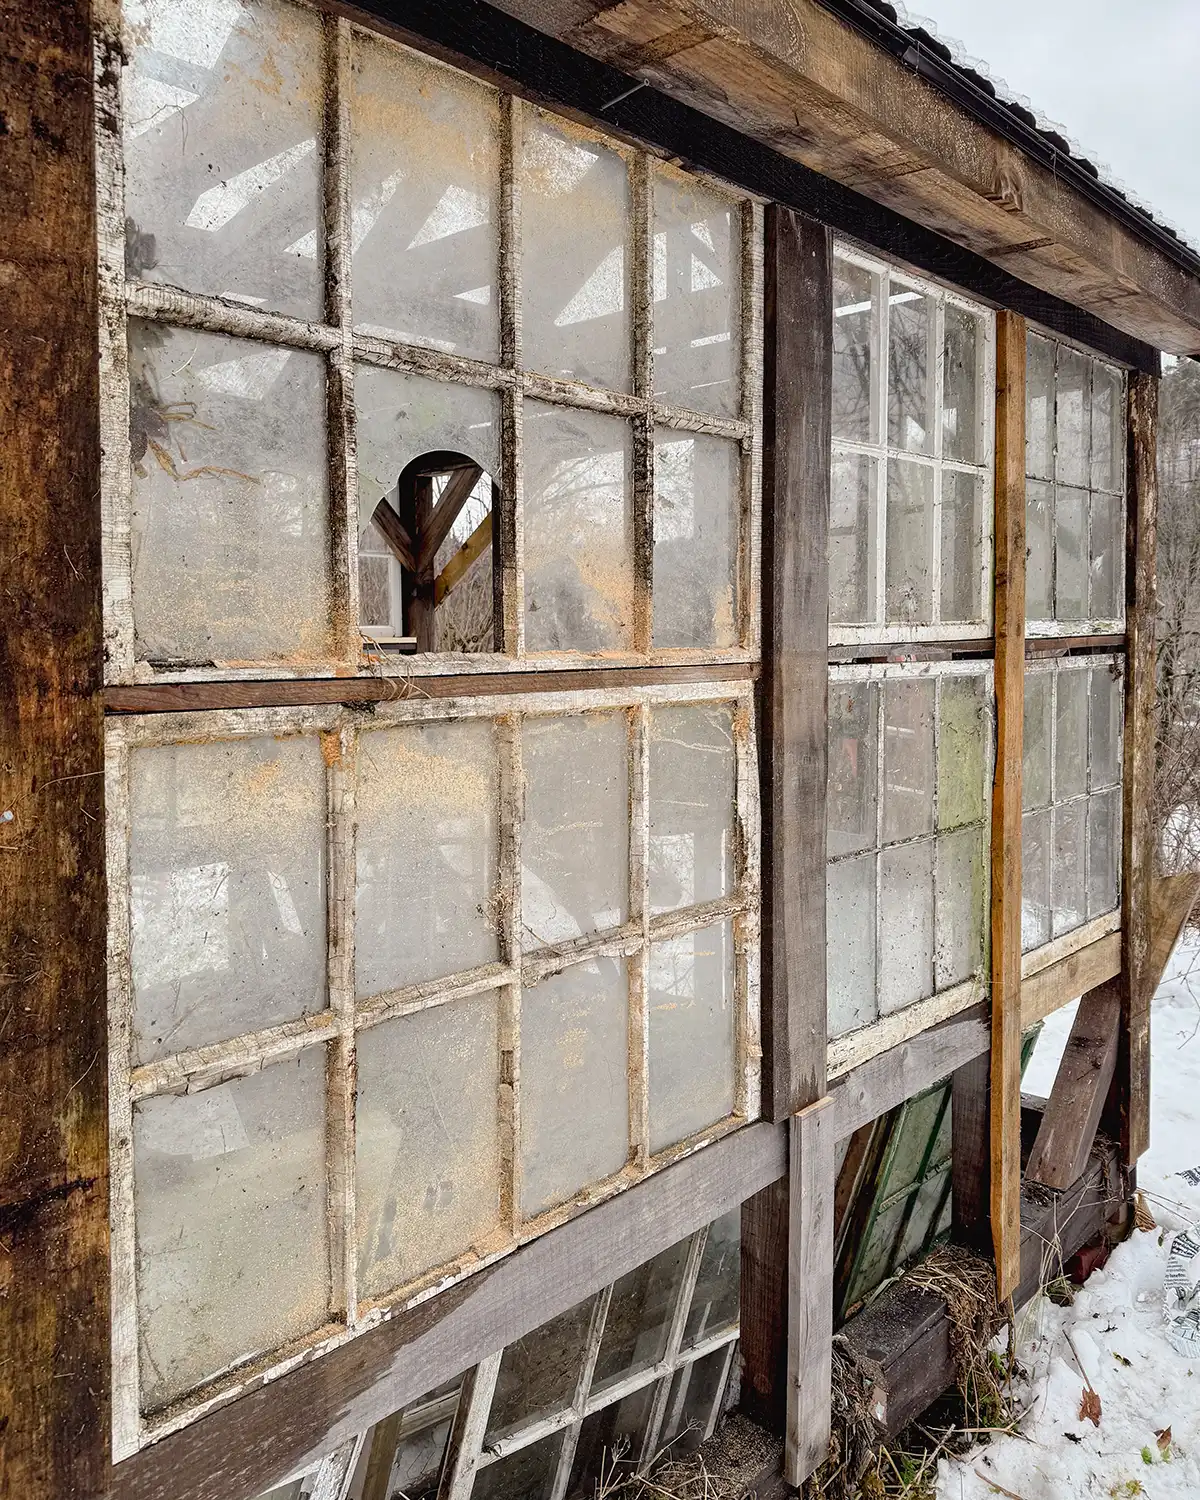
Shot of one of the hauls from our old window sash dumpster diving adventures:
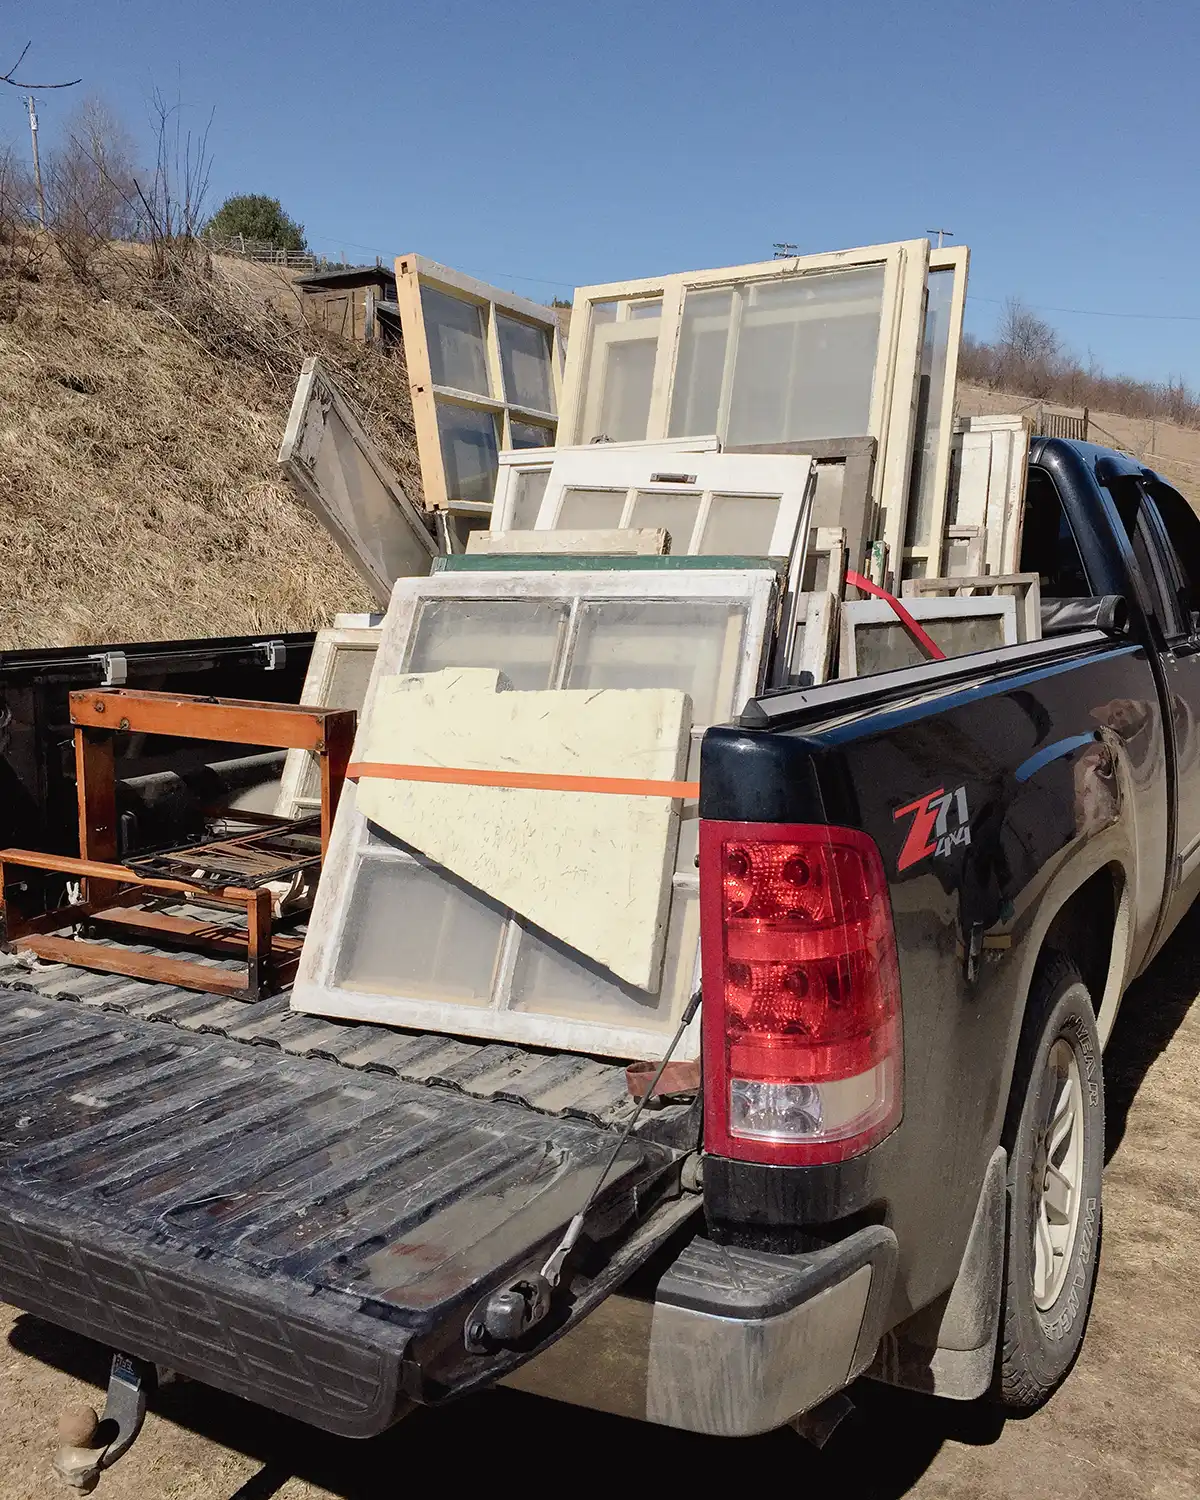
You know the saying, the couple that dumpster dives together, stays together. Or something like that!
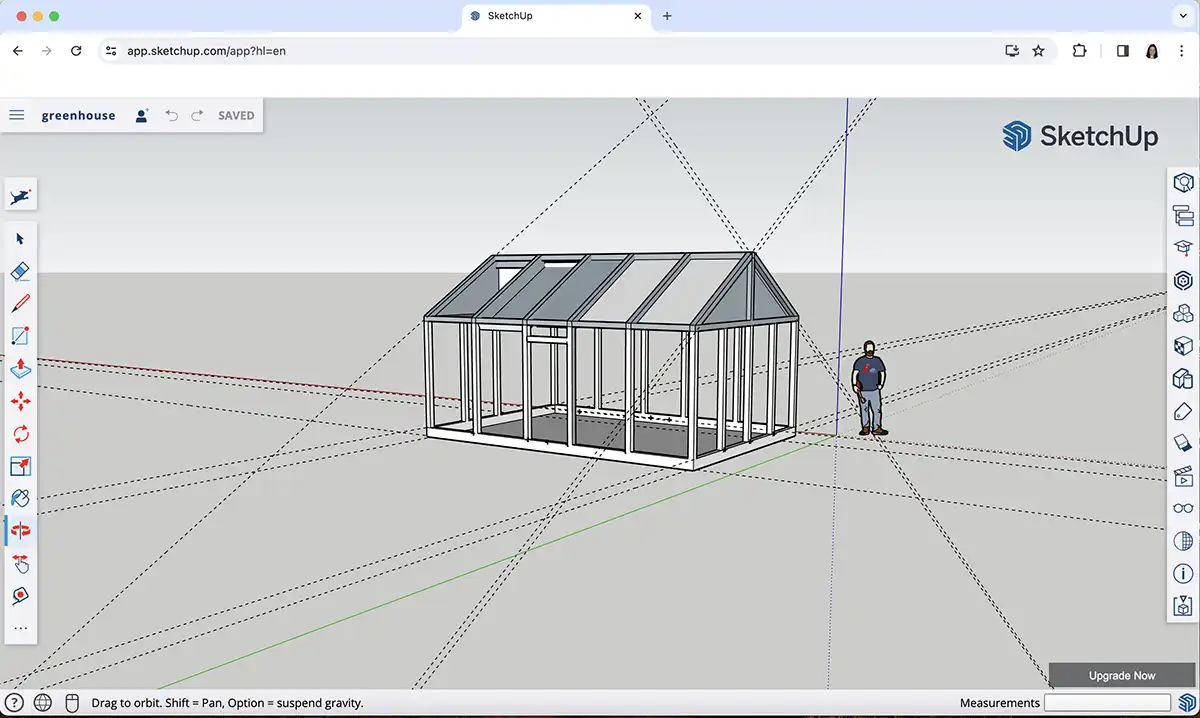
Using SketchUp To Draft Plans
Shameless plug for the free 3D modeling software SketchUp. We’ve used it to help design and draft so many of our projects, from decks to islands and now for our own greenhouse. The software is robust and relatively easy to use.
If you asked Colby he would say, “It’s simple.” If you ask me, who deals in Photoshop and Lightroom on the regular, I would say “It’s tricky.” To each their own but if you do use it, know that there is a learning curve to it. I did successfully use it recently to mock up some playground modifications. So it can be learned!
General Building Materials List
Before we even started to sketch up our green house plans, we made a super rough materials list. There were a few things we were set on materials-wise, like using the old windows.
But some things were variables, like what type and size of roofing materials. Or what were we going to use for siding or side walls?
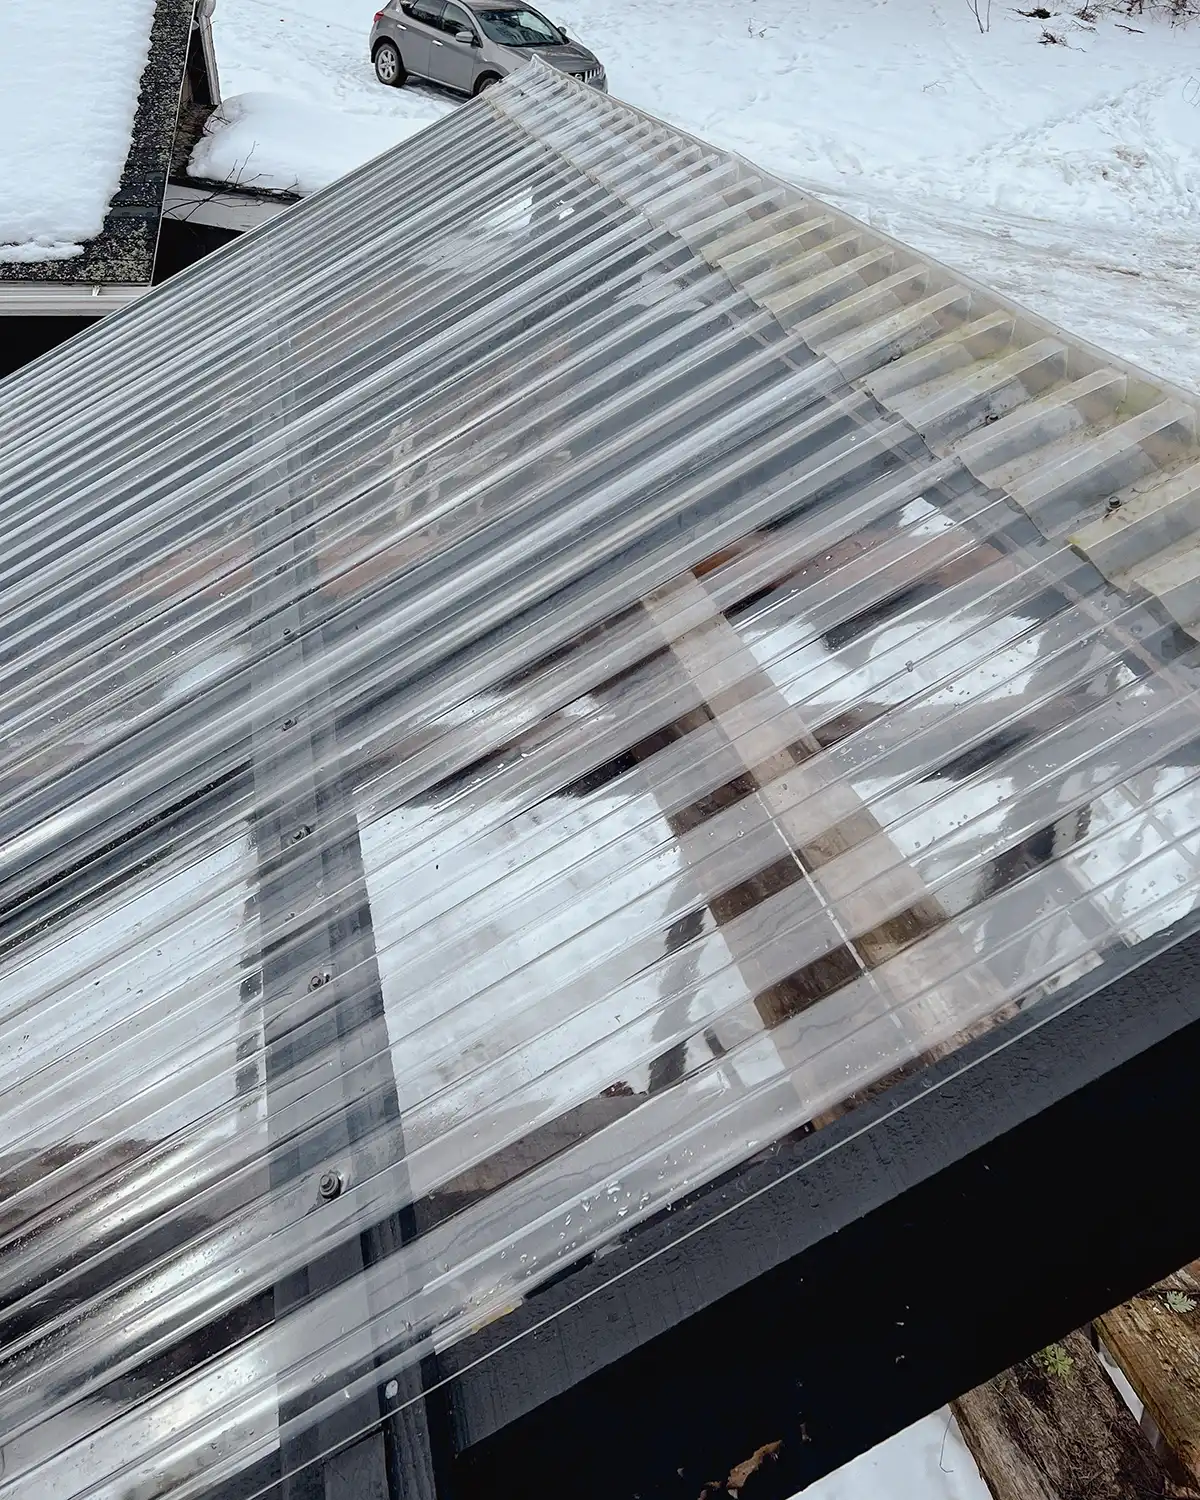
In general, we knew wanted to use the corrugated polycarbonate sheets from the Home Depot. We had researched roofing options and these seemed like the best fit for the greenhouse we wanted.
Polycarbonate roofing material lets in light, like the plastic sheeting or greenhouse plastic used for high tunnels, but is much more rugged.
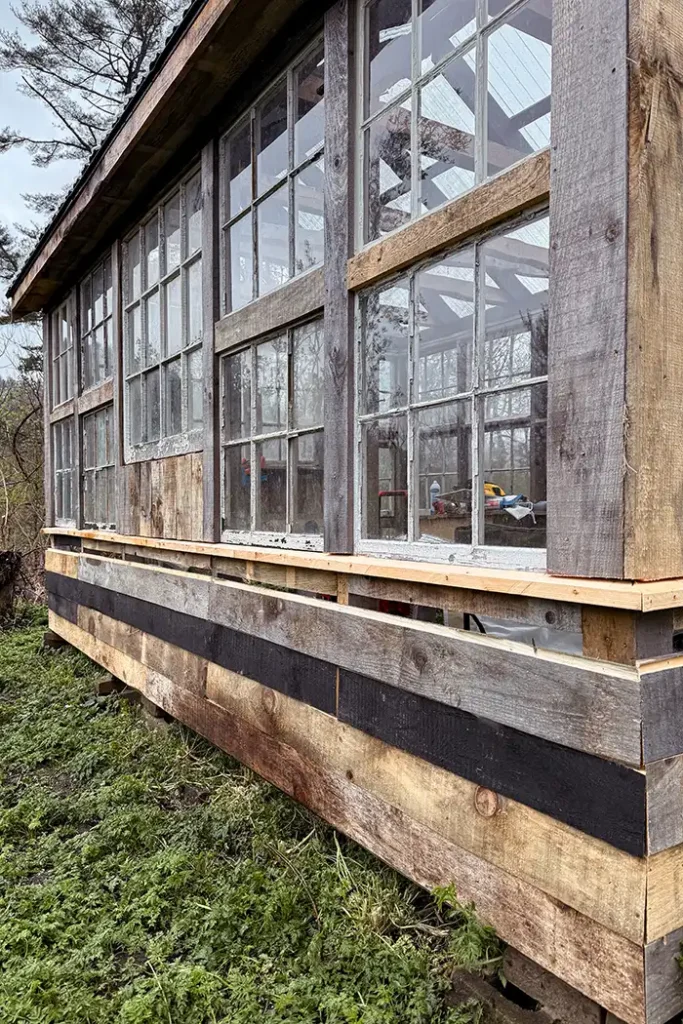
We also knew that we wanted some sort of siding or planks around the bottom of the greenhouse. In part, this is because, inside the greenhouse, I want to extend our growing season by having a combo of some tables and shelves for seedlings and raised garden beds to grow in.
I would also like some storage space under the tables against the back wall. Outside the greenhouse, up against the siding on the south side, we plan to build a cold frame. But more on that on another day.
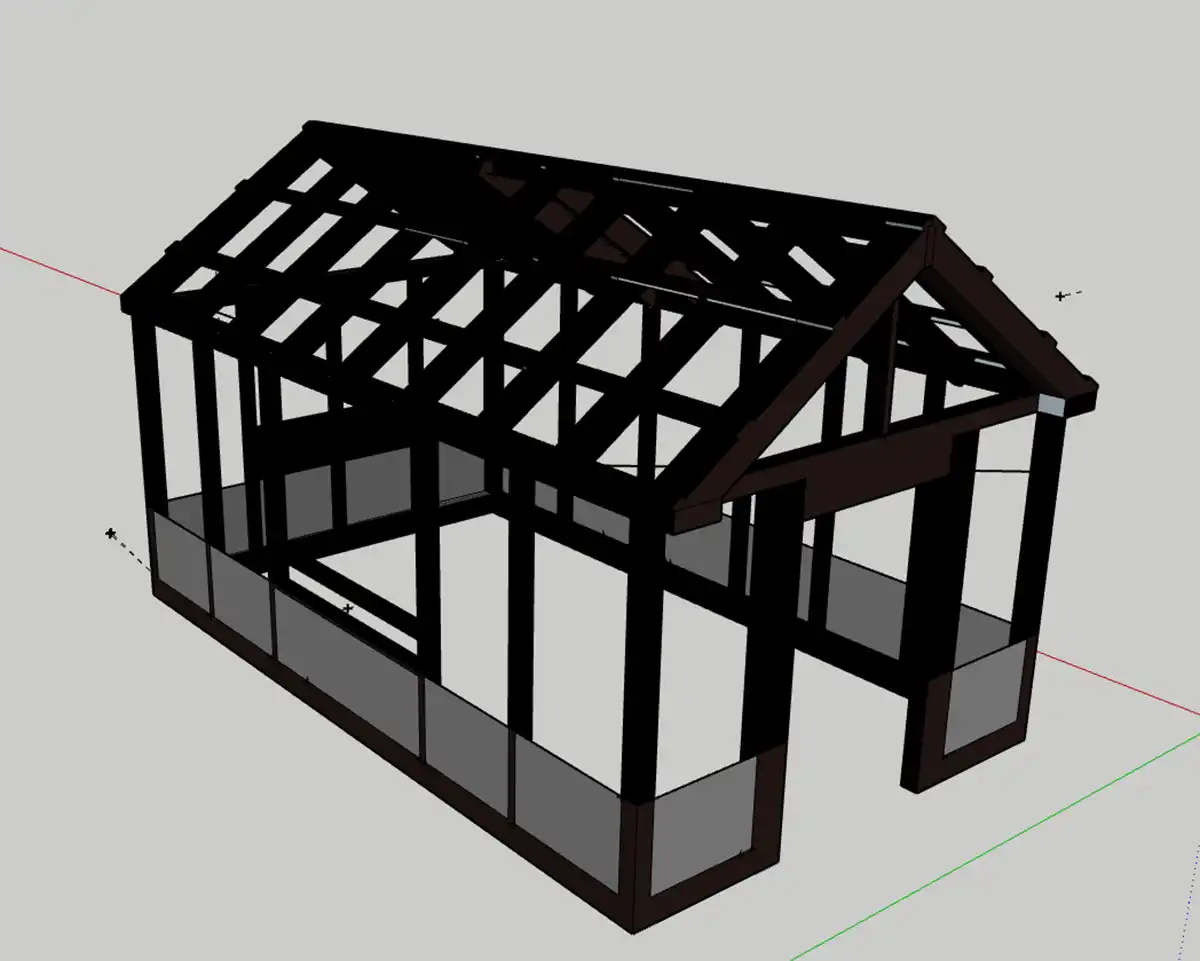
Greenhouse Construction Plans First Draft
The first draft of the old window construction plans looked a bit like this:
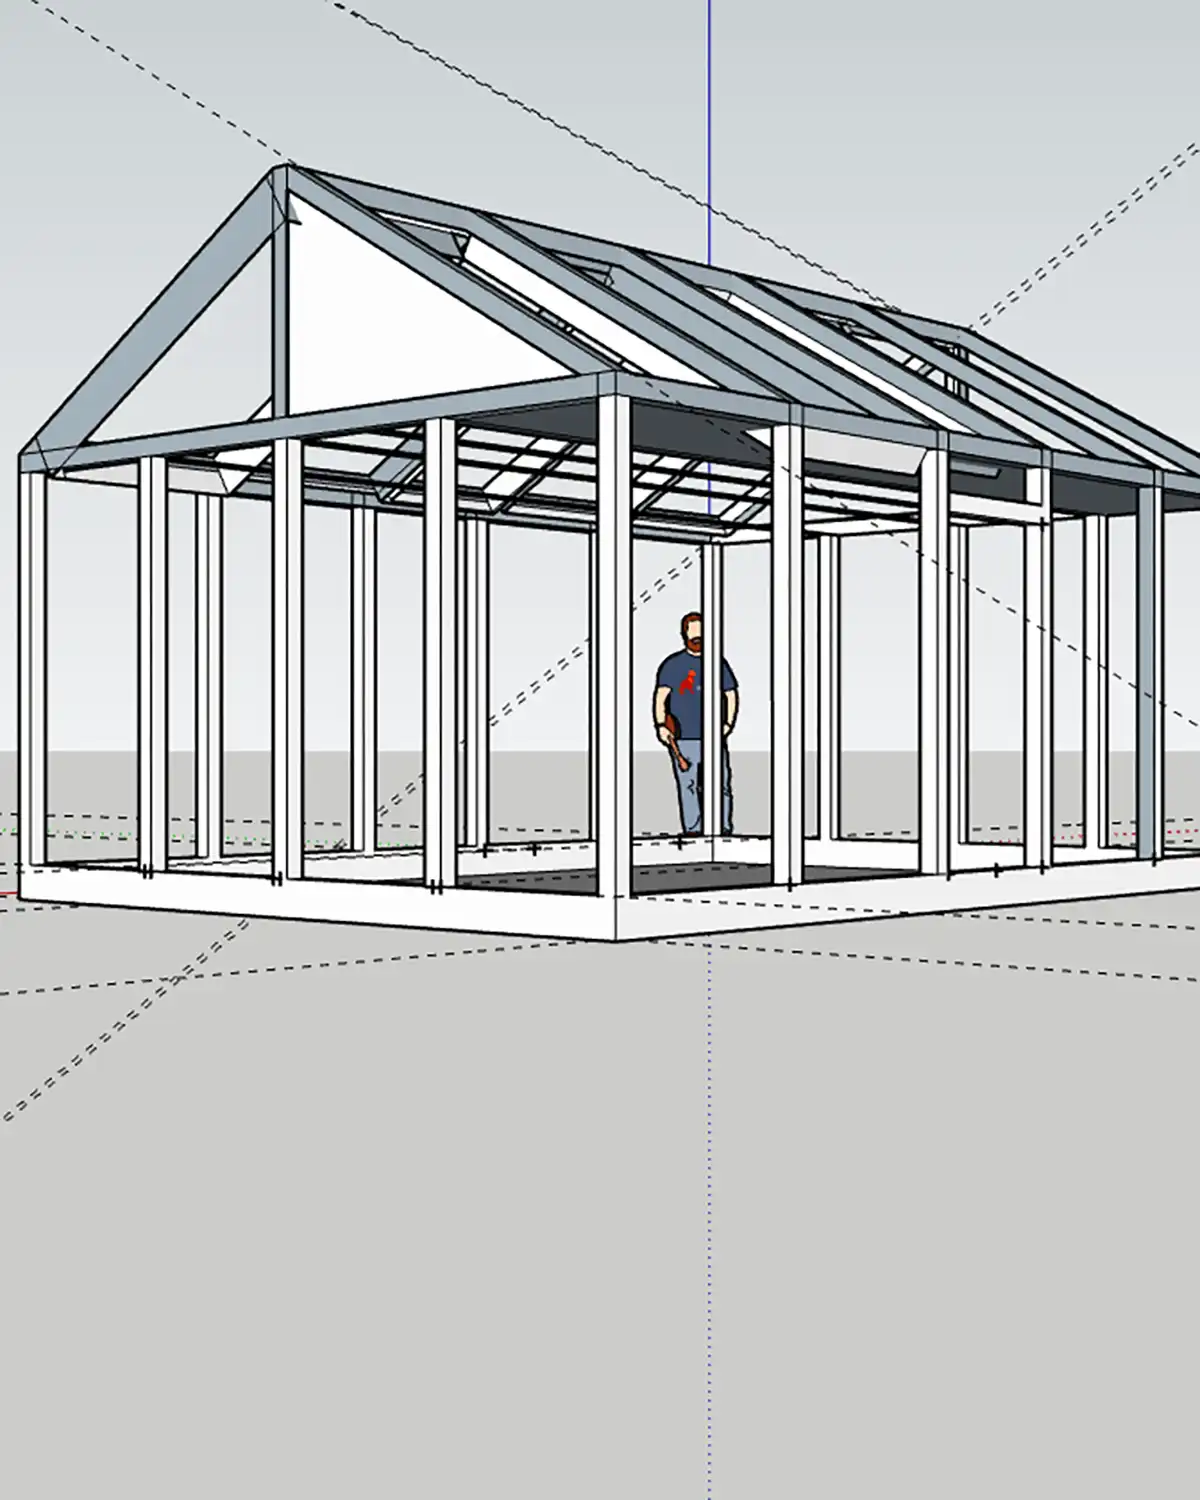
It was a good first attempt. Solid. BIG! Too big clocking in at 20′ long by 14′ wide. But more on that in a second.
In our first, rough draft of the greenhouse, we learned a few things. One, we didn’t like the door frame on the long side. This was our initial plan since the location of the greenhouse sits at the end of a brick path. With the door on the side like this, it would put it at the end of the path, like in this Pinterest pin.
How beautiful would a greenhouse be sitting at the end of the garden path, with a small garden of cut flowers on either side, with the door right there?! So good!
Here’s where the greenhouse sits in our garden when it bloomed last spring.
But the more I thought about how I wanted to use the greenhouse, the more this design didn’t feel right. I believe in the marriage of both form and function when it comes to our projects. I want our home to be both beautiful and functional.
This greenhouse needed to work well in extending our growing season, help us grow during our cold winters here in Vermont, and house frost-tender seedlings.
To maximize usable space, it made more sense to put the door on the gable end. Then all the tables and shelves could be on the long North side, a garden bed could be on the south side, and then a small potting table could sit on the opposite gable end from the door. Sold!
Location Of The Wood Greenhouse
This is also the point where we figured out the location of the wood greenhouse. In retrospect, we probably should have done this first. You know. Went outside with a tape measure and mapped it out. Don’t be like us. Figure out your location first.
Our initial plan was to put the greenhouse at an L with the shed, on the end farthest from the garden path. The vision was for the greenhouse to sit farther back with flower gardens all in front of it.
But when we went outside to mark out the location, it was in a spot where our yard narrows and it wouldn’t fit. Enter exhibit A.
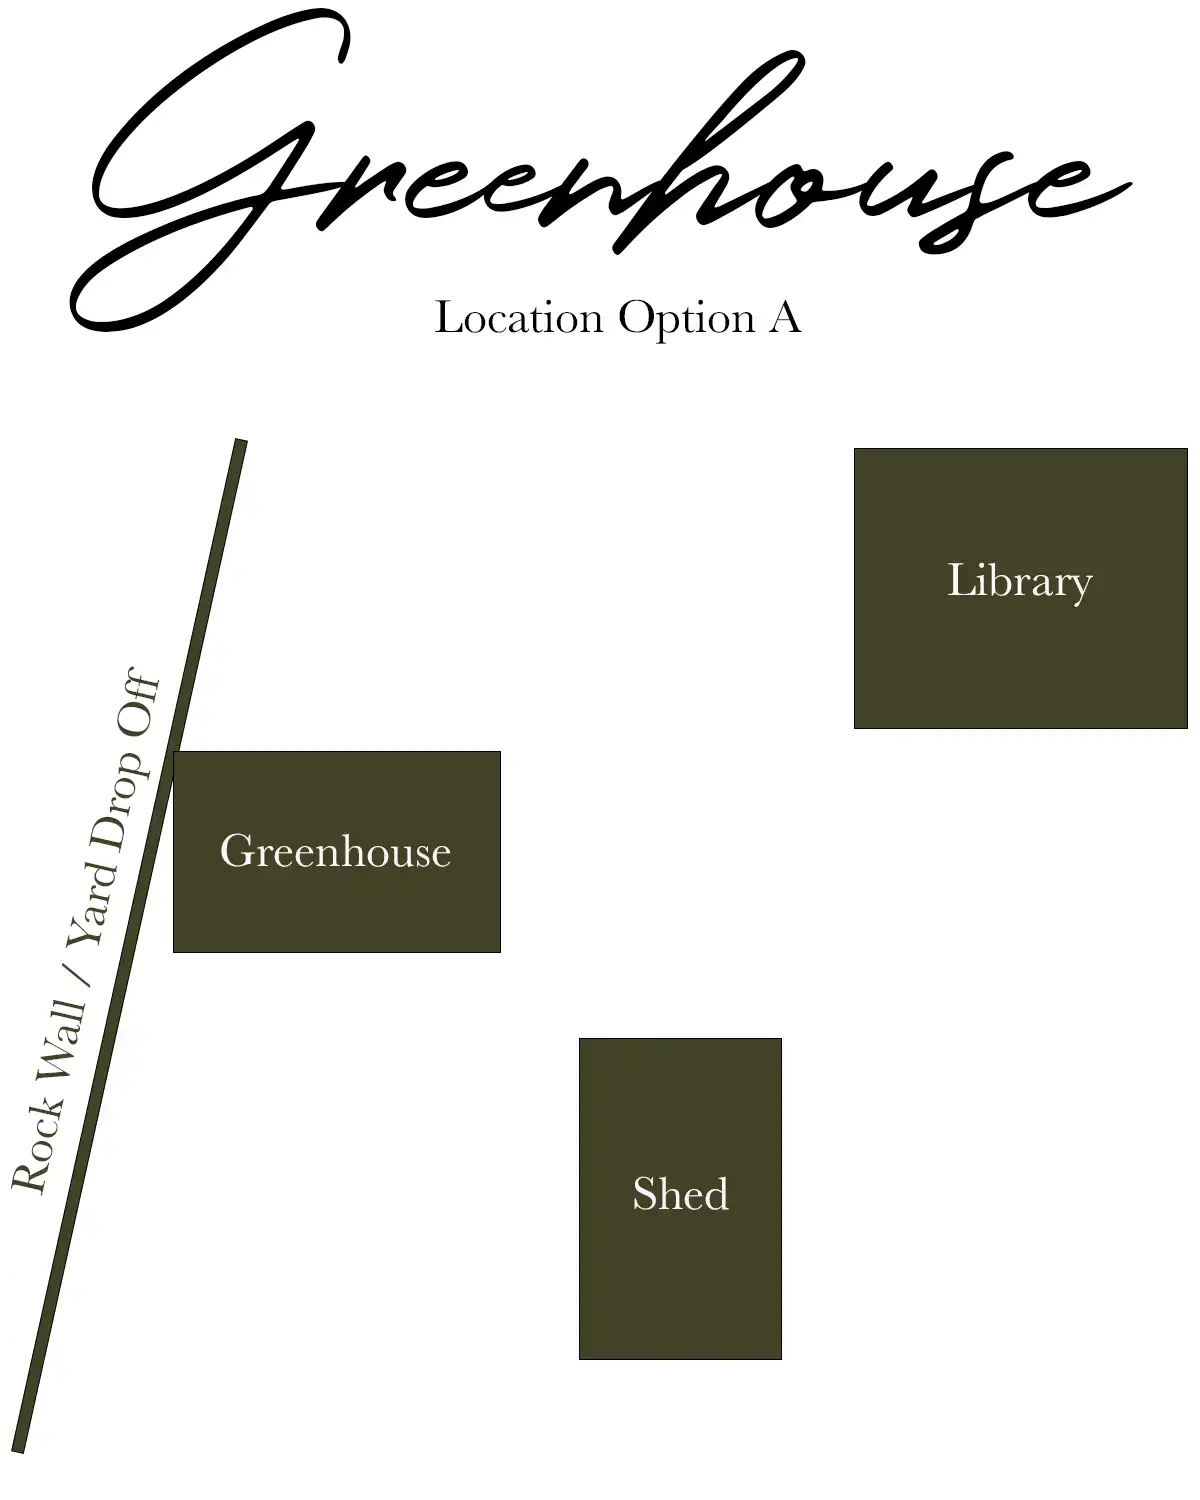
So then we thought about pushing it back even further, but then it would sit near where we want to install a septic system for a future in-law apartment or Airbnb. Enter exhibit B.
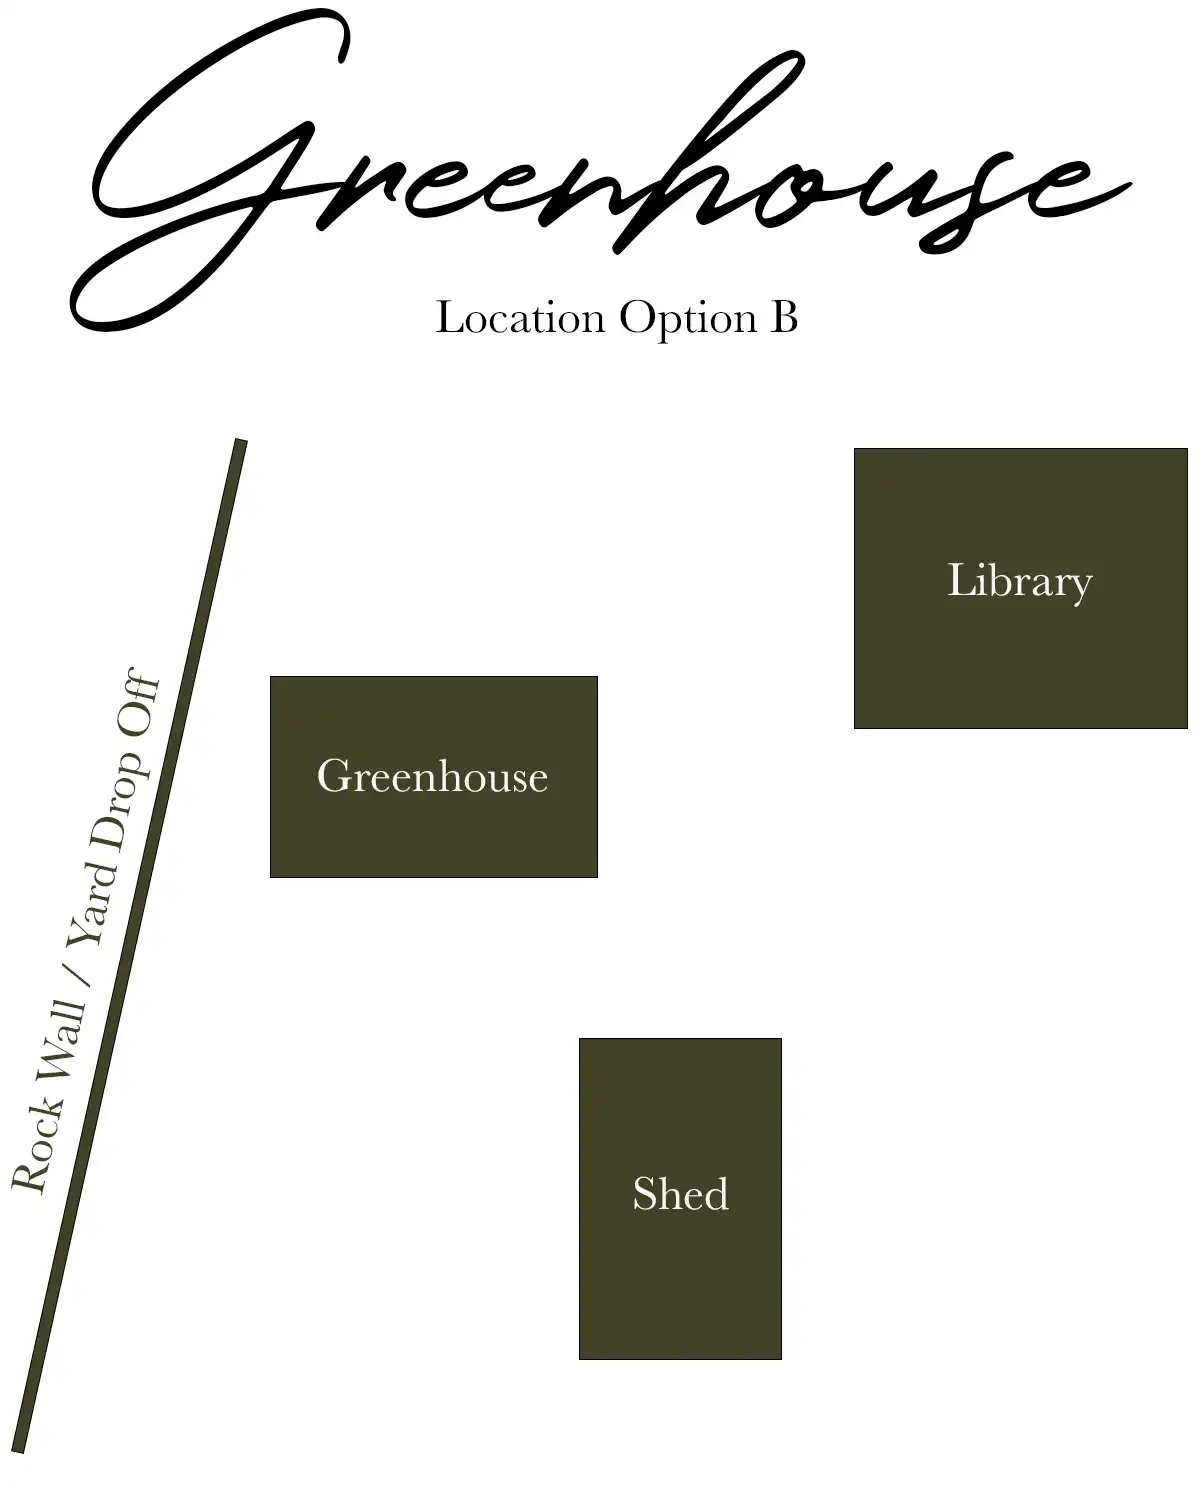
Then Colby thought about bringing the greenhouse up close to the garden path near the other end of the shed. This meant we could continue with our plan of having a cut flower garden on the north side of the greenhouse and then we could do another garden area, maybe an herb garden, on the south side of the greenhouse.
This idea made a ton of sense. Enter exhibit C.
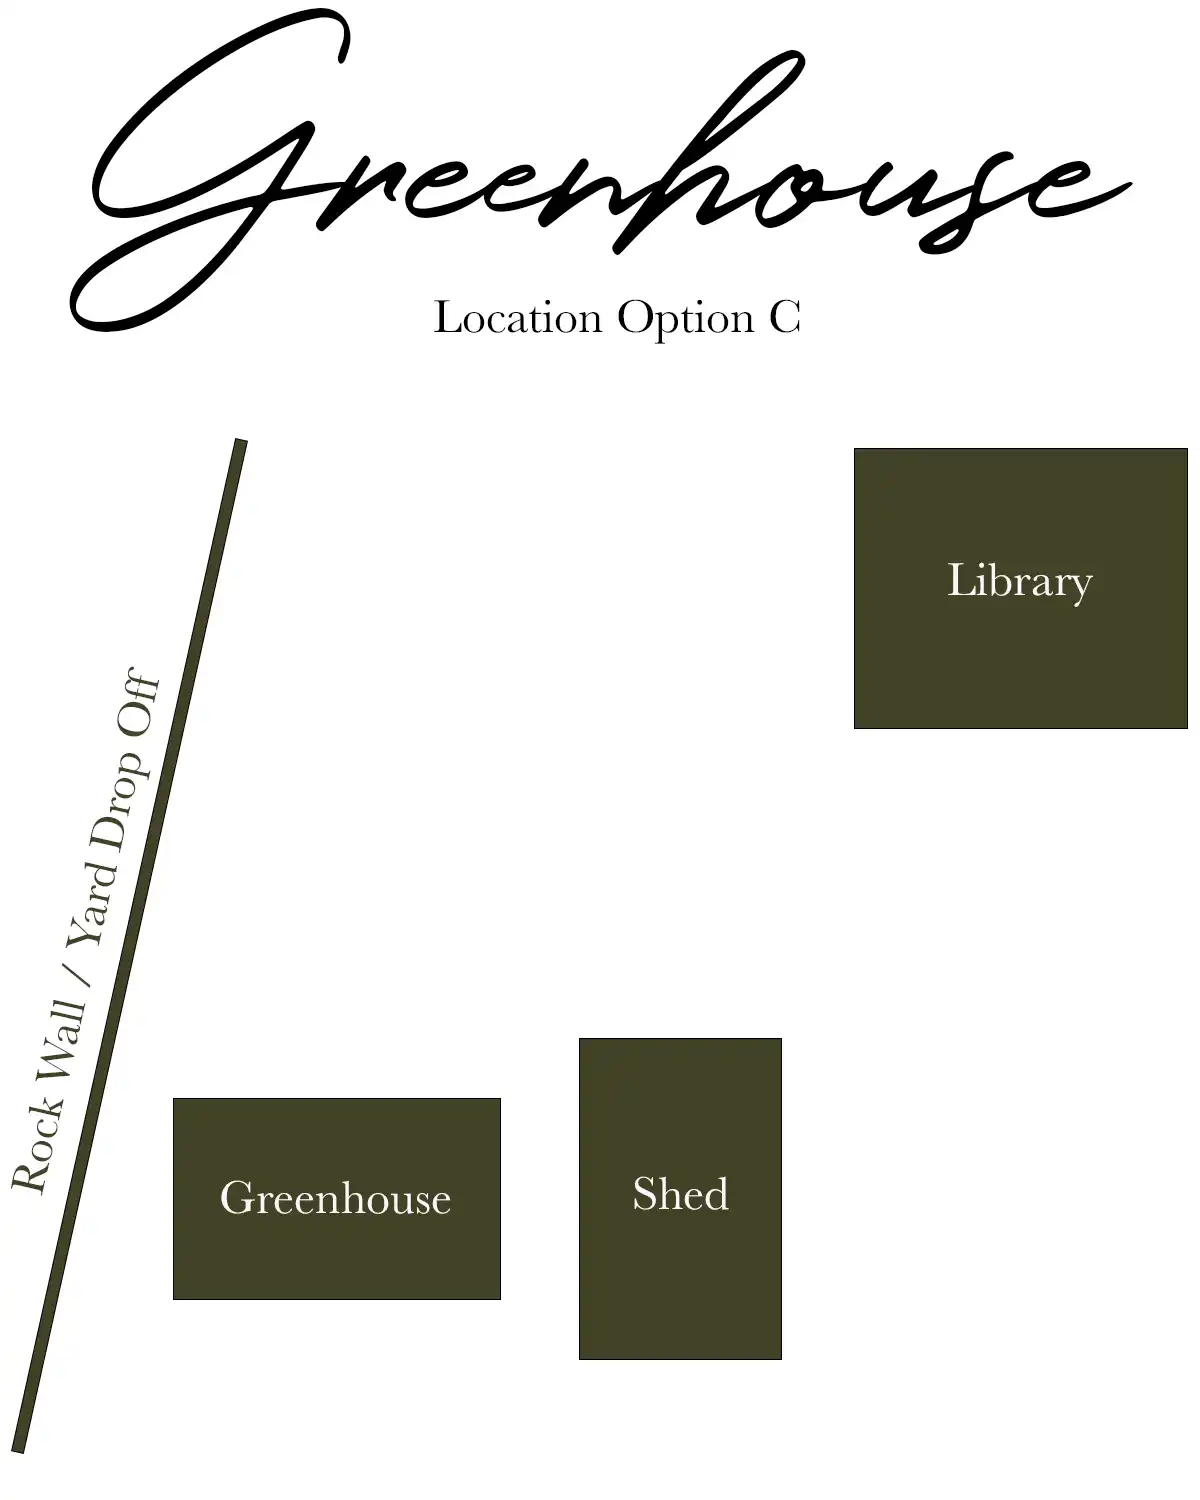
We measured out our original 20′ greenhouse design and the large greenhouse design didn’t quite fit. It could, it just would be awfully close to both the current shed and the rock wall/drop-off on the other side.
We marked off an area and decided a greenhouse length of 13′ – 17′ would be the best fit for our space.
Ideal Location Of Greenhouse
When it comes to the most ideal location of a greenhouse, I’m hesitant to suggest what is right or wrong as long as the structure gets lots of light. You do you! But if you are trying to optimize light and growing, there are a few considerations.
For us, the ideal location was a spot that’s level (which is hard to come by in the mountains of Vermont) and the longest side with the cold frames facing south. If you live in a northern, cold climate and you want to use a greenhouse to extend your growing season, ideally the length should face south to optimize the winter light.
Some people even create a lean-to greenhouse with the north side up against a home or insulated. This leaves only the south side with polycarbonate panels or glass walls.
This side is the north side of our greenhouse, facing what will be the cut flower garden.
Determining Greenhouse Size
Armed with a better idea of the greenhouse size, the exact location of the greenhouse nailed down, and how we wanted to use the greenhouse, we next decided on the size of the greenhouse.
The original size of 20′ by 14′ was too large to fit the spot we wanted so we went into our sketch to figure out the ideal size. Based on two factors, we landed on 16′ long by 10′ wide.
The first sizing factor was the size of the polycarbonate panels for the roof. The panels come in a variety of sizes and we tried to optimize the amount of materials we needed to buy along with necessary cuts.
If we made our greenhouse a certain size, it meant we didn’t need to cut the panel width down, just the length. This looked like a 16′ greenhouse roof, the building is more like 15′, with a roof overhang of 6″ on each end.
The second sizing factor is the size of seedling trays. I have a certain size of seedling trays that I wanted to make sure fit on the shelves and the table. When I mapped out how I would store my seedling trays in the greenhouse, this helped determine the greenhouse structure width of 10′.
We briefly tried factoring in the size of our window sash, but that just got way too confusing. We opted to wing that part deciding to fill in with glass panels and trim where we needed to. It worked out pretty good.
Adding Air Circulation
Another consideration when we went back to the drawing board on our greenhouse construction plans was adding air circulation. Plants need air circulation. They also need to be kept from overheating, which can happen in the late spring.
Many greenhouses have roof vents or automatic louver vents on the sides. These are both a great option for adding air circulation.
Ideally, I would put two louver vents with automatic louver openers in this greenhouse. One vent on each of the gable ends. Instead, I’m opting to put a window sash on each gable end that can be pushed open to help vent.
I chose this option for two reasons. One is a small cost savings. The louvers clock in at $100 and it’s another $100 for the automatic opener. Meaning a $400 investment for the windows. Using the window sash costs us very little since we just need to repair and install them.
Two is because of the greenhouse aesthetic. I really want this greenhouse to look and feel vintage. Using old windows for venting in my mind, gives me that look.
I know it means having to babysit seedlings and manually opening and closing the vents. But it feels like a price I’m willing to pay to get the look I desire. Although I reserve the right to change my mind later on.

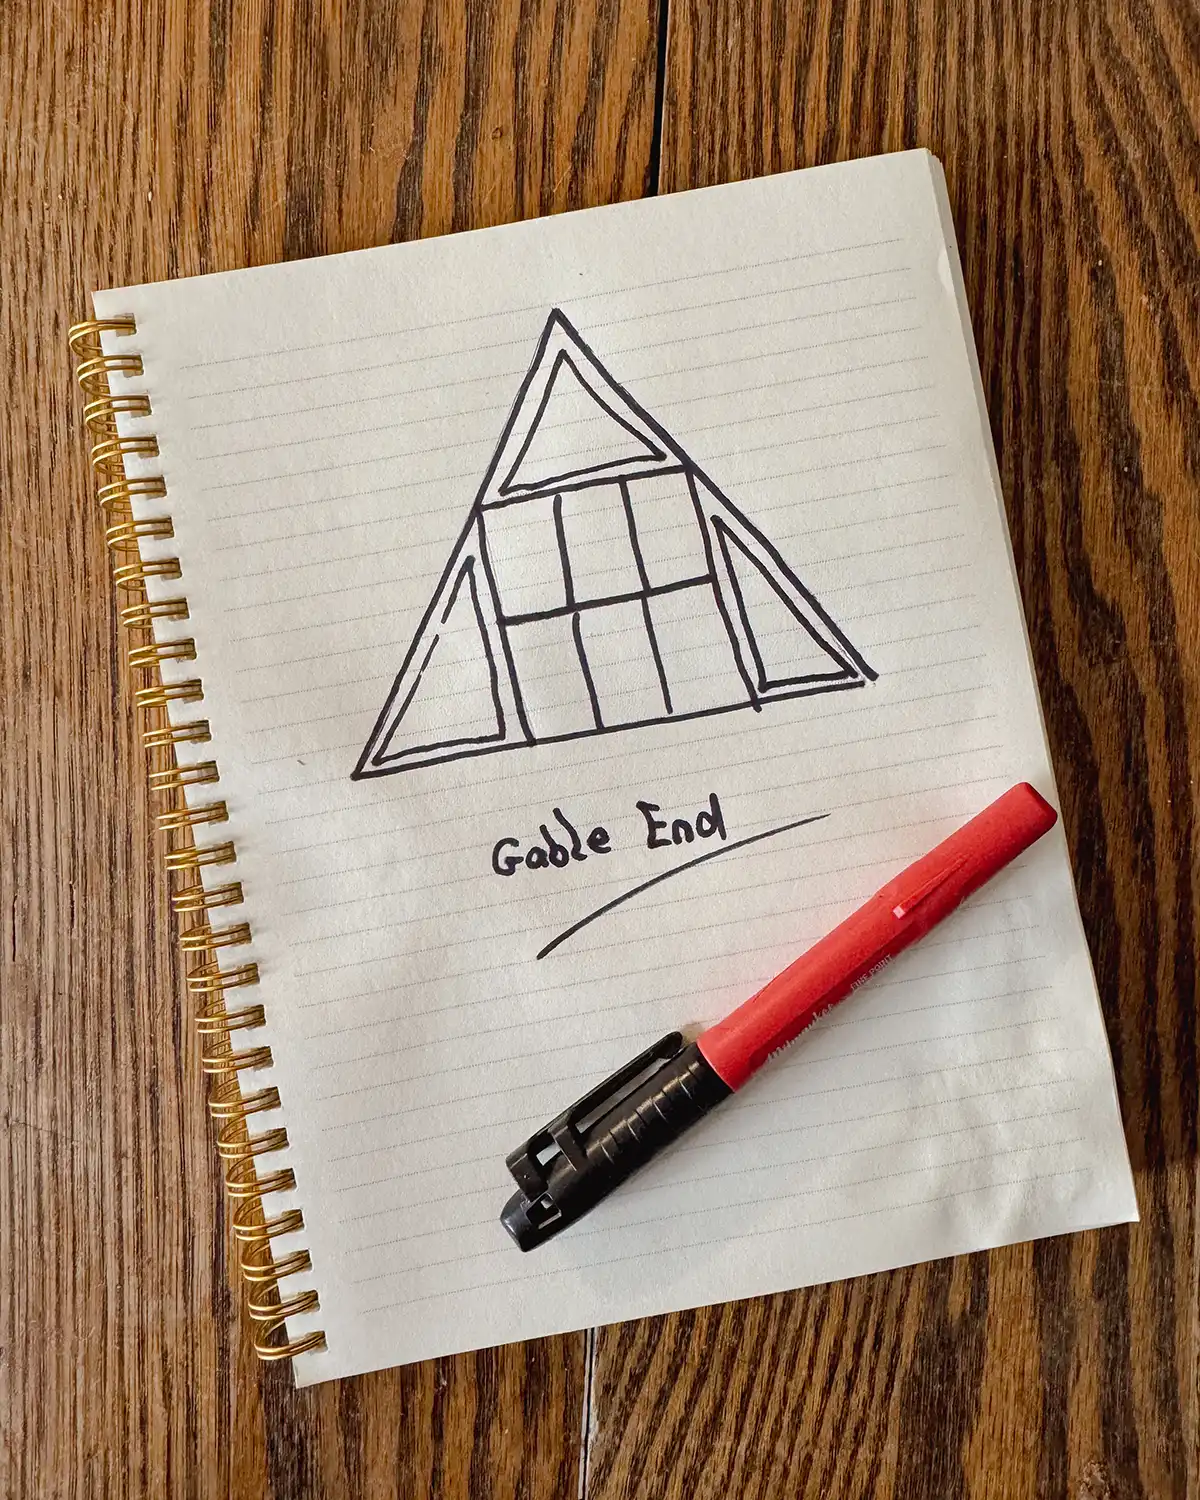
Gable End Design
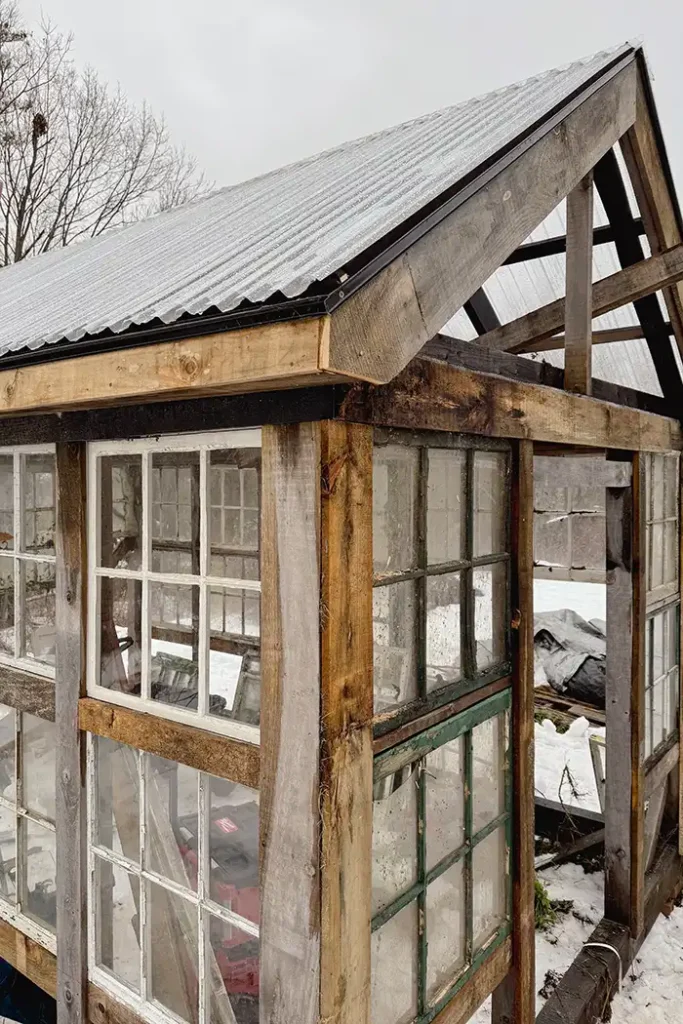
This leads me to the final design decision for creating our greenhouse plans and that’s how to finish the gable ends. On the entry side, we plan to build a Dutch door to fit the space, offering some added ventilation for hot days. The opposite gable end will just be a wall of windows and siding like the long sides.
For the triangular gable, the plan is to insert one window sash as big as we can fit it and install it so we can prop open the window for ventilation. Surrounding the old window, we’re planning on building our own sash to fit the remaining space. We’re opting to get custom-cut single-pane glass that we can use for these spots.
Here’s a sketch of how we want to fill the gables. Note…sketch precisely 0% to scale or accuracy.
There was a brief moment where the health of our marriage hinged on the choice of materials for the custom sash we plan to build. Colby wanted to use plexiglass. I wanted to use glass. Glass won out mostly because (1) it’s my greenhouse, (2) adding plastic feels so wrong for these types of greenhouses, and (3) it’s my greenhouse and I would prefer glass.
Colby’s argument for using plexiglass is that it’s cheaper and that it’s easier to cut ourselves. He’s not wrong, I just like what I like. But depending on how much the glass panes will cost, I may change my mind.
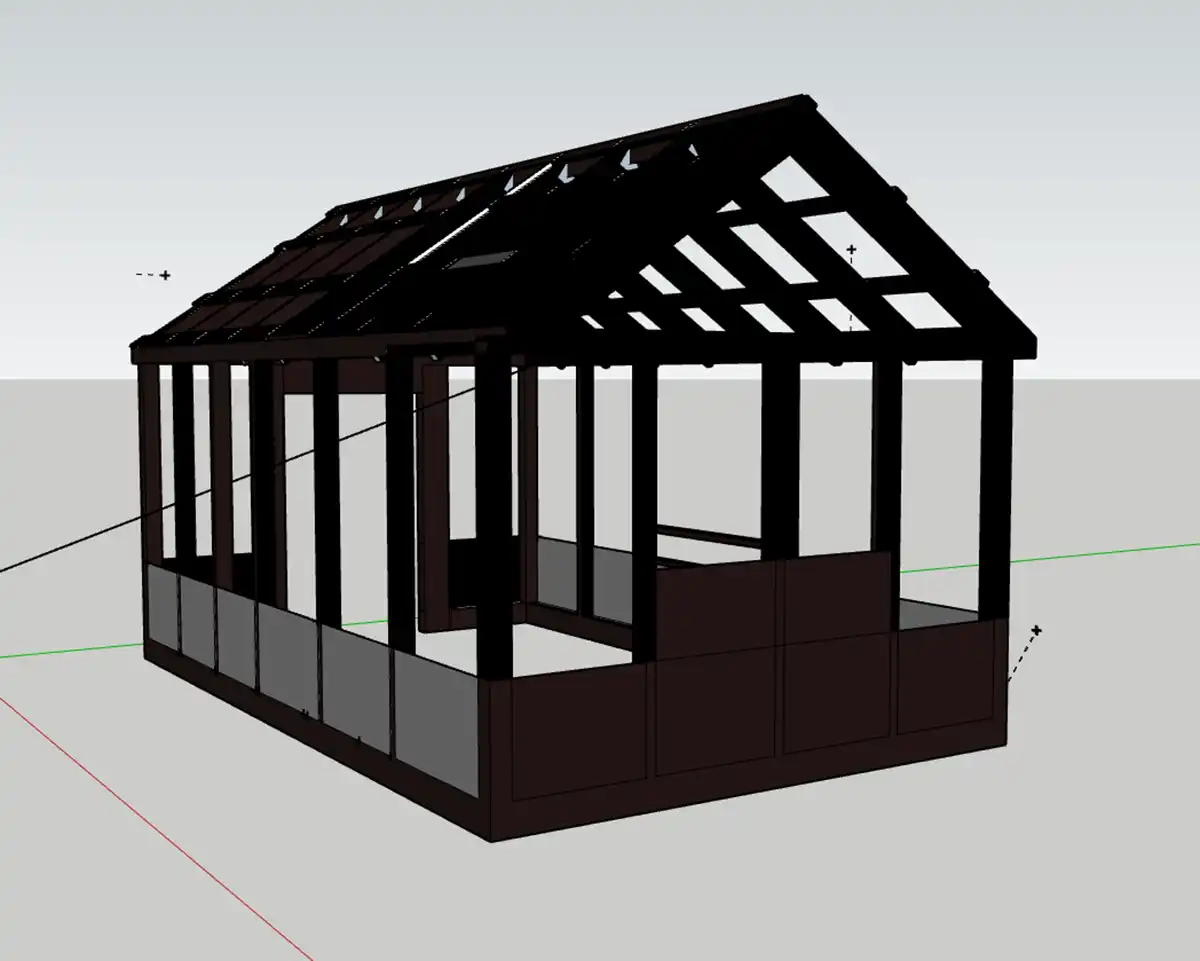
Greenhouse Construction Plans Final Draft
After all these considerations, here’s what the final draft of our greenhouse construction plans looked like:
The final dimensions are 16′ long by 10′ wide. The greenhouse sides are old window sash above with horizontal wood siding painted black below.
And another view and angle:
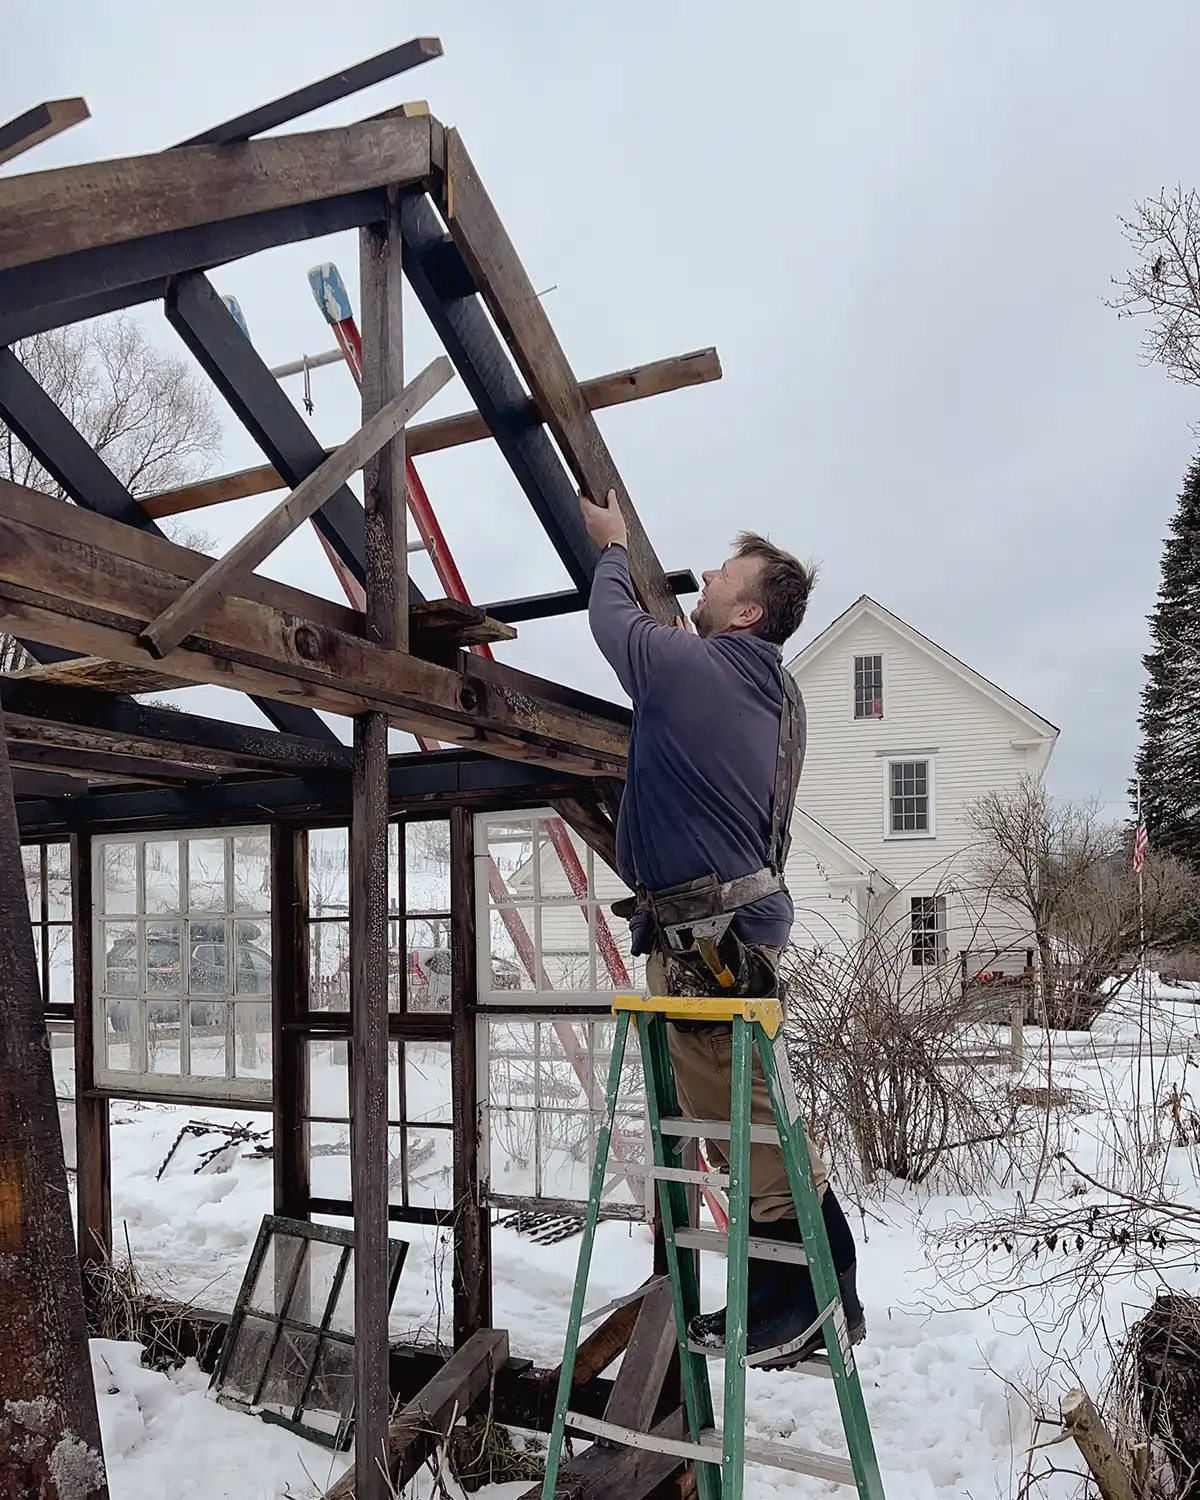
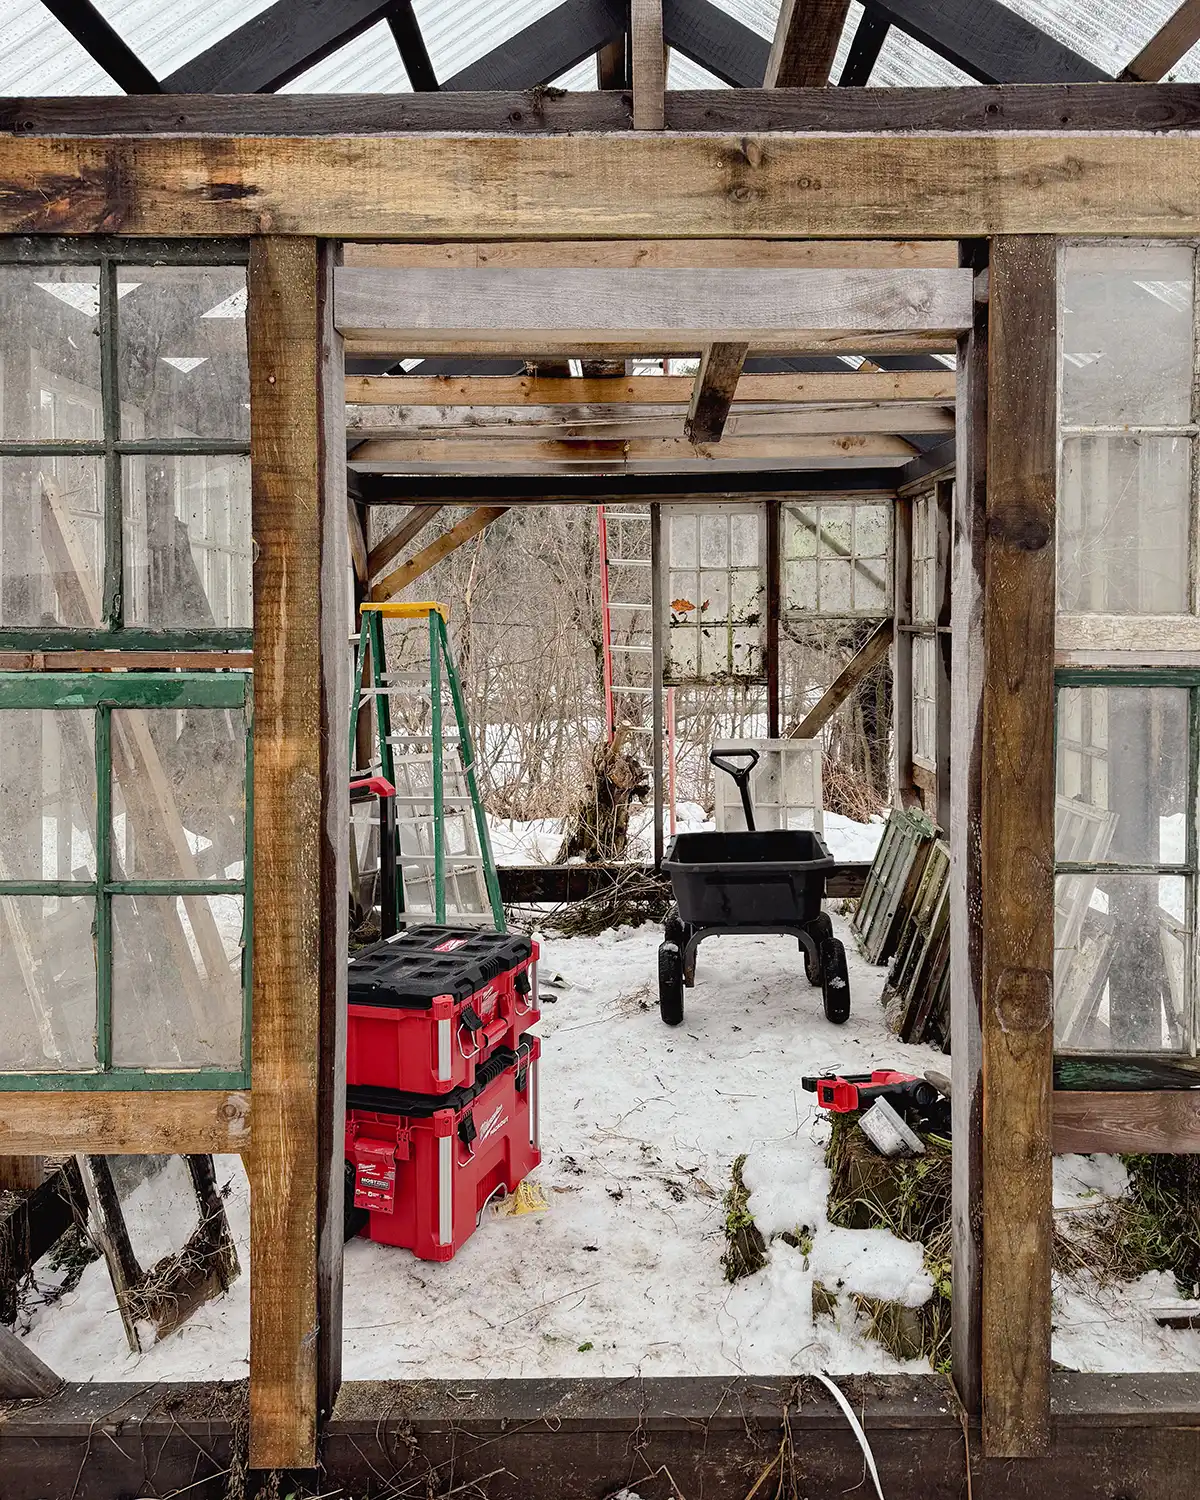
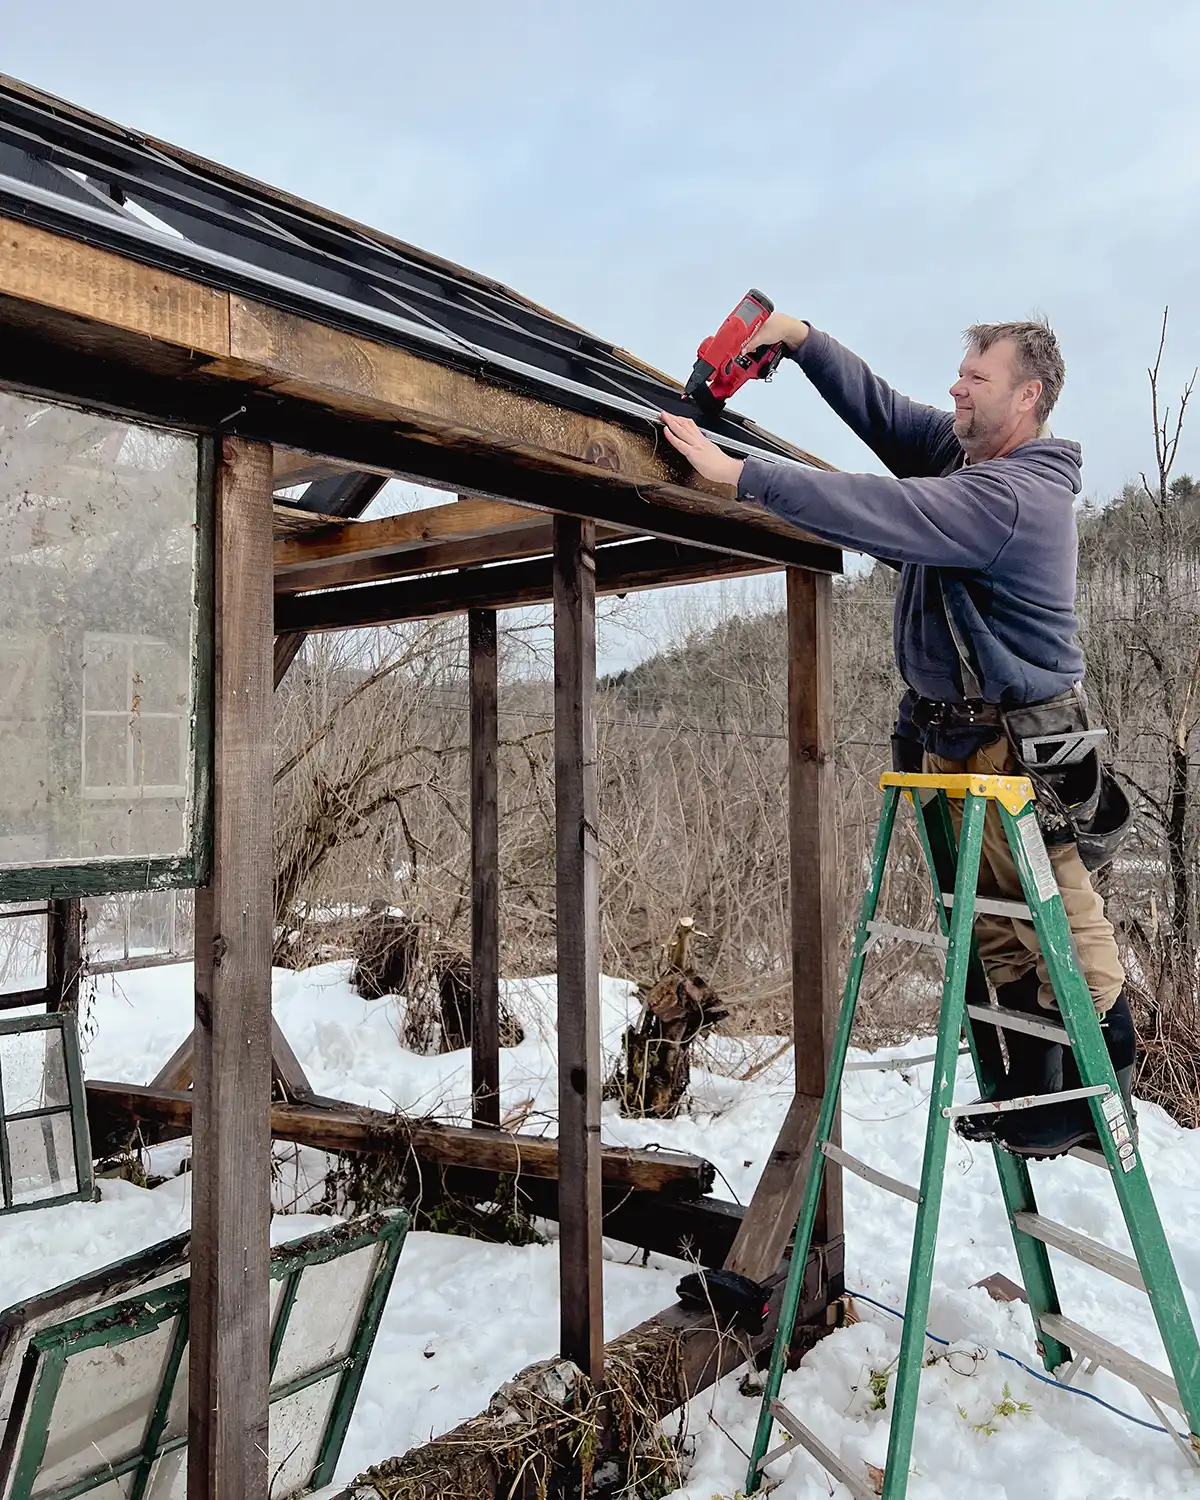
Building The Greenhouse Frame
Using the greenhouse plans, we built the wooden frame throughout the summer even painting it as we went.
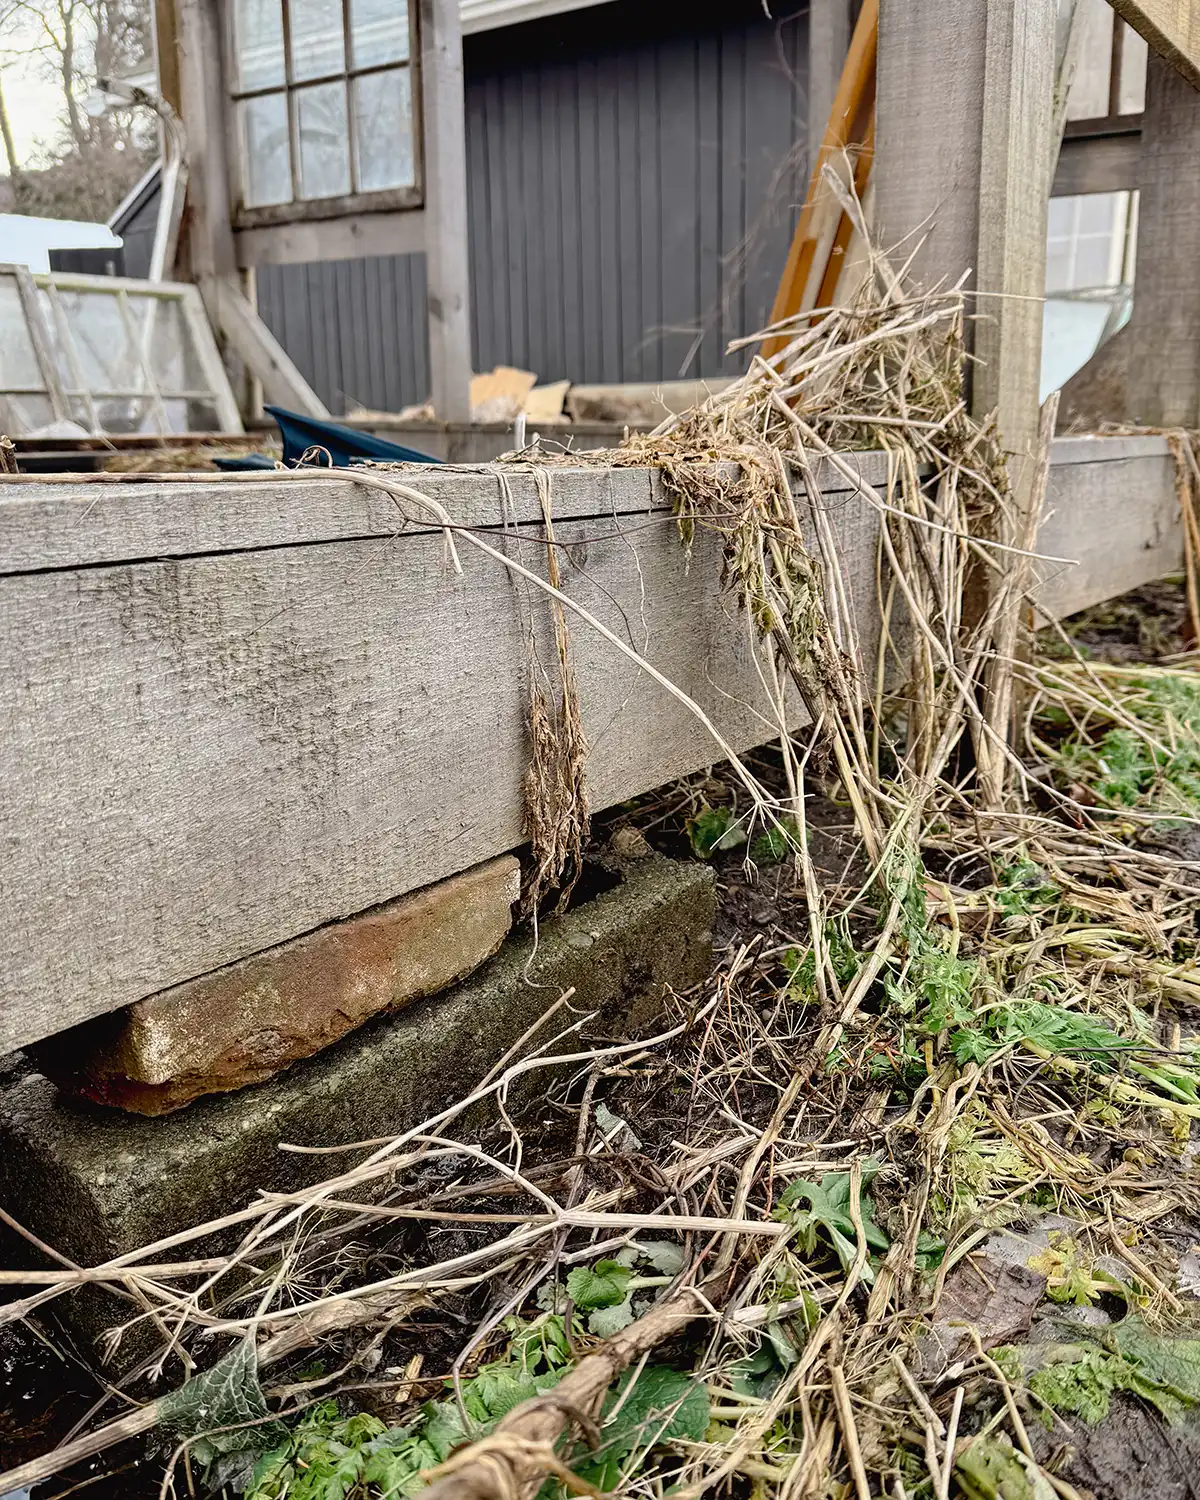
Greenhouse Supports
The way that Colby built the greenhouse supports is a little unconventional but hear me out. Generally, footings are built by digging down 4′, putting in form tubes below the frost line, and filling with concrete.
We opted to dig down 4′, stack cinderblocks in the hole, and fill it with gravel to serve as footings. Colby preferred to build the footings this way since the structure is freestanding and not attached to the house (so if it moves it’s not going to rip off our house), and can more easily be adjusted if the structure shifts.
In the past, we’ve used form tubes and concrete for freestanding structures and they still moved. It’s much more difficult to adjust a structure permanently attached with poured concrete than one sitting on top of cinder blocks and gravel.
But check your codes! Our building process for the footings may not fly in certain locations.
Greenhouse Frame Materials
The materials that we used for the greenhouse framing included rough-cut 4 x 4 posts, rough-cut 4 x 6 beams, rough-cut 2 x 4s, rough-cut 1 x 4s and 1 x 6s.
We are lucky enough to live in a location with an abundant amount of sawmills around and ordered a bunch of rough-cut wood to frame the greenhouse. The person we purchased the wood from was a high school friend of Colby’s.
Tip for ordering custom from a sawmill. Order plenty early! It can sometimes take several weeks or months to get your lumber order, especially during the busy construction season. So plan ahead and order your materials early.
Otherwise, the framing can be purchased from a local lumber yard. You can also get your materials from Home Depot but the wood is planed. There is no benefit of buying rough cut over planed other than price. Rough cut is cheaper.
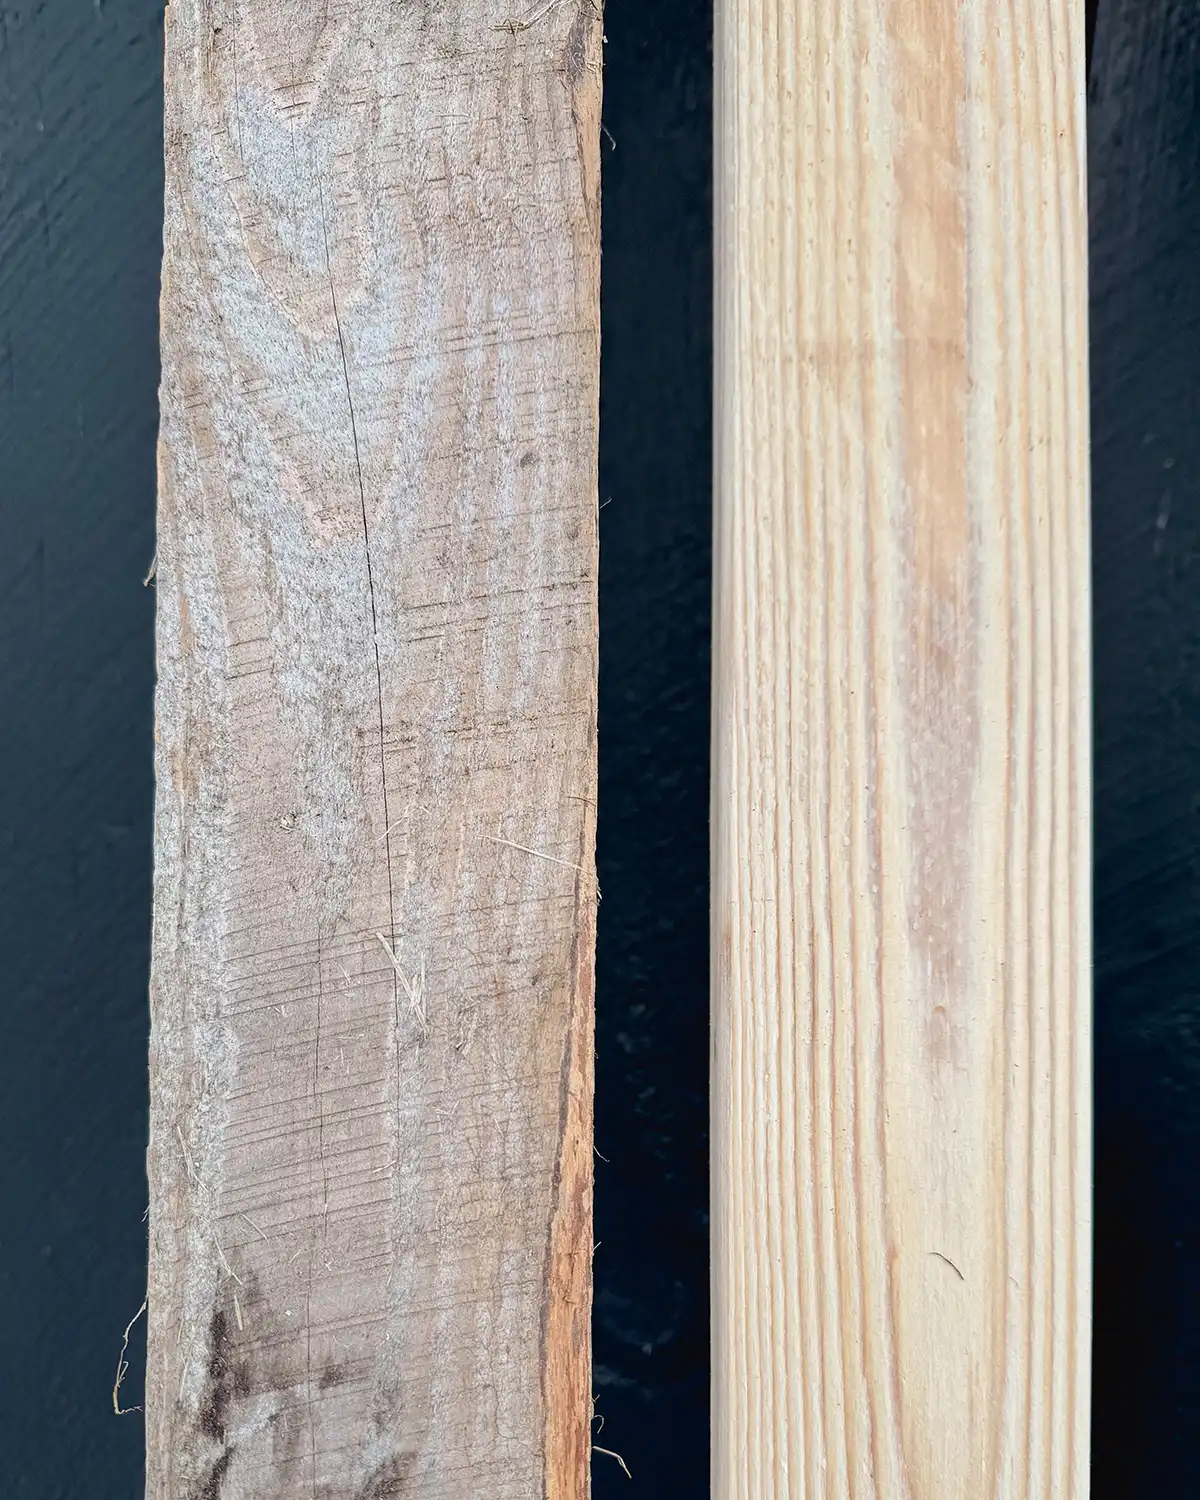
Photo of rough cut lumber vs planed lumber.
Basic Greenhouse Framing Steps
Here are the framing steps we went through next for building the greenhouse:
- Framed the base with the 4 x 6 beams
- Built the 4 x 4 corner posts, bracing them at the bottom
- Added studs, screwed in knowing they would need to be moved later to adjust for the sash
- Built the roof on the ground so we could paint it, unassemble it, and put it up
- Painted 1 x material and installed it as cross-members
Then it’s all sash and roof installation but more details on that for another day.

Do you have a set list of materials and plan you could send through email?(: love the look and style just trying to get a price and set list of materials?
Hi Morgan! I don’t currently have a materials list or a general price. We’re still in the middle of the project, waiting for the snow to melt so we can finish. As soon as it’s done, I’ll be writing a big post with exact costs and the materials list. If you check back later in the spring, I should have it done.