As promised yesterday when I introduced our little “Roofing With The Campbells” series where we’ll be chronicling the task of re-shingling our home, today is the big “How To Calculate Shingle Quantity” post. And of course what would an epic bloggy series be without an equally epic logo?! That’s what I thought!

Before we could even begin to shingle our roof, we needed to figure out how many shingles we needed to buy. We have three roofs on our house (from left to right): the porch roof, main roof, and the kitchen addition roof. The roof we’re focusing on is the main roof, which is a very traditional roof for this area…aka…steep old farmhouse style.
Calculating the shingle quantity for the roof seemed like a daunting task but it really was quite simple. No measurements needed since we knew the dimensions of the house and the angle of the roof. But you could always just hop on up and measure away at the roof. But we left it up to our mad geometry skills to calculate the surface area of the roof. Just when you thought that the SATs would be your last go around with geometry…it’s back to haunt us. It’s all about triangles, rectangles and slope. So here we go…a “How To Calculate Shingle Quantity” tutorial complete with visual aids (I feel like I’m in school again giving a presentation).
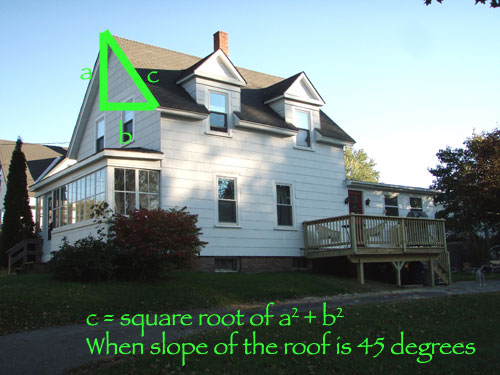
First up, we needed to calculate the angle of the roof. This was pretty simple in our case since Colby just knew that it was a 45 degree angle. He knew this because he had been working in the attic and noticed that the rafters formed a perfect 90 degree angle. This is pretty common in old homes where the angle of the roof is essentially a slope of one. Meaning that rise over run is equal meaning a=b. This made the calculations of “c” much easier since the formula to calculate the hypotenuse of the triangle (the height of the roof) c = square root of “a” squared plus “b” squared.
We knew the width of the house was 22′ so we divided it by two to come up with “b”. Knowing “b” meant that we knew “a” since a=”b” when you have a right angle triangle with two 45 degree angles. When we plugged in our dimensions, we ended up with a roof height of 15.556 feet (c).
Once you know the height of the roof (c), you just multiply it by the length of the roof (d) to come up with the surface area for the roof. But before we could do this, we added in an extra foot to the roof height (c) to factor in the roof overhang.
The length of our house was also a number we were familiar with thanks to the house inspection documents from when we bought the house. So when we plugged in our dimensions, we had a surface area of about 430 square feet.
Since this calculation was just for one side of the roof, we multiplied it by two to get total square feet of roof of 860 square feet. Then we converted square footage into shingle bundles. There are 33.3 square feet in each shingle bundle so simply divide the square footage by 33.3 to get the total number of bundles needed for your roof.
Our total for the main roof ended up being 25.85 bundles, but we rounded up a little bit to factor in the shingles needed for the dormers, the porch roof (might as well tackle that while we’re at it) and for mistakes…I mean…Bob Ross “happy accidents”. In total, it worked out to be 33 bundles. If for some reason we have extra bundles (fingers crossed all our calculations pan out) we can always return them.
So now we have 33 bundles of shingles and 2 bundles of ridge cap sitting in our driveway waiting to be attached to our roof. It’s going to be a loooooong weekend of roofing for the boys while I’m Pinterest-Challenge-ing away. So stay tuned for more riveting roofing action and a big Pinterest Challenge project reveal next week. I promise not to disappoint!
Pssst…So now that you all know what we’re up to this weekend, it’s time for you guys to dish! What’s on your big to-do list this weekend? Or anyone just throwing caution to the wind and ditching your to-dos for a little fun and games?!


