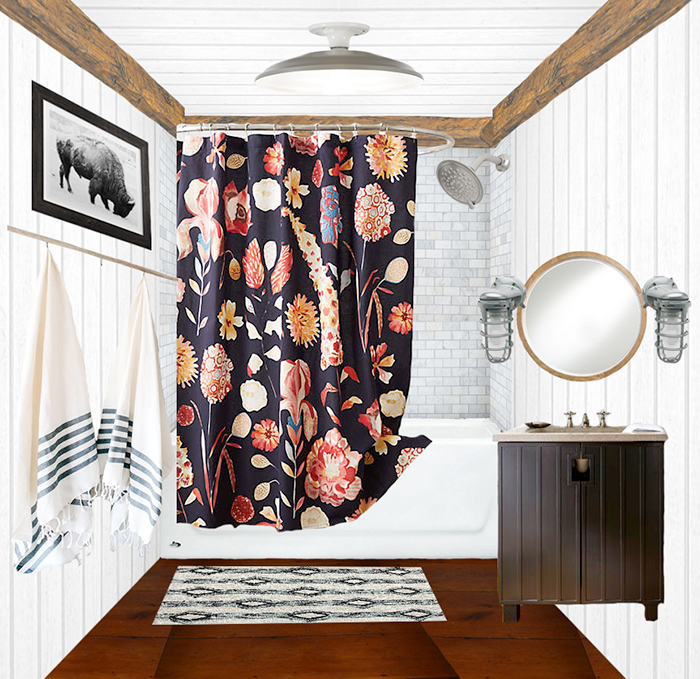
A couple of weeks ago, Colby had his annual bass club banquet a few hours south of us, in Manchester, NH. It’s the annual meeting of all the clubs in New Hampshire and Vermont and is a jolly good time for all the club members. Colby invited me to go along. A good wife would have gone with her husband. A good wife would have clapped along when they introduced his club at the banquet. A good wife would have kept him from spending his entire morning coffee budget on raffle tickets for a Lowrance HDS-9 Gen3 sonar/GPS combo electronic system with side imaging for the bass boat. But I just couldn’t stomach hearing one…more…story from the guys about catching the big one (complete with large hand gesturing)! So instead, I chose a night of Photoshopping a bathroom plan for our guest bathroom remodel for the One Room Challenge. Case in point, our guest bathroom plan:

I went a little overboard this time around. Instead of a traditional mood board, I Photoshopped the entire space for the bathroom plan. I wanted to get a feel of what the room would look like since I was worried about what planked walls AND a planked ceiling would look like.
So let’s talk bathroom plan. If you remember from last week’s post about our bathroom before and demo progress, we had discovered old circa 1781 beams hidden under the ceiling. They just don’t build houses like they used to! Thus, exposing the beams became integral to our bathroom design plan. The only two things that are staying are the old, wide pine floorboards and the ceiling beams.
Here’s the game plan:
- Raise the ceiling a bit and install v-match ceiling planking. The same planking is also going on the walls.
- Plumb and install a 4-1/2′ tub since it’s the only size that will fit in such a small bathroom. We installed the tub this weekend…fits like a glove!
- Tile the tub surround with a marble-looking tile.
- Add light fixtures. I love this industrial flush mount light as an affordable option. Amazon has a bunch of barn lights and industrial lights at affordable prices.
- Refinish a $1 flea market find mirror for the room.
- Build a vanity base for a freebie cast iron sink we found.
- Install a new toilet or possibly reuse the one that was in here if we can fix it and clean it up.
- Add flare with an Anthropologie shower curtain that I’ve had for nearly a year now, some Turkish bath towels from Amazon, Nate Berkus bath mat, and Minted buffalo art.

We are on a lowwwww budget for this project. Like walking around perpetually singing the low-budget song (by The Kinks FYI) kind of low budget. Let’s just say paying a GINORMOUS tax bill to the fed, Maine, Vermont AND Massachusetts (Colby’s employer location) put a damper on our project budget over the next few months.
I almost hate to admit this, but being on a budget has been a good thing. I started Photoshopping and designing this bathroom plan with a “sky’s the limit” approach and it was pricey! Rejuvenation brass fixtures, real marble tile, store-bought vanity, swanky Pottery Barn lights, soaker tub, and over $6k. But then I started sleuthing the look for less (porcelain but looks like marble tile for a fraction of a price), budget items (replacing the Pottery Barn light fixtures with cheap industrial ones), and DIYs (like salvaging a freebie sink and building a vanity base out of scrap wood and materials we already have).
Keeping the budget in mind made me choose the things that mattered to us, like the planking and gorgeous tile. The budget is also forcing us to get creative. Store-bought items are great, but DIYs add character and charm to a space making it super unique to our home.
Overall, our bathroom remodel plan and budget came in at about $1.5k. Not too shabby for a bathroom remodel where our goal was to keep it under $2k. As we’re working along we’ve saved in some areas (reusing a door but changing its swing) and forgot to account for other things (like GFCI outlets). Once we’re done, I’ll be sure to share our final budget for the project.
I’m so excited to share the progress we’re making and fingers crossed we’ll be able to pull off the renovation in just the four weeks we have left for the challenge. We did get the tub installed, roughed in the electrical, and have started planking the ceiling and walls. I’m aiming to share the planking progress during next week’s update. Spoiler alert, it’s oh-so good and I’m foreseeing a few more ceilings to come down and get replaced with planks and exposed beams!


That budget for a bathroom is not too shabby! I sometimes hate being on a tight budget, but I do like how it pushes me creatively. Can’t wait to see those beams and ceilings!
Oh man! I’m so excited to see how this one turns out! LOVE everything so far!
Love the inspiration board…. that shower curtain! can’t wait to see it come together.
Love that shower curtain! I’m excited to see it all unfold!
Your design plans look amazing, and I am beyond impressed with your Photoshop skills! I can barely piece a board together in PicMonkey 😛 I know your bathroom makeover will be impressive, no matter the budget – you have such a cool style and a great eye for what works together!
I love EVERYTHING about your design plan! I will definitely be following along to see how it all comes together. Good luck!
you can do it! I love to see what people can do on a low budget. It makes you think outside of the box.