And this time not to each other (been there…done that…maybe someday after I sift through thousands of amazing photos you’ll get to read about it too). But this hitching relates to plumbing…bathroom plumbing…and how we cut a hole in the back of our Craigslist buffet find turned bathroom vanity and hitched up the plumbing.
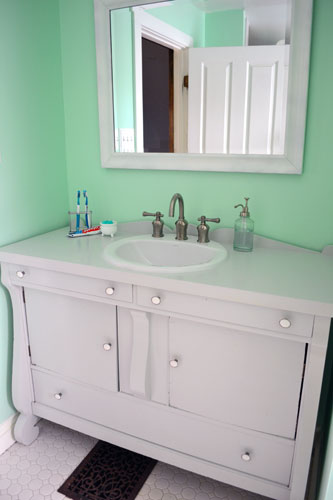
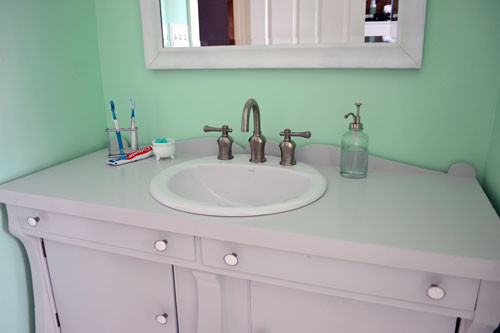
Teeth brushing in the tub is no longer a “normal” thing around here. Oh…and have you met our fancy new sink hardware?!
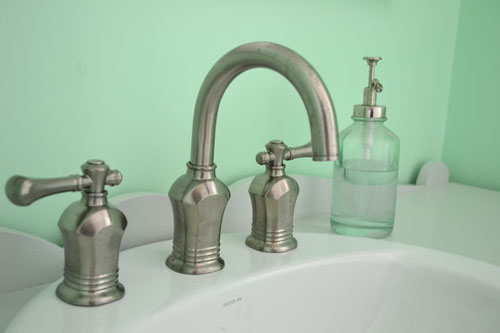
For the ripe ol’ price of FREE! Thank you Mom and Dad for bestowing upon us your cast off NEW bathroom hardware. Story coming. You see, my parents built themselves a gorgeous new country home (you can catch a glimpse of it in this Christmas post). Seriously…they built it themselves with the help of my contractor brother. You see where I get my DIY ability?! And during the building process a Home Depot store in my neck of the woods closed and reopened across town…hence…MOVING SALE! Prices slashed on everything…all sales final. So my mom bought all the hardware she needed for all four of the bathrooms in their new home for cheap. Except…when she later purchased the vanities/tops, the hardware she needed was the one hole type as opposed to the three hole type she had bought on clearance. So she gave us brand new hardware…that’s been sitting in our basement…for three years…with our $2 Lowes display model sink that we impulsively purchased for our “someday” vanity. Story officially over, let’s install a vanity.
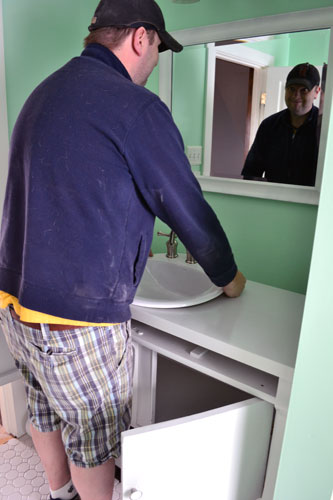
The first step was to attach the hardware to the sink and make sure sink/hardware combo fit in the sink hole that Colby cut a few weeks ago before I painted the vanity. Look at him making faces at me in the mirror.
Thankfully, everything fit perfectly and no new cuts needed to be made.
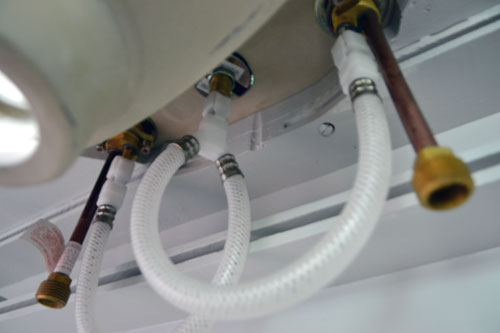
Except for one cut, the one in the back of the vanity where the plumbing needed to come through. To do this, we scooted the vanity up to the plumbing, measured/leveled/marked the cut locations, drilled a couple of pilot holes in the upper corners of the plumbing hole to be cut, and cut it all out using a jig saw.
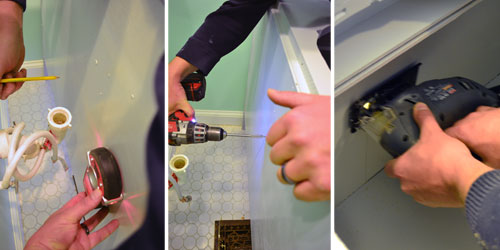
Then just slid the vanity into place so the plumbing coming out of the wall came through the back of the vanity. Then plopped the sink/hardware/drain back into the sink hole so the drain fed right into the plumbing trap.
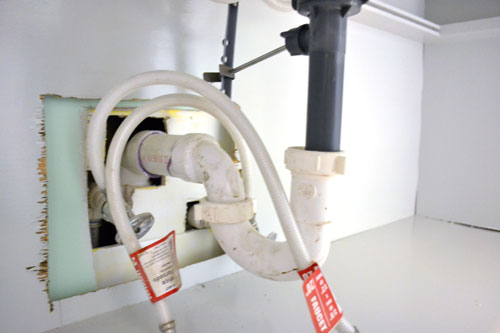
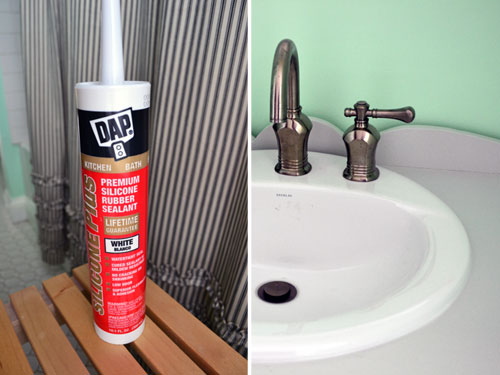
But do you see the little problem? The trap that we had used with our old sink (white plumbing) was a size too big for the new faucet drain pipe (dark plumbing). So off to Lowes Colby went to pick up a new, smaller sized trap which cost us a whopping $5 for the whole kit, and simply installed it.
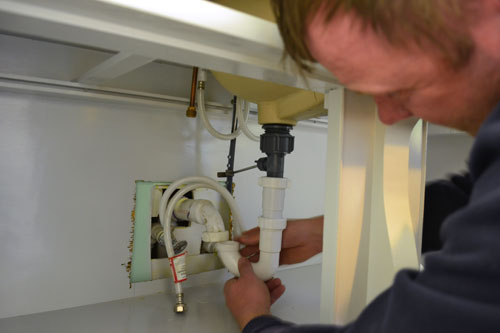
Much better fit. But then we learned the gasket that came with the drain was leaky so back to Lowes for a new gasket, which seemed to work better. But just in case, before we caulked the sink permanently into place on the vanity, we plopped a pie plate under the vanity plumbing and left it there for a few days to catch an possibly leaky drips…you know…just in case. But it remained dry.
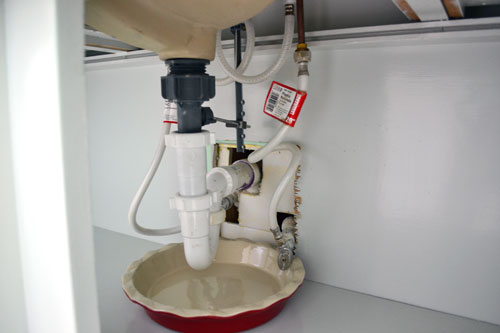
Thankfully, none of our friends came over and asked us to bake them a pie. Because how embarrassing would that be when you have to tell them, “hold on a minute, let me retrieve my pie plate from the bathroom and I’ll get right on that pie.” Anyway…after adding back a couple of essentials (toothbrushes, toothpaste, soap, floss…nothing too fancy or decorator-ie yet) the vanity was looking a little bit like this:
But note the slight gap going on between the lip of the sink and the vanity top. Not cool. The final step for our vanity installation was to caulk that gap nice and tight so any water that spilled onto the vanity top wouldn’t leak down inside the vanity. To do this, we used a tried and true bathroom caulking from Dap to caulk the seam. This is the same stuff that we used to caulk around our bathtub and where the shower tiles meet the tub. It’s super strong, water resistant stuff that lasts a good long time.
And see? No more seam! And finally, our bathroom is starting to feel more like a real bathroom with a real vanity.
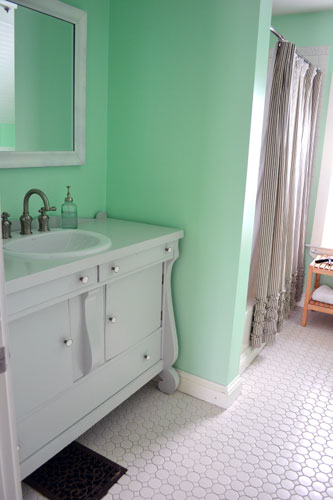
Although, it still feels a little builder basic to me with lots of empty walls and a standard issue mirror (it was a $10 yard sale find that we spray painted white). That blank wall is begging for a little shelf and a hand towel hook. Other walls are screaming for help too. I can hear them…all…night…long. No joke, I decorate and renovate our home in my sleep. And on occasion, the blank walls talk to me. I’ve got a problem. Actually I’ve got 99 problems but the vanity ain’t one!
This weekend I’m excited to REALLY set up our bathroom…you know…do a little decorating…maybe some organizing…and basically get down tonight…get down tonight. That 70s song spoof worked out so much better in my head. #bloggerfail
Pssst…What’s on tap for you this weekend? Organizing? Painting? General chillaxin’ in the sun? Speaking of…for the love of pink glitter I hope it does not rain this weekend AND the temps stay above 38! I need sun!

Oooo, I really like how that turned out. Parents are the best!
Awww…thanks Michelle! And yes, totally agree…parents are the best!
Love the FREE hardware! And don’t worry, I decorate and redecorate my house in my mind all the time too….My kids rooms are the current hot items on my list, have just gotten them new beds, of course we had to rearrange everything, and when you rearrange furniture you have to redecorate! I can’t wait to see the finished product!
Yes! Glad to know I’m not the only dream-decorator! Haha! And new beds TOTALLY justify an entire redo! Justified!