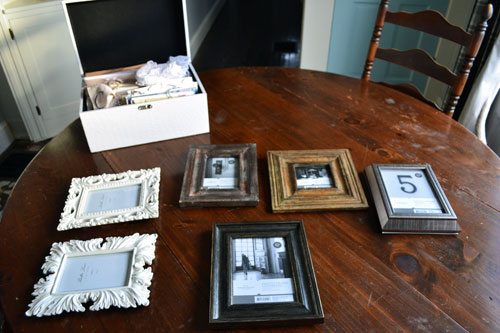
You knew I couldn’t leave it alone…the wedding art gallery that was in the works in our master bedroom. So we recently noodled away at it and took it from this:
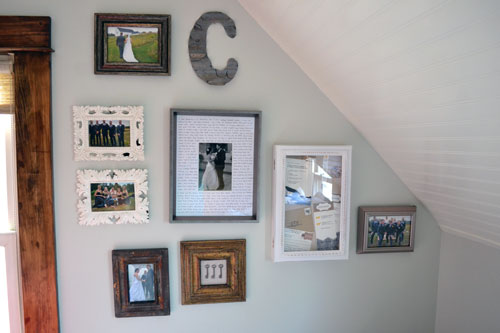
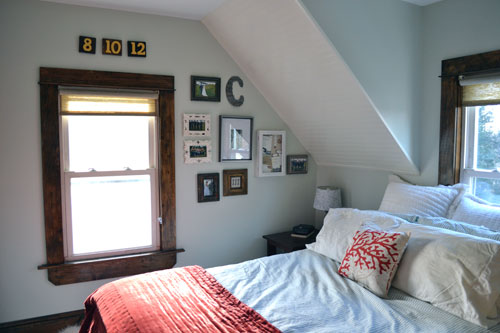
To this:
Ahhhhh…I’m finally at peace with the gallery. It’s perfect…ridiculously, awesomely, perfect. The project was so un-Angie like, at least in terms of how I tackled it. I’m normally a very calculated, planned out, hang-up-paper-templates-and-play-around-with-art-layout type of person. Not this time. I winged it…totally winged it…starting with the frame selection.
The two white frames I had picked up at Home Goods about two years ago. It was one of those purchases where I fell in love with the pair of frames which were cheap so I picked them up knowing perfectly well that I would use them someday. The other four picture frames are from Target. And it was a total Russian roulette situation when it came to picking out the frames. I just grabbed my four favorites from the Target shelves and hoped for the best. Who is this girl?! It’s like I don’t even know her?! But I love the mix of rustic finishes on the frames.
As for what went in the frames, I went with my favorite wedding photos and had them printed at the Target photo center. I shop there way too regularly and it’s just too easy to upload my photos online and later run over to pick the prints up while completing my weekly shopping.
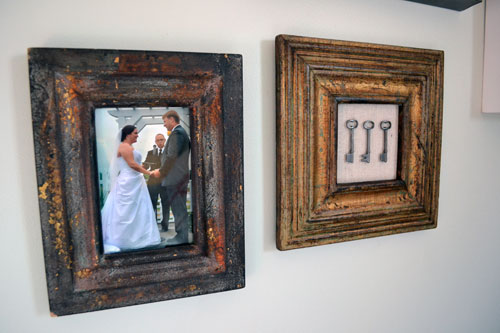
Of the six frames, five of them were filled with wedding prints. The other frame I used to showcase a few of the keys that were attached to the note cards on our wedding gifts from Pottery Barn. They were just too cute to throw away. I may be a sucker for old school like skeleton keys. And they look so cute in the rustic-ified frame.
For those of you curious about the “how’d she do that?”, it was easy. I wrapped the glass from the frame in a linen material leftover from a few wedding reception decor projects, and hot glued it in place. Then I just tacked the keys onto the fabric adorned glass and inserted the keyed fabric into the frame.
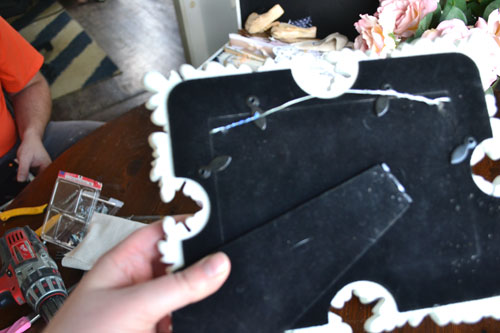
Oh, and I should also let you in on a little secret about picture frames and gallery walls. When you’re picking out frames, don’t let a really great frame stay at the store if it’s a free standing frame only and you need it to be a wall hanging frame. There’s an app for that a picture hanging kit for that. And there are two methods for converting the frames, both of which we used for this little gallery project. Option one…using a 1/16″ drill bit, drill holes into the back of the picture frame:
Then wrap wire through the holes and loop it back around the wire before closing up the frame.
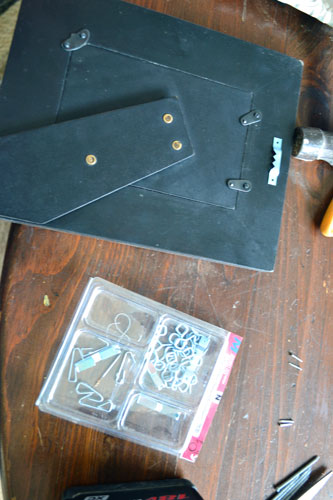
Option two…if the frame is a wooden frame, simple nail a picture hanging bracket onto the back of the frame. Easy as that.
Four of the frames that we hung (both white ones and two of the rustic wooden ones) needed to be converted to wall hanging frames. Now that the frames are on the wall, you can’t even tell. And we left the free standing frame thingy on the backs just in case we ever want to take the gallery down and stand the picture frames on a dresser instead.
Let’s zoom in on the gallery a little bit and get up close and personal, starting with my favorite picture of Colby and I.
I love that pic for several reasons, but mostly because it’s obviously adorable (obviously) and it’s in a field of yellow flowers (one of our wedding colors), the same wedding flowers that I picked the day before to use as reception decor. AND my husband’s butt is cute and I just want to pinch it. Too much information? Then there are the groomsmen and bridesmaid pics.
And an obligatory us at the alter pic along with the wedding gift keys.
And then my favorite pic of the whole wedding party which includes me in a carriage, my girls at my side, and the boys “pulling” the carriage. Photo op genius.
Ever since hanging the gallery, I can’t stop staring at it. Reading in bed has suddenly gotten a whole lot harder with all the distractedness. It’s just so hard with heart warming memorabilia hanging in our room.
The only piece I’m debating switching up is moving the 8-10-12 table numbers that are currently hanging above the window to the left of the gallery, and moving them to the bottom right area of the gallery. Just to make it so the gallery is contained in one area like a tight little package, instead of spilling out.
But I’m sure the art gallery is going to stay like this for long time. Now we just need to tackle the other empty wall area in our bedroom, that space above the dresser. I’m thinking big mirror…BIG!
Pssst…Holy time flying batman! Can you believe how close Christmas is?! Where did 2012 go?! Please tell me I’m not the only one spazzing about the holiday season craziness that is upon us?!








Love the gallery wall and reading how you picked out each frame and photo. I am with you on gallery walls, its my time to throw symmetry out the window and just wing it. That’s when gallery walls look their best. I thought about it and a much as I want to say ‘don’t touch a thing’. Something about putting your date in that corner sounds interesting to me… My vote is for the relocation! 🙂
I heart you…just thought you should know! And it always seems like the best gallery walls are the ones just slapped up there without too much calculation! And I’m totally moving the numbers. I’ve been on the fence but I think you’re right and they need a little bit of relocation!
Love the fix for converting standing frames to hanging ones. And the keys are genius. I am going to tack some objects to a few empty frames we have. Your wall looks lovely.