Once upon a time we had a yellow bathroom with cute little labeled towel hooks. Then, one day, the big bad Goose came along. And he huffed and he puffed and he pulled those towels down.
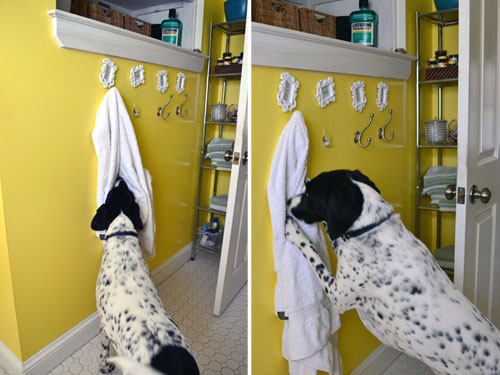
Until he ripped out a couple hooks (only one of those hooks is still properly secured). For some reason, Goose has a nasty habit of pulling down our bath towels and proceeding to roll in them. It’s the same move that he pulls when he’s busy rolling in dog turds (sometimes his own) and dead snakes. It’s a real charming quality of his (she says sarcastically). So it didn’t take very long for Goose to pull down enough towels that the towel hooks started coming out of the wall, bringing bits of sheet rock down them them.
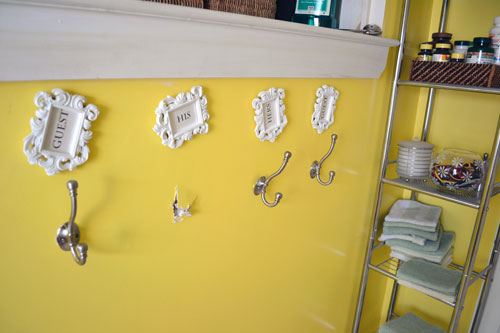
But I can’t blame the wonkiness of the towel hook labels on the dog. That’s my bad. No…not really. More like poor luck. For some reason, they just won’t stay straight. Maybe it’s because we only used one nail to secure each hook label to the wall?! In retrospect, we probably should have used two nails. Anyway, towards the end of the yellow bathroom’s tenure, we were pretty much over the towel hooks and labels and we were ready for a change. So after we finished patching the old hook holes and painting our bathroom minty green, we were ready to give the space the hook up (see what I did there?!).
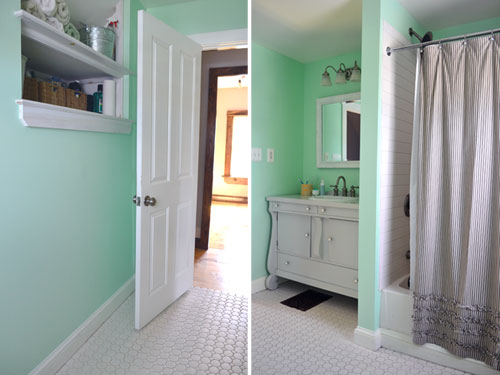
We actually wanted to install two sets of hooks in our bathroom. One set of hooks to replace our old towel hooks underneath the built in shelves. And another hook on that little, sliver of a wall between the vanity and the shower. We’ve never had a hook there and thought it would be a good spot to hang shower-in-progress towels.
So the other day while I was cruising the School House Antiques Mall in Brewer, I came across a couple of items that would fit the bathroom hook bill. First up, an old hat rack.
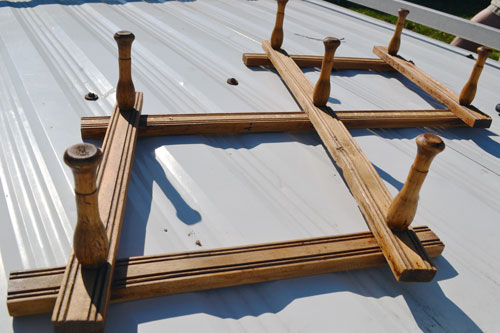
It’s accordion style meaning that you can expand it and contract it for different heights and widths. I couldn’t resist it at a price of $12. Although I wasn’t a fan of the color, which is nothing a can of spray paint couldn’t fix.
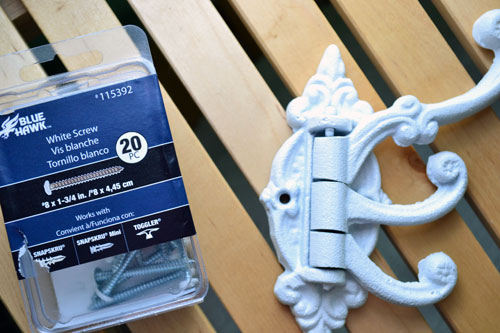
At another booth in the School House Antiques Mall, I came across this black, cast iron hook for $7 and promptly added it to my shopping basket with the intention of making it our shower towel hook. No more towels draped over the shower curtain rod! Yippee!
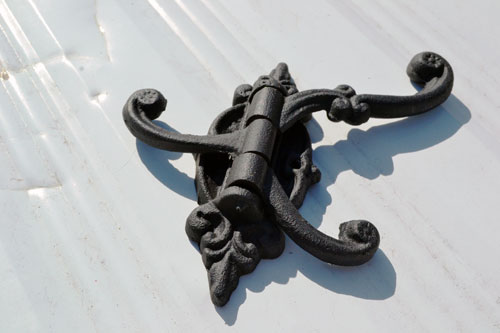
It’s one of those triple, swiveling hooks and I have been jonesing over all the colorful versions of them on Etsy for quite some time. But who says I couldn’t spray paint my own triple swivel hook?!
After a long winter with a serious lack of spray painting, I was going through withdrawals (curse you spray paint fumes and your addictiveness!) so it was time to break out a can. It was the first pseudo nice weekend here in Maine and just barely warm enough to spray paint things outside. So I set up my painting station, whipped out a can of spray paint (leftover from another project), and officially declared spray painting season open!
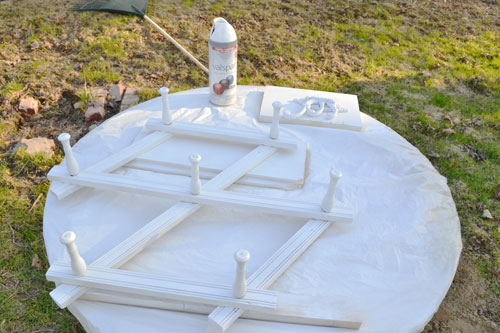
Before painting I gave the hat rack a quick scuff job with some sand paper. Then it was just a matter of layering on about five super thin and even coats of spray primer/paint in one. I let the hooks dry for a few days, making sure they dried completely and the finish hardened up (since they would probably be exposed to a decent amount of wet towel moisture). Then it was installation time. And true to form, Colby whipped out the laser level to make sure we installed the hat rack turned towel rack, straight. He’s such a stickler for levelness.

Colby leveled while I properly positioned the towel rack on the wall. I held it in place while Colby simply nailed the hat rack directly into a couple of studs (the other use for the laser level/stud finder).
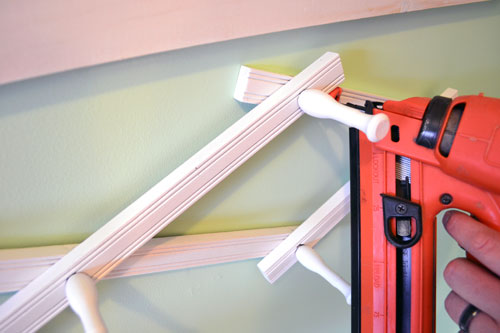
That was one of the problems with the old towel hooks, we didn’t install them to studs and just used sheet rock anchors. Under normal circumstances (as in if Goose didn’t exist in our home), the hooks would have held just fine. But after daily wear and tear from the pooch tearing down our towels, the anchors just couldn’t hold up the hooks anymore. Good thing our dog is cute! Sheesh!
Next it was time to install the triple swivel hooks. This one was a bit different. The hook had two holes in it meant for a pair of screws but didn’t come with screws. During spray painting, I hadn’t thought about picking out a pair of screws from the workshop and spray painting them too, you know, to match. Nope…completely forgot. I blame the paint fumes! Turns out that Lowes stocks all kinds of colored screw heads. So during an emergency “I’m out of Etsy shop supplies because those darn stands keep selling out” trip to Lowes, we also picked up some white headed screws (not to be confused with those white heads of your teenage years).
Then it was just a matter of picking the right spot for the hook, eyeballing its vertical/horizontal spacing, and screwing it to the wall. Easy as pie (mmm…pie).
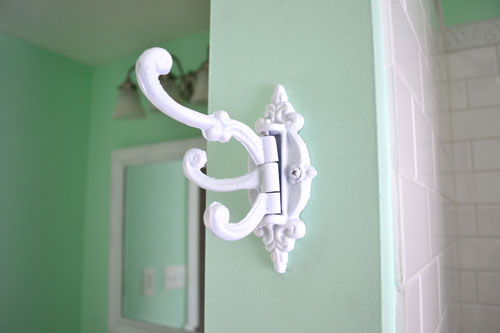
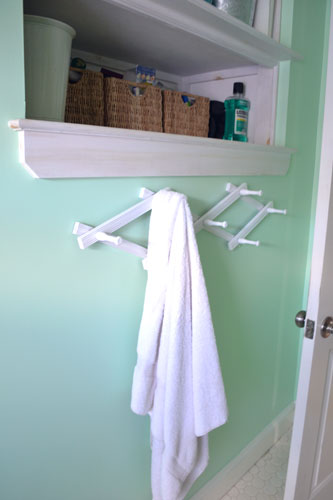
Here’s the after shot of the bathroom with the new hooks installed (I know…you can BARELY see them…but they’re there if you squint really hard).

It’s a subtle change to the space visually but has a GINORMOUS impact on the functionality of our bathroom. Although breaking the three year draping-the-towel-over-the-shower-curtain-rod habit is HARD! But if that’s the worst of my habits, I’ll take it.
So we’re inching ever so closer to having a done bathroom! It feels so weird…especially where we were sporting a plywood vanity for oh…three years! And because I can’t resist checking things off the to-do list, here’s where we stand on our bathroom list:
Find a dresser/buffet to convert into a bathroom vanity(we found a buffet on Craigslist for $75)Hack up said dresser and paint it(vanity hacking post here and here during installation; the vanity is painted Gray Owl by Benjamin Moore which you can read about here)Demo out the old “temporary” vanity that had been in our bathroom for nearly three years and patch the sheetrock(vanity demo go boom…note…Colby challenge me to spoof the KFC “Game Day Bucket Go Boom commercial in every post…challenge accepted)Prime and paint the bathroom wall a cool, minty color(we painted the bathroom Mantis Green by Benjamin Moore)- Add bead board above the built-in shelves and paint the bead board and the shelves glossy white (for shame that we haven’t yet painted the bathroom built-ins…it’s been three years!)
Build a first aid cabinet for the space above the toilet paper holder(we didn’t build it though…we found it…for six bucks…here’s the post)- Organize, organize, organize!
Build shelves for the blank wall space beside the vanity- Build another shelf, maybe one out of driftwood, to hang over the back of the toilet
Find or DIY some interesting towel hooks- Finish off the space by hanging a little art and accessorizing here and there (I’m sensing some Etsy art I’ve been drooling over in our future!)
- Patch the cracked ceiling (kind of broke it while working in the attic) and paint it
- Replace the light fixture with something fun and less boob-light-like
Oh so close to done done. But I’m starting to feel the itch to move on to another space for a little while. And I’ve got a big switcheroo planned for the not so distant future. We’re talking a flopping the craft room with the guest room so the craft room becomes the guest room and the craft room (and Etsy shop office) moves into the guest room space. Still with me? Good. Stay tuned for details.
Pssst…How about you guys? Have you been adding any finishing touches to a space lately? Or do you also get the “itch” to move onto something else when you’ve been working on one thing for too long?
