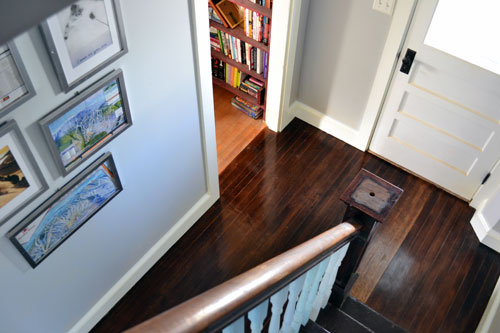
After a long weekend of ridiculously amounts of polying the hallway floor, I’m super stoked to reveal the finished hallway floor.
Well…kind of finished hallway floor. There’s still the heating vent to spray paint and put back in the floor. And then there’s that weirdly, light colored floor section that I want need to sand down, re-stain, and re-poly. But other than that we’re good to go. But back to the poly process. As mentioned back here in our initial hallway refinishing post, we learned that our floor is maple which is incredibly hard to stain and finish. It’s a very hard wood that doesn’t take stain very easily. We learned that the hard way. But we came up with a fool proof method, which I by no means endorse or recommend. It is definitely not advised by the pros but I’m not one to always play by the rules. I’m more like the chick that gets told no, gets frustrated that I was told what NOT to do and does it anyway. The process…layer the stain on thick, let it dry for a considerable amount of time (24+ hours), and then poly. The most time consuming part of the process, was the first coat of poly. Here’s why:
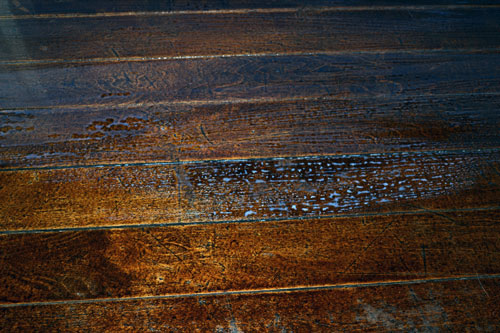
Why yes that’s what happens when you apply a water based poly on top of an oil based stain that has been applied WAY too thickly. No wipe-age going on there. The key to the floor finishing success in this situation was really taking the time on coat number one of what ended up being five total coats. I ended up brushing on the poly over and over and over again until it looked smooth and refrained from beading. It took a long, LONG time. We’re talking over an hour to do a section about six rows wide. But it was worth it.
Unfortunately, I didn’t learn this until I neared the end of the poly process. You can kind of see in the pic below, just in front of that shiny spot, where the poly dried all bubbly like. That’s from not taking my time on the first coat and working the poly smooth.
I couldn’t be happier with the floor refinishing….well maybe a little. There’s this little strip of lighter colored flooring that I feel the need to sand, re-stain, and re-poly. It just doesn’t match the rest of the floor. But apparently that’s what happens when you stain maple wood. It’s inconsistent at best.
Here’s the birds eye view from the staircase. You can compare the newly finished floor with the old floor peeking through from the living room.
And another view from the other end of the hall.
And one more view from the dining room looking down the hallway. The new floor color blends in quite nicely with the dining room floor for less of a shocking transition than the old, light colored flooring.
Although the floor isn’t 100% complete in the hall, more like 95% done, we’re very happy with it. The best part…the project was essentially free since we used materials that we already had on hand. We sanded the floor down with our own orbital sanders (no need to rent a floor sander), stained it with leftover stain, and used leftover floor poly to finish it off. Even if we did pay for the materials it would have cost us $80 at most (about $40 for each a gallon of stain and poly).
So what’s left to do in hallway? Shockingly still a few more details:
- Sand down, re-stain and re-poly the funky colored floor area.
- Spray paint and re-install the heating vent.
- Install and finish colonial stop (fancy term from the mill work salesman boy-toy…in Angie terms it’s more like “that trim stuff that you add to the bottom of the baseboard where it meets the floor”).
- Fix the newel post…sadly the top is living on our bookcase instead of its home in the hall…it kind of fell off in a running down the stairs like a crazy person episode.
- Fancy up the lamp shade around the light fixture…I’m leaning towards covering it with rope these days.
It’s uncertain when we’ll get to these projects. We take more of the whatever we feel like doing is what gets done first attitude with projects these days. But that’s what keeps things fresh and exciting.
Pssst….What did everyone else do this weekend? Any other fellow floor refinishers or maybe some fellow Maine-ahs soaking up all that ridiculous sun? Oh I definitely broke out the hammock…I hammocked so hard today!


omg these are gorgeous! They turned out a lot better than what I was expecting from your last post. Although I’m partial to light wood (I love the sh*& out of beech and maple and wish my entire house was that!) I think this is fantastic. The different shade gives it character and make it look rustic and natural.
Are you going to get a runner for the floor? I envision something like a red Ikat pattern, or some kind of folk art, like scandanavian or polish with bright red and blue geometric birds and leaves.
Ahahaha! You’re too funny! You know…I never even thought about doing a runner in the hallway but I have to admit I like the idea. Thanks! And I hear ya about light wood. Eventually we’ll have light pine but by staining the floor dark it hid all the cracks and gappages that were going on with our ancient, damaged floor. Okay…I’m off to Pinterest right NOW to go look at hallway runners! Look what you started! Ahaha!