One of the major projects we tackled this weekend was painting the dining room. Oh painting how I heart thee! I seriously could paint all day and I have done it before. I came close this weekend. Just a few hours shy of a full day-o-painting….dang! But like the hallways we gave the dining room a nice and light gray paint job. Technically the paint color is Valspar’s Bay Waves in an eggshell finish and I LOVE it! Here’s the first dining room shot post painting.
There we go, let’s just get the crappy photo out of the way first. How about a (slightly) better one.
Not much better but hey, photography just isn’t really my thing. I’m trying though, trying so hard! But I totally blame the camera. It’s legit! I’ve got this permanent blur spot going on in the camera lens that I’m pretty sure is joint compound dust from all the sanding that we’ve done over the past year and a half. It’s like the camera has cataracts. So that’s my excuse and I’m sticking to it. What…you want another painted dining room shot? Sure, you got it!
I like the gray, I really do and I’m so much happier with it than I was with the cream that we originally went with in the living room and the parlor (you can check out the great cream vs. gray debate back here). You can kind of see the color difference between the parlor (the name we have given living room #2) and the dining room in this shot:
So what’s next for the dining room? Oh lots of things…lots of things in deed! Here’s our to do list, which I’m officially putting out there in blog land for inspiration to actually tackle it. Here we go:
- Next up, the major floor refinishing. The old floor boards are just temporary (when we re-do the living rooms next year we’re planning on installing wide pine floors throughout the whole first floor). To dress up the sub-floor for now, I’m planning on painting them a darker gray and then maybe stenciling on a pattern for added flair (one of ten official pieces of flair for the house…oh what a great movie Office Space was).
- Install window trim. We’re thinking something kind of fancy with trim running along the sides of the window from floor to ceiling with paneling below. Kind of like what you see in really old fancy houses.
- Install crown molding to hide all the super wonkiness…curse you crookidly built house. Just kidding…I love you house…please don’t randomly fall in around us!
- While we’re on the installing bandwagon…install baseboard. But because we’re planning on putting hardwood floors above the sub-floor, Colby has intentions of adding baseboard but leaving a gap to insert the flooring later. Then he will just add a simple cap to make it look finish.
- Craft a really cool chandelier…maybe one made out of an old wagon wheel.
- Refinish the round table…enough said.
- Refinish the chairs by removing the old, not so safe caning and adding an upholstered seat. FYI…I accidentally stumbled upon my chair fabric while searching for fabric for another project this weekend! Why does it always work out like that?!
- Paint all the trim, baseboard and crown a glossy white. This step may take awhile considering there are three major doorways and a GINORMOUS window all with trim.
- Sew curtains. Yup…that’s right…the girl who can’t sew is going to have a little lesson in curtain making and try to tackle the task.
- And last…but certainly not least…and probably the coolest project we’ve ever tackled…drum roll please…build a bookcase door for the closet to secretly stash items. It’s so James Bond…or the Goonies!
It’s quite the list and will probably take awhile to tackle. Heck…it will probably take about four weeks just to get the floor primed, painted, stenciled, and poly-ed while keeping it traverse-able. It is a main artery for traffic in our house. But we’ll get there eventually.
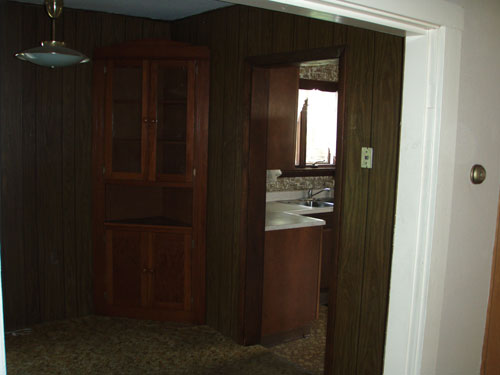
So…just because I REALLY like tracking our progress (it keeps my motivation up…really…something about reminding yourself about back when a room was sporting paneling and shag carpeting just really keeps me chugging along). Here are a few progression photos, first a pic from before we touched it.
I’m not gonna lie…that old pendant was pretty cool…ugly…but fun. You could pull it down real low or yank it back up high. And it kind of looked like a space ship. Then here is a shot of the progress we made, actually Colby did it all while I was traveling in Russia:

I’m pretty sure that just removing the paneling helped make the room bigger. And finally…we’ve gone gray:
Pssst…Check out some of our past dining room work like when Colby gutted the room, or the before/afters in the blogiversary tour here, or when we bought the new GINORMOUS window here (it was a sweet deal!) and then installed it here, or when I scored a helluva deal on an old Ethan Allen table with eight…count ’em…eight chairs…for only two-hundred bucks here, or when Colby built me a whine…I mean wine rack here (it will eventually live in the dining room), or when we spent eternity sanding/mudding back here, or even the great gray vs. tan debate over here.


