Welcome back Inspired Design Challenge followers/readers/general awesome people. How was your weekend? Mine was fantabulous…thanks for asking…mostly because we tackled this little Urban Outfitters inspired project:

Boom! New plant hangers for the dining room in your face! Sorry. Apparently I get a little excited about plant hangers. Anywho, this week for the Inspired Design Challenge we were charged with using the gorgeous goods from Urban Outfitters as our inspiration. I have yet to set foot in a physical Urban Outfitters store as there isn’t one near us, but I had a HARD time leaving the virtual Urban Outfitters store when trolling for project ideas. I wanted EVERYTHING. But I settled on this little plant hanger as inspiration.
Especially since our pre-project plant hanging situation in the dining room included an overgrown, not doing so well pothos plant (I think that’s the right name for the plant…I am soooo bad at plants). AND the poor pothos plant was still in its original, cheap plastic container from the store. Doh! We actually purchased the plant last summer as wedding decor. Cue up the awwwwwww! So here’s the before/after for comparison’s sake.

Much classier with the updated plant hangers, no?! So let’s get into the good part…the part I’m sure all you guys are DYING to read all about…the “how we did it”. First starting with the supplies.

Our supplies list included two cheap metal mixing bowls from Home Goods for $6 each, a can of black hammered metal spray paint for $6 from Lowes, way too much gold/black chain from Lowes (we bought 20′ for $20 and only used 6′ for $6 thanks to poor planning…but we’ll use the leftover chain for another project later on), a pair of o-rings for $2, and a pair of hooks for $2 which we never ended up using. Our original intention was to hang the plants from the ceiling. But we couldn’t find a stud, didn’t want to punch a dozen unsuccessful holes in our ceiling, and decided to just hang them from the curtain rod instead.
The fist step was to drill the holes into the bowl…three equidistant holes. To measure, we wrapped a piece of twine around the bowl, measured the twine length, divided by three and marked the three hole locations on the string. Then wrapped the twine back around the bowl, marking hole locations on the rim, and drilling through the bowl using a bi-metal drill bit slightly larger than the chain width.

And tested a chain link by looping it through the freshly drilled hole just to make sure it fit.

Next up was spray painting time. Since the bowls were super shiny, smooth and glossy AND a round, non-flat surface (which means difficult to sand) I tried something new in finish prep…liquid deglosser.

I was apprehensive at first. I didn’t think that wiping a chemical across a metal bowl would really scuff it up and “degloss” it like sanding would. But oh my word did it work! I am now fully on board the liquid deglossing train and am lining up the projects I can more easily tackle with this stuff!
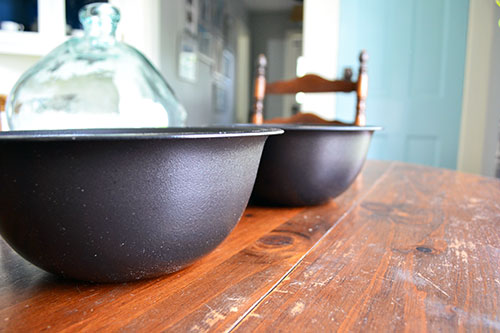
After layering on a trio of thin and even coats of the black, hammered metal spray paint onto the bowls, and letting them dry overnight, it was assembly time.
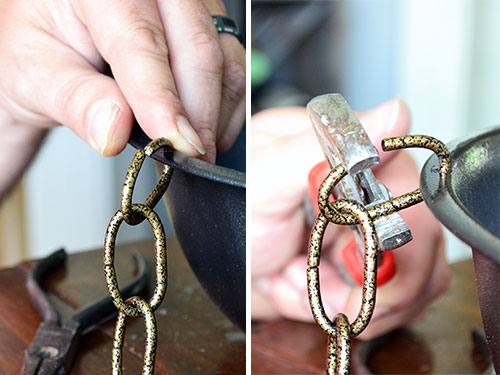
Colby assisted me with the chain de-linking process as he is the card carrying member of the “gun show” and I always buy tickets to that show! Seriously…my man is strong! Using a pair of pliers, he pried apart the chain links so we could attach one end of each chain piece to the bowl and the other to the o-ring.

We used a very precise method of having Colby raise and lower the bowls up against the window, underneath the curtain rod until I found a high/low combo for the planters that I liked. Then I measure the distance from the bowl to the hanging point on the curtain rod at an angle to simulate the chain angle hanging from the o-ring, center point. The planters ended up being about 15 chain links for the short hanger and 26 links for the longer one.

Then it was a matter of linking the chain through the bowl (and the other end around the o-ring) and closing the links back up using a pair of pliers.
Then we just split open our curtain rod in the middle and looped the rod through the o-ring.

Even without plants in the pots, they were already looking pretty adorable. But they weren’t fulfilling their plant hanging destiny so we had to fill them with green goodness. I had been told by a coworker that if you clip pothos plant stems and stick them in the dirt that they grow. And since our plant was looking a little sad and scraggly, we decided to give it a try. First by clipping the plant stems:

And sticking them into the dirt. Fingers crossed they grow!

With the plants planted, we just looped the plant hangers back onto the curtain rod and gave them a solid drink of water. I’m not gonna lie, it will probably be the only time I water them. Have I mentioned I’m bad at plants?

And now our dining room is looking just a tad bit classier with some dressed up plant hangers going on. Now I want to tackle more dining room projects…like maybe some new/more colorful curtains, or some seat cushions for the chairs, and maybe some art. It just seems like soooo long since we’ve done anything to this room. I think the last project we did in here was turning that corner china cabinet into a hidden closet door. Oh yeah…we really did that and it’s awesome!

So now I encourage you all to go check out the blogs of four of my bloggie colleagues with their amazing Inspired Design Challenge projects. They each are DIY/design super stars, we’re talking Mary Katherine Gallagher smelling her armpits super stars, so you don’t want to miss what they’re dishing out this week.

And because I LOVE a good teaser…here are all of their inspiration pics. But I’m not going to tell you which pic belongs to which blogging buddy because I think it’s fun to make you guess which one belongs to who. I was THAT kid growing up. My poor parents (“guess what I’m thinking, mom” and “dad, guess what we did, no, you have to guess” were my favorite games).
Pssst…Did anyone play along with us this week? If so, don’t forget you can either send us a link to you Urban Outfitters project in the comments section or for you non-bloggers, email it to me at angie@angiesroost.com and we may just feature your awesome project!

Woah, these are awesome! I love how your paired two of them together. I was really looking forward to seeing your reveal—I loved your inspiration image. I’m starting to sense a theme of hanging plants going on in your home : ]
Thanks Jennifer! And yes, now that we have so much excess chain (doh!) I think you may be on to something!
Great idea to use the mixing bowls. It is amazing how you can modify items to work in a completely new way and have it turn out perfectly! I love that about DIY.
Manda @ Our Wolf Den
Thanks Manda! And oh how I love a good repurposing!
I LOVE hanging planters! I was so excited when I saw your inspiration image because I’ve been planning to create some for a while and wanted to see how you did it 🙂 I love how they turned out, and like Jennifer, I think they have so much pop by pairing them together. Yay!
Awww…thanks Lindsay! And they were super easy to make…definitely would recommend. Now I need to go make more!
Love love love this Angie! Great job! xo Kristin
Thanks Kristin!
Really great, Angie! I like the tip about the liquid deglosser. I’m always looking for new tricks to add to my bag! Love it!
That stuff is awesome! You know all those spray painting projects that you forgo because it’s awkward to sand? Liquid deglosser to the rescue! The stuff is amazing…stinky…but isn’t all the good stuff smelly?!
Great idea. I like that you did them in a set.
Awww…thanks Elisa! My attitude…things are always better in pairs!
Great project! Happy plants make happy people! PS I love your Blue door!
Thanks Sherry! Here’s hoping we don’t kill the plants!
What a great idea! I do suggest that you place some rocks in the bottom before adding soil. Will improve drainage and prevent root rot.