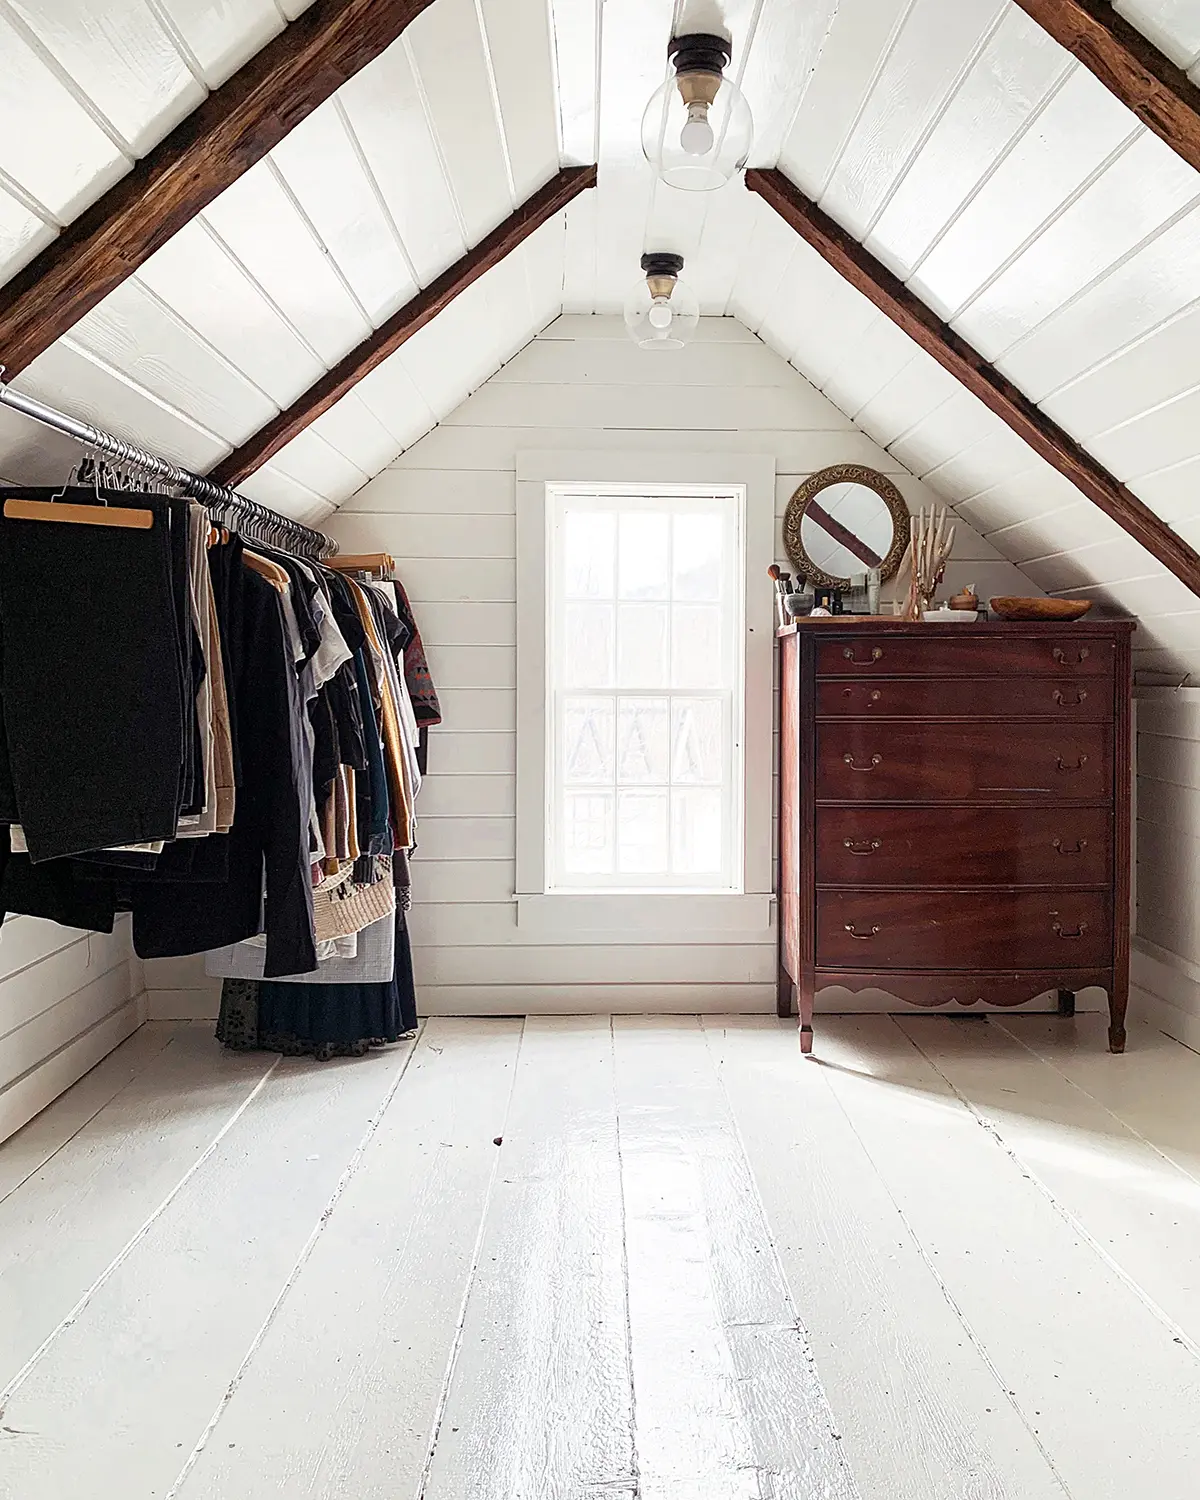
Sometimes, the easiest projects make the biggest impact. This holds true for the simple DIY window plant shelf we made from scrap wood for the attic closet window.
This simple plant shelf project took under an hour of active time to create (painting dry time not included) and made such a big difference in the attic closet.
It’s finally warm enough to move the house plants in here, and as a rare south-facing window in our home, it was the perfect location for a plant shelf. A project like this would be a cute idea for other plant babies like herbs in a kitchen window.
I’ve wanted to make one of these shelves for years and we finally made it happen this week. It seems random to have a plant shelf in a closet, but we only have four south-facing windows in our home (south-facing gets the best natural light, especially in the winter months) so strike when the iron is hot…I mean…the light shines through. And of course, there’s a story behind this shelf.

Why We Built A Plant Shelf In The Closet
I have a terrible habit of focusing solely on the big, forever home types of projects and not on the smaller or temporary projects. The kicker is, that every time we do a phase one project, I always love it and the project ends up staying for many more months and years than I ever planned. For example, the kitchen island was a phase one project that probably won’t find a home when we fully remodel our kitchen but it’s been there for eight years.
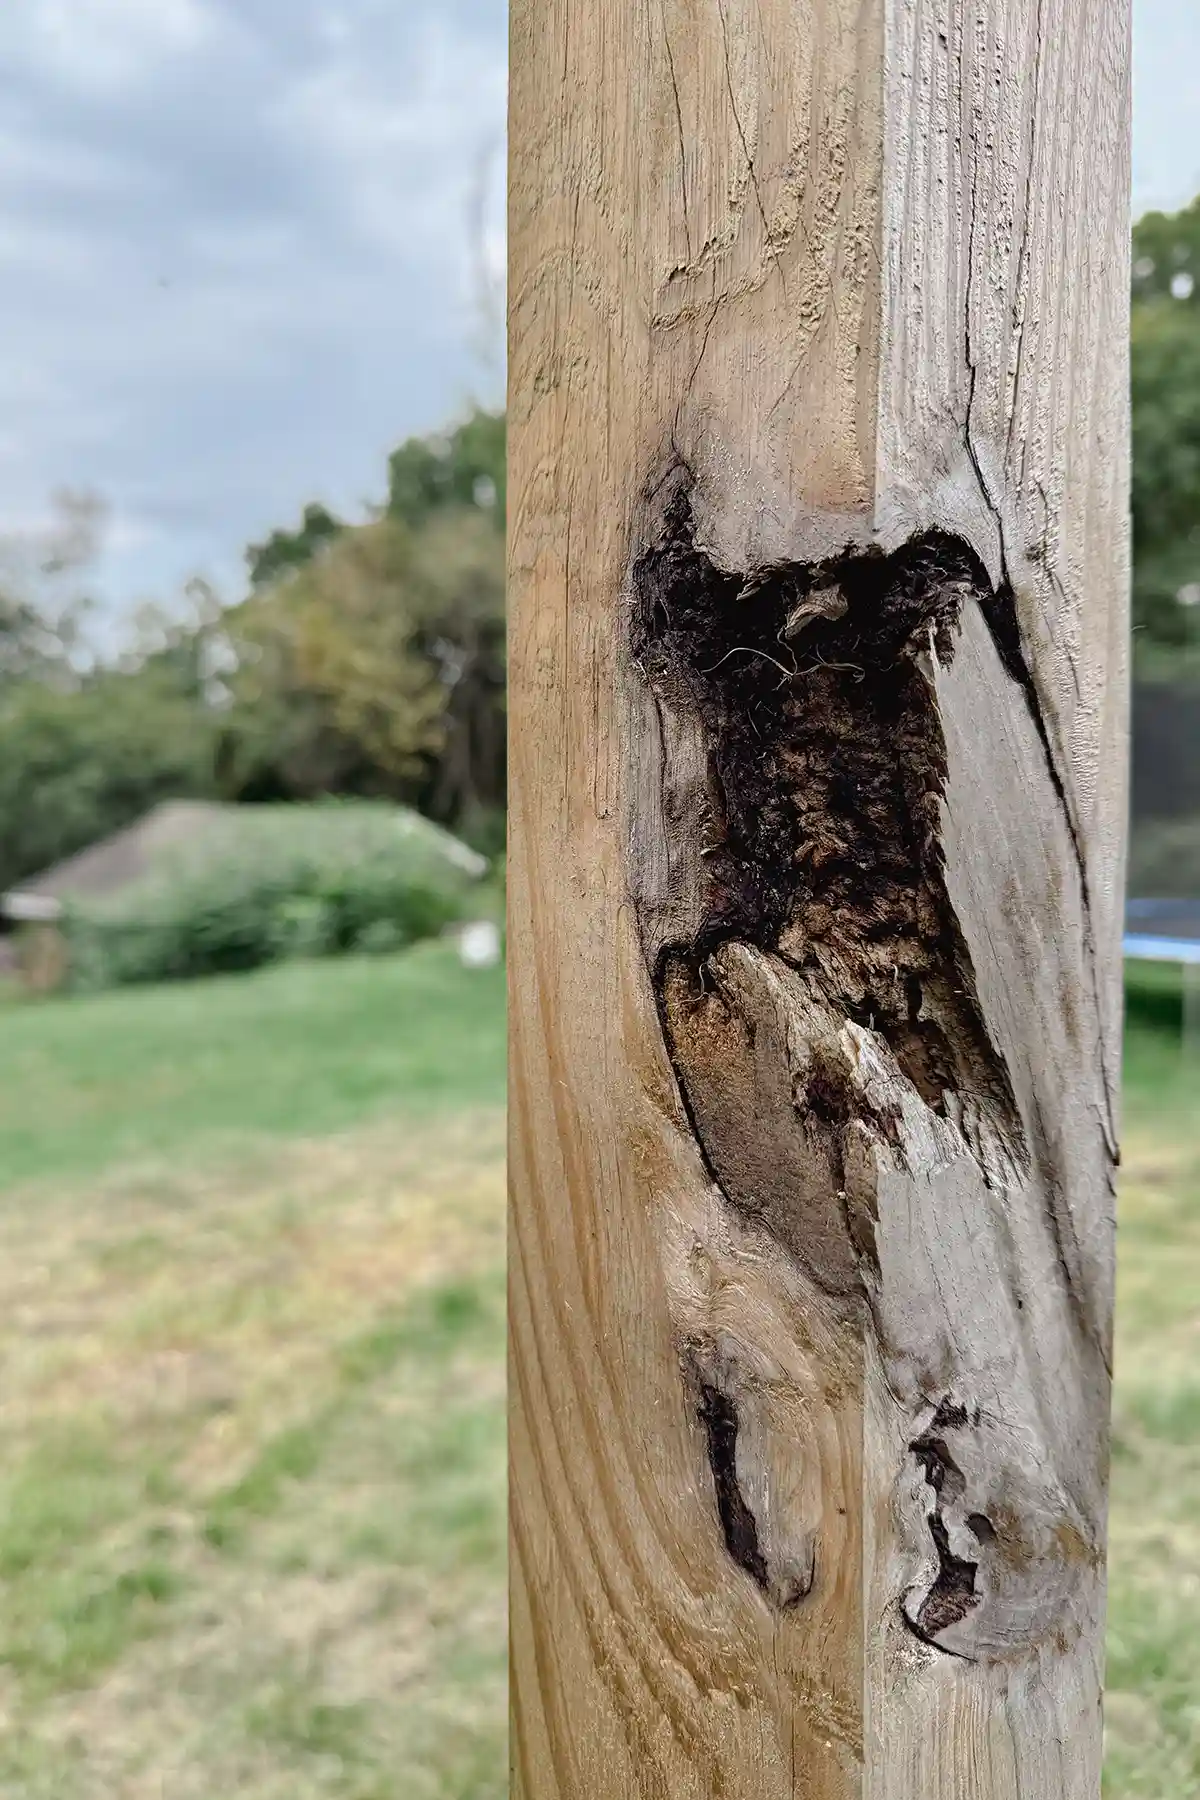
The attic closet window is the next window on the replacement list. We’re saving every penny for a new window and since we want to stick with the same (expensive) Marvin Ultimate windows we installed on the second floor, it will cost us a lot of pennies.
The durability of the current attic window scares the snot out of me. Let’s just say a strong wind pushed the window in this winter. We’ve repaired it as best we could but it still scares me especially because it’s so close to the ground and we have small children who think the window sill is a good place to sit.
I have a theory that if the window sill is full of plants and there’s a plant shelf just above those plants that are ALSO full of plants (are you following?!), maybe a certain toddler won’t fall out the window. In my anxious mothering mind, it’s another line of defense after screwing the window solidly in place, keeping the kids out of my closet, and supervising all second-floor toddler playtime.
Ultimately, when we replace the window with something operational and more durable (fingers crossed it will get replaced before winter), we’ll nix the plant shelf for a different window treatment.
But enough about anxious mothering minds and wild toddlers, let’s build a DIY window plant shelf, shall we?!
How To Build A Window Plant Shelf
Supplies:
- Pieces of Wood (scrap wood works well)
- Fine Grit Sand Paper or Sanding Block (Home Depot)
- Fine Grit Orbital Sanding Paper – Optional (Home Depot)
- Trim Head Screws (Home Depot)
- Small Hole Filler (Ace Hardware)
- Primer (Home Depot)
- Semi-Gloss Paint (Aubuchon)
Tools:
- Tape Measure (Home Depot)
- Miter Saw (Home Depot)
- Orbital Sander – Optional (Home Depot)
- Drill (Home Depot)
- Drill Bit (Home Depot)
- Paint Brush (Aubuchon)
- Level (Home Depot)
- Screwdriver Bit (Home Depot)
Determine Window Shelf Size
A few things went into determining the size of the window plant shelf. First was the size of the window frame. I didn’t want the shelf to stick out very much. I envisioned a small shelf in front of the window flush with the window trim.
Next was the size of the indoor plants I planned to place here. I needed a good spot for small plants propagated from our other house plants. I’ve been working on my house plant green thumb and propagating new plant babies has been one of my latest endeavors.

Measure Twice Cut Once
This is a great project to use up some scrap wood. We used leftover pine boards from a previous project to build the shelf and wood brackets. Wood scraps rarely get tossed from this household (hashtag wood hoarders) so it’s always fun to tackle a scrap wood project.
Next, we measured the distance between the window frames and also the depth. For our project, the space between the sides of the window is 23.5″ and the depth of the frame is 3.5″.
We cut the pine board shelf to fit flush in the span between the window frames. So it’s a 1 x 4 board (actual size 3/4″ x 3.5″) cut to 23.5″ long.
We also used a scrap piece of wood for the shelf brackets. These brackets were cut down just shy of the depth of the window frame. Along with a tiny angled cut for more visual interest. This meant that the new plant shelves would have a tiny overhang over the brackets but not much.

Pre-Drill
For the next step, we opted to pre-drill the window shelf but this isn’t necessary when using trim head screws with zip-tips. Pre-drilling helps prevent the wood from splitting and is necessary with many types of screws. Hot tip…check your screws to see if pre-drilling is required.

Sand Rough Edges
The next step was sanding any rough edges, focusing especially on the front of the shelf. An orbital sander with fine-grit sandpaper attached, I’m using 150 grit here, makes for a super quick sanding process. But if you don’t have an orbital sander, a piece of fine grit sandpaper or a sanding block works well too.

Prepaint Shelves and Brackets
You could skip this step and paint the shelf in place if you wanted, but I much preferred to prepaint the shelf board in particular.
I could foresee it now. Me gazing longingly from the garden outside the window into my attic closet, dreaming of trading in my jeans for those cozy leggings that are my mom-iform and I see it. The unfinished back side of the plant shelf peeks out from behind the window grills. Prepainting wins.
I gave the plant shelf and the brackets two coats of primer and two coats of glossy white paint, letting each coat dry for a few hours before adding the next coat. I fully let them dry for 48 hours before installing the pieces in the window.
Secure The Brackets
Securing the DIY window shelf to the frame was super simple. It’s a similar process to attaching wall brackets.
First, we attached the brackets to the shelf by screwing straight through the pre-drilled shelf into the bracket lined up below using the appropriately sized screwdriver bit. Also, make sure you’re screws aren’t too long!

I measured and marked the brackets’ location, considering any taller plants that would be sitting on the window sill.
After marking, and enlisting Colby’s strength, we wedged the shelf into position. I may have also given the window grills and framing another coat of paint while I was painting the shelf and that extra paint made for a tighter fit. Hence the “wedging.”
I double-checked the levelness of the wedged-in shelf. Although, in our old house I take levelness with a grain of salt. Sometimes things that ARE level look out of level because most things in our home are unlevel.
The shelf was just a tiny bit unlevel but it lined up well with the window grills so good enough wins.

Then we screwed the shelf brackets into the window frame using two wood screws in each bracket. One wood screw on each side didn’t feel like quite enough to support the weight of the plants and prevent twisting.

Wood Filler and Touch-Ups
The final step was filling the screw holes with wood filler, letting the filler dry, sanding it smooth, and touching up the shelf with another round (or two) of glossy white paint. And scene.
Colby, a salesman for Marvin Windows who often performs service calls on windows, swears by this 3M High Strength Small Hole Repair product. He claims it’s the closest in shade to Marvin white for all those Marvin window owners looking for a good repair product. Plus it has an applicator and sander on it for an all in one product.

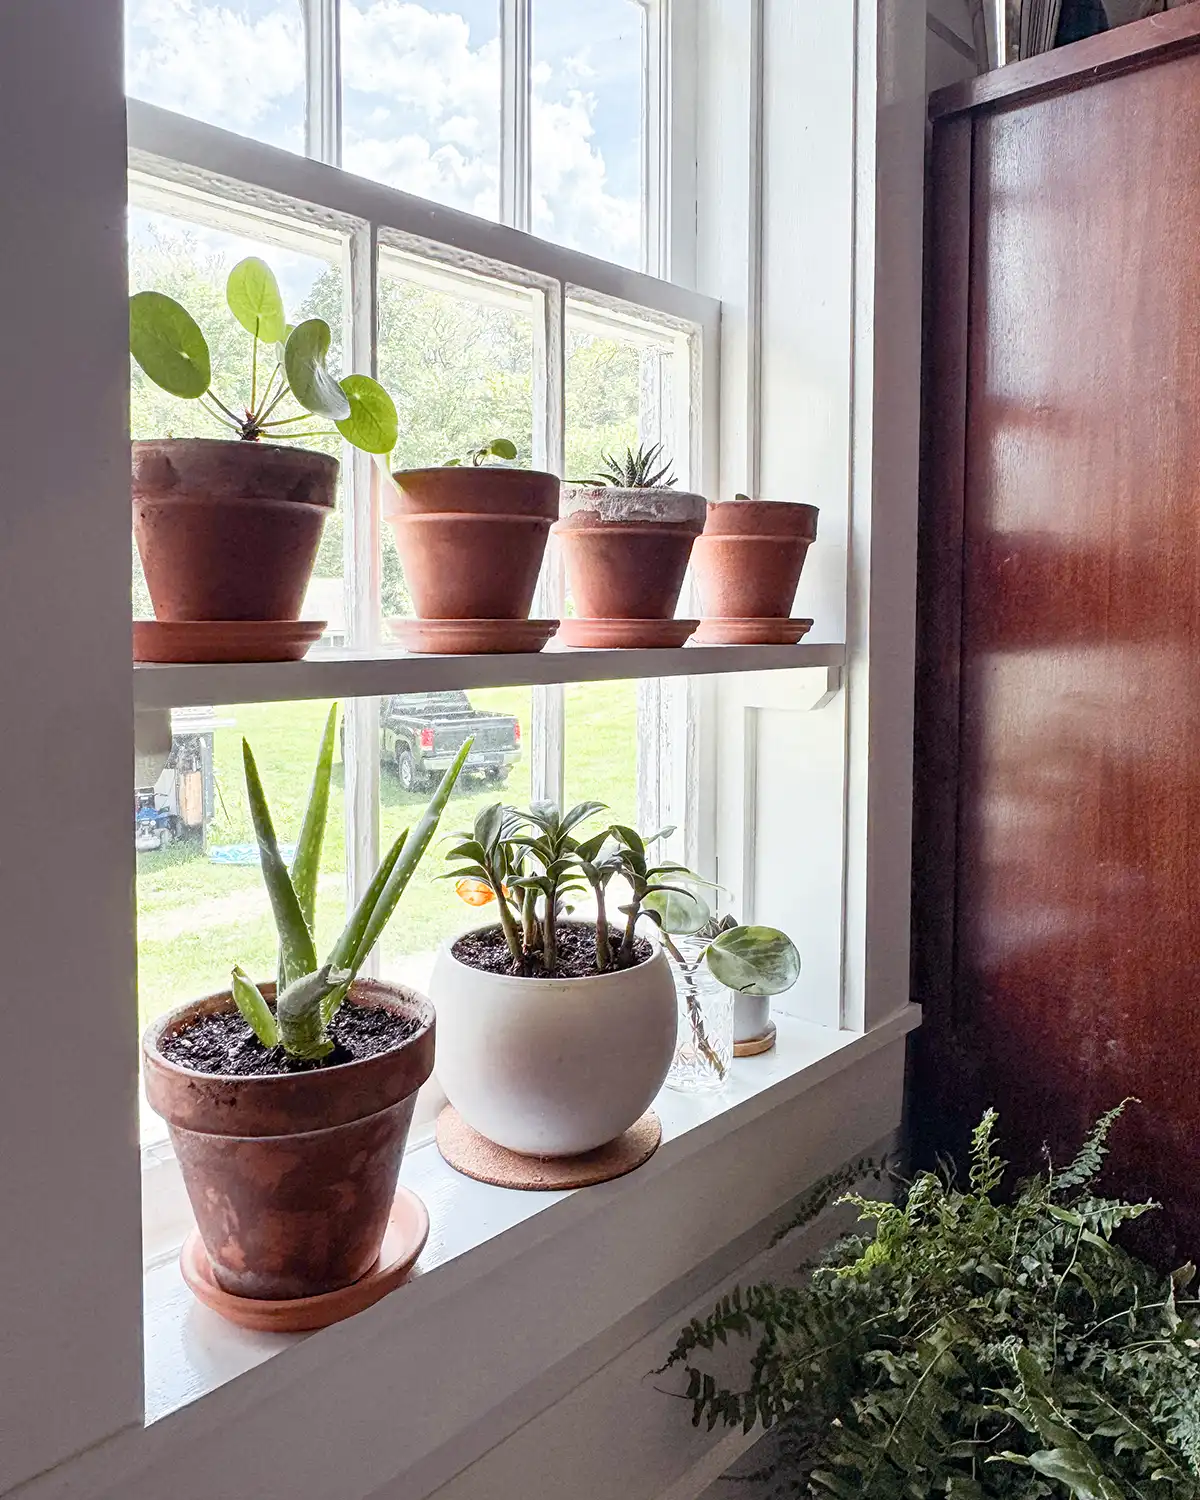
Finished Shelf For Plants
And there you have it, a finished DIY window plant shelf.
Here’s a view of the naked window shelf from the top down so you can see where there is still a space between the window and the shelf. It’s the perfect amount of space for curved and tapered plant pots.

Total cost of the project…wait for it…zero dollars and zero cents. You can’t get a better DIY project cost than that! I mean, if you didn’t have scrap wood, leftover paint, or any of the other supplies, then yes, the project would cost a bit more.

Now let’s see how long it takes before the kids decide to rearrange my plants. Or steal them for their rooms. Both happened within hours of adding a slew of plants to our primary bedroom.