Last week, we played the big tease card and revealed to you our absolutely amazing mirror makeover. It was a builder grade mirror that we gave the little West Elm-ish treatment to and turned it into something like this:
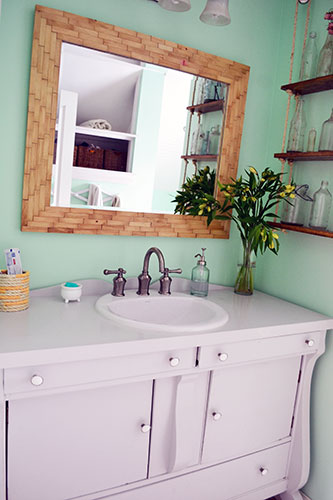
But to fully appreciate the mirror makeover, you need to know that it used to look like this:

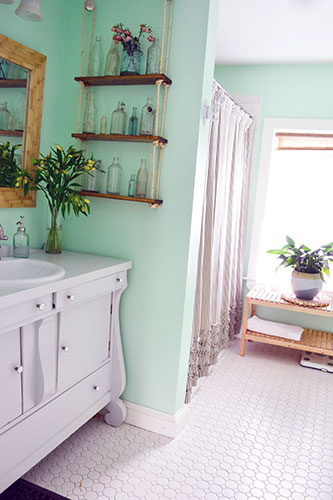
Our bathroom has come a long way, no?! So now it’s time for the “How To” behind the mirror makeover. I have to admit, the project was super easy AND it cost us a whopping $5.00 for a piece of pine to build the frame. Other than that, the project consumed scrap wood and materials we had hanging around our workshop. The first step in operation mirror makeover was un-assembling the old mirror which basically involved removing a ba-gillion tacks from the old frame before we could remove the mirror. Pliers became our new best friend in tack removal.
The game plan was to build a basic mirror frame, almost identical in size and shape as the old one except that the front surface would be flat. That would create a nice foundation to essentially tile wood “bricks” onto the face of the frame. So Colby got to work replicating the frame in pine. The first step was measuring…both the inside lengths and the outside lengths. Then cutting the pine boards to the same size using the mitre saw.
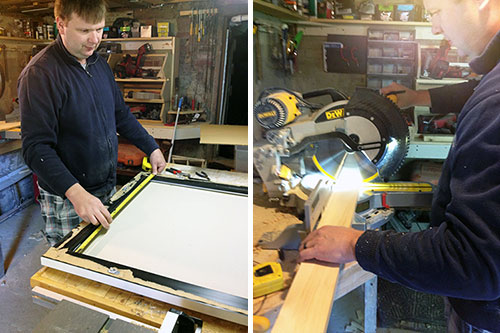
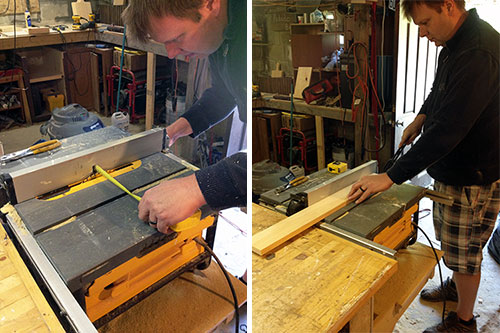
Since mirror frames are typically beveled (you know…so the wood frame holds back the mirror and keeps it from falling out) the next step was beveling the wood frame pieces. We are lucky enough to have a sweet a** table saw that allows for adjusting the depth of cut. After Colby measured the recess depth on the old frame, he adjusted the table saw to that depth and ran each frame piece right through the saw.
The final step in frame assembly was attaching each of the pieces together, which Colby quickly whipped through using his handy Kreg Jig.
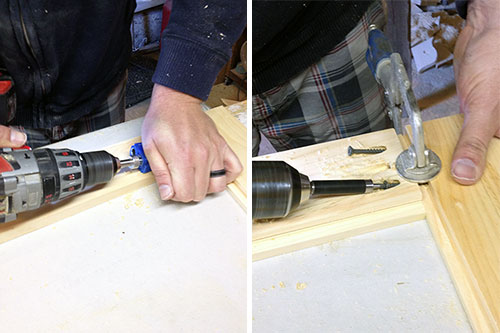
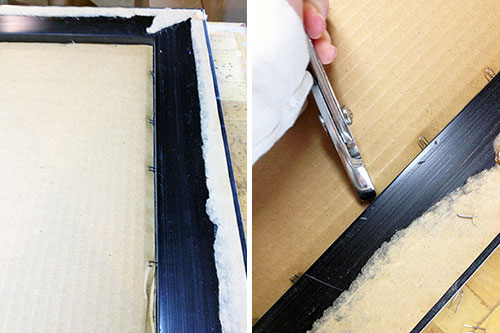
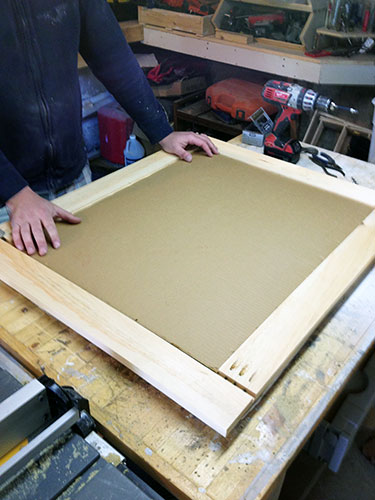
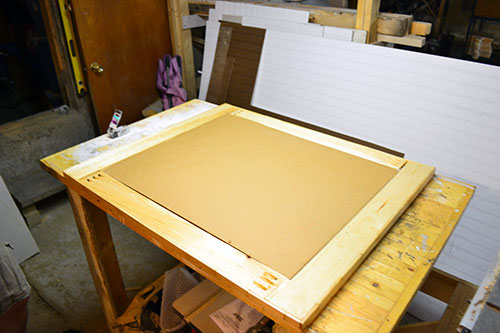
Thankfully, when we tested out the mirror to see if it (and the cardboard backing) would fit, everything pieced together seamlessly and no mirrors fell out of their frames. Note in the pictures above and below…you can see that we didn’t do 45 degree cuts. If we were painting the frame, we probably would want to go the 45 route. But since we were covering up the entire frame with wood tiles anyway, it didn’t really matter for us and we chose the simple, non 45 degree route instead.
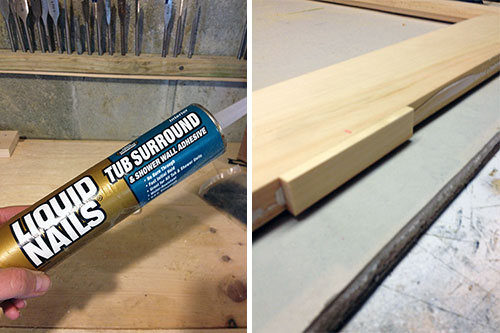
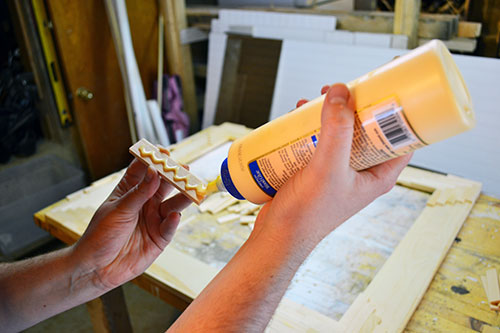
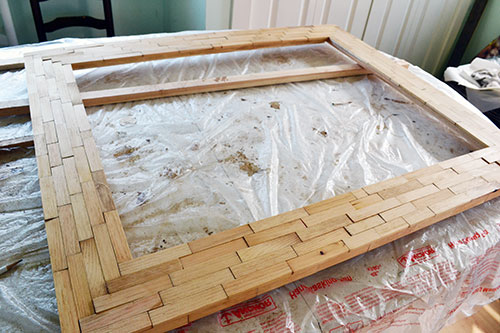
Despite taking approximately 200 pictures of the project (I wish I was kidding…apparently I’ve taken out my “it’s raining and can’t spray paint” aggression out on my camera), I didn’t take a single pic of how we made the wood tiles. But here’s the run down…scrap wood cut to all the same height and width…cut pieces off of scrap wood with mitre saw…all at the same depth. The tiles ended up being 3/16″ thick, 3/4″ tall, and 3″ in length. Next came the fun wood tiling part. We broke this part up into two segments. First up, we used construction adhesive to glue tiles around the sides of the mirror frame. Why construction adhesive and not wood glue? The wood glue doesn’t dry nearly as fast and isn’t nearly as strong. We feared these tiles would slide right off the frame before they fully dried thanks to our dear friend Mr. Gravity.
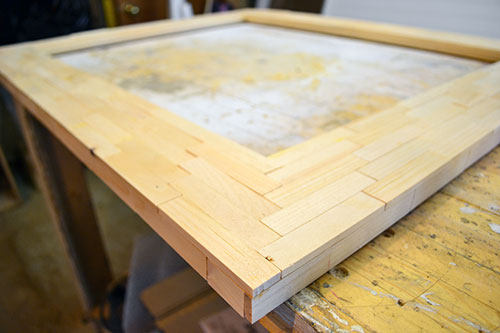
After tiling all the way around the frame and letting it dry for about 24 hours, the next step was wood tiling the face of the frame. We had two tile pattern designs in mind for this part. On the left was the “start in the corner” method which staggered the tiles slightly kind of like steps. This method looked great at the corners but in the middle we would need to get a little creative about how the tiles would come together. The pattern on the right was the “start in the middle” method where the tiles were laid more like bricks, splitting the tile above and below it in half. This method looked great in the middle but the creative part would come at bringing the ends together.
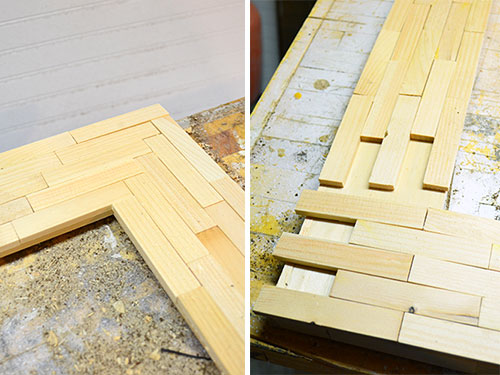
We ended up choosing the start in the corner method since we liked how the corners looked the best. After choosing the design, we laid all our tiles out, made a few custom cuts (we’ll get to that in a moment) and started gluing away, starting at the corners. This time around, we used wood glue…copious amounts of wood glue.
So here’s what I mean by the middle gets wonky.

Because we started in the corners and worked our way to the middle, the pattern didn’t quite line up. And by “quiet line up” I mean it REALLY din’t line up. So we got a little creative and chopped a few pieces here and there and came up with a pyramid like pattern for the middle of each side, the top and the bottom. But see below how nice the corners turned out?! Swoon!
After all was glued and dried (we left it for another 24 hour dry time), it was stain time. Since I’m mildly obsessed with my new lightening stain technique, I brought it out again for the mirror frame. This time I went with about 1 part stain to about 3 parts mineral spirits, mixing it in a Red Solo Cup. Toby would be proud.
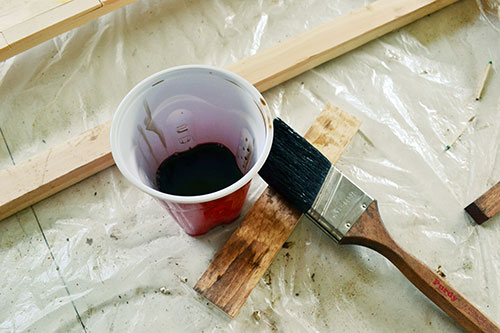
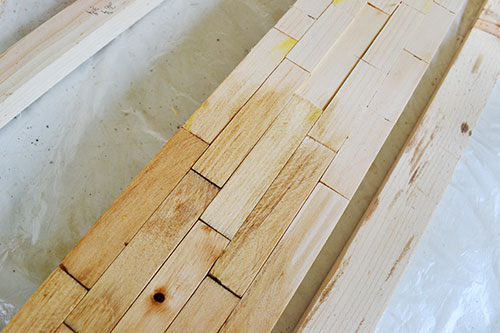
But not too proud because apparently either the stain or the mineral spirits is not Red Solo Cup appropriate because eventually the mixture ate right through the cup and made one serious mess. Note to self…don’t do that again. The pic below gives you an idea of how light the stain ended up. It just gives the wood a hint of color but nothing too overbearing or saturated. It’s like a nice little wash.
After letting the stain dry for awhile, I slobbered on a couple coats of water based poly and let the entire frame dry overnight. This is the point in the project where I fell mad in love with the frame and couldn’t wait to hang it up. Seriously…I wanted to make out with it in the truck while Boyz II Men was playing in the background.
The next day it was back to the workshop to re-assemble everything. Back in went the mirror…back in went the cardboard backing.
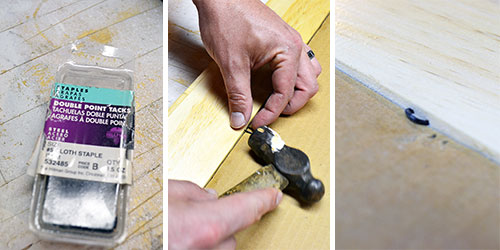
We had a package of tacks on hand, pretty much the same ones that we took out of the frame while un-assembling it, and tacked the cardboard backing into place using a small hammer.
As for the hanging hardware, we just recycled it. The hanging hardware easily unscrewed from the old, about to the go to the dump mirror frame. Colby was smart enough to measure their exact location and reinstall them at the same location on the new frame. This prevented us from having to move any hanging hardware already in our bathroom wall. I would never have thought of that. Colby is mildly genius…sometimes.

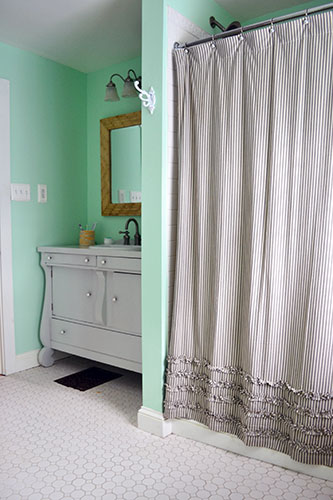
Then back up to the bathroom the mirror went. I’m really liking how nicely the mirror fits into our new, minty bathroom. AND how (more importantly) it upgrade our sink nook from builder grade boring to West Elm charm awesome (FYI…the mirror frame was inspired by those West Elm wood tiled night stands which you can read more about that back here). Although, now it has me questioning whether or not the light fixture above the mirror needs upgrading. Now it’s the boring element in the space.
Isn’t it funny how sometimes an element seems so right until you change something else and upgrade it (like our mirror) and once that used to be ugly thing is no longer ugly, something that looked okay before now is the “ugly thing”. That’s how I’m feeling about the light fixtures in our bathroom. I’m already scheming up ideas.
As for what’s left on the good ol’ bathroom makeover to-do list, here’s what it’s looking like these days:
Find a dresser/buffet to convert into a bathroom vanity(we found a buffet on Craigslist for $75)Hack up said dresser and paint it(vanity hacking post here and here during installation; the vanity is painted Gray Owl by Benjamin Moore which you can read about here)Demo out the old “temporary” vanity that had been in our bathroom for nearly three years and patch the sheetrock(vanity demo go boom…note…Colby challenge me to spoof the KFC “Game Day Bucket Go Boom commercial in every post…challenge accepted)Prime and paint the bathroom wall a cool, minty color(we painted the bathroom Mantis Green by Benjamin Moore)- Add bead board above the built-in shelves and paint the bead board and the shelves glossy white (for shame that we haven’t yet painted the bathroom built-ins…it’s been three years!)
Build a first aid cabinet for the space above the toilet paper holder(we didn’t build it though…we found it…for six bucks…here’s the post)- Organize, organize, organize!
Build shelves for the blank wall space beside the vanity(that would be the rope pulley shelves)- Build another shelf, maybe one out of driftwood, to hang over the back of the toilet
Find or DIY some interesting towel hooks(read about that here)- Finish off the space by hanging a little art and accessorizing here and there (I’m sensing some Etsy art I’ve been drooling over in our future!)
Makeover the builder grade boring mirror- Patch the cracked ceiling (kind of broke it while working in the attic) and paint it
- Replace the light fixture with something fun and less boob-light-like
Oh…so…close! Until next time…Angie…out! Pssst…okay HGTV star fanatics, did you watch last night?! I was kind of sad to see Abby go. I would have kicked off Borris first, he kind of creeps me out.


Wonderful makeover! I really like the color choices of your new bathroom. So beachy and natural, yet vibrant. Everything coordinates perfectly!
Ooooh…thank you! I’m glad you picked up on the beachy theme! That’s what we were going for in a not cheesy/obvious way.
Love the mirror. Can I ask where you got the shower curtain ? Love it too !!!
Thank you! And absolutely you can ask about the shower curtain! And I’ll send you an email just in case you don’t check back here. The shower curtain came from Pottery Barn last summer as a wedding gift. Here’s a link to it: http://www.potterybarn.com/products/ruffled-ticking-stripe-shower-curtain/?pkey=cshower-curtains& It’s the vintage ticking strip ruffle shower curtain. Hope this helps! And for the record, in case you’re considering it, we LOVE it! So worth every penny (or every penny of our wedding guests’)!
Love the mirror idea. Came to us at a perfect time, just as we were looking for a unique mirror solution…
I was wondering if you could share the measurements of the wood used for the frame? It seems to have fit perfectly with the small wood bricks around it.
Ooooh…thanks! Absolutely I can share the dimensions. Outside: 37″ x 31″ Inside: 29″ x 23″ Wood tiles: 3-3/4″ x 3/4″. Hope this helps and let us know if you have any other questions!
Oh my, I just love everything about your whole bathroom! My bathrooms are so sorry and sad and… beige. They need some love like you have given yours!
Also, I work with Cassity at Remodelaholic scheduling guest features. We would LOVE to feature you, and your bathroom, and your awesome mirror! I typically email, but I couldn’t find an email address for you… If you’re interested in being featured, will you drop me a line at hello@remodelaholic.com and we can discuss the details? Thanks!
Eeeek….so excited! Totally emailing you now! Thanks for the sweet comment! And seriously…if you saw the before pic of our bathroom it would make your beige bathroom look amazeballs!
Love your makeover!
Could you please tell me the faucet maker/model?
I saw your bath makeover in This Old House Magazine October 2014.
thank you… love your blog!