When our eldest was two, family members gifted us their children’s old outdoor playground. We were oh so grateful because have you seen how expensive playgrounds are?! It’s your run-of-the-mill, basic backyard playground with a climbing wall, swings, and a slide. But at 15+ years old, the playground was hurting. And now almost five more years later, it’s hurting even more.
We vowed to make over the playground and turn it into something magical. But since the last remaining swing broke this week, we are tackling the DIY playground modifications NOW.
We’ll share the entire playground-building slash modifying journey, but this blog post focuses on the backyard playground plans for modifying the old playset. Along with some other backyard playground ideas.
Sourcing Free Playground Equipment
We are perpetually on a budget around here, especially with DIY projects. One of our favorite ways to stretch a small budget is upcycling. We’ve converted old buffets into vanities, turned an old trunk into a console table, and refinished countless pieces of furniture. All for pennies compared to how much it costs to buy something comparable new.
The same is true for playground equipment. There are opportunities out there to find free or inexpensive playgrounds. Some examples include asking family and friends, scouring the Facebook marketplace, or even perusing your local community’s listserv or community group. Free and cheap playgrounds are out there.
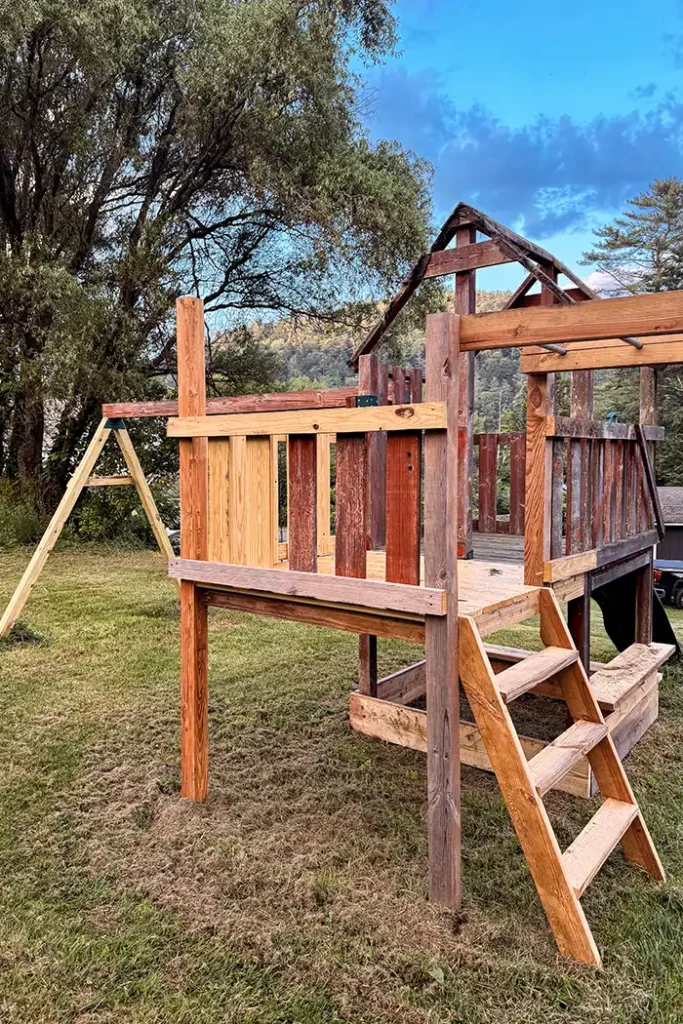
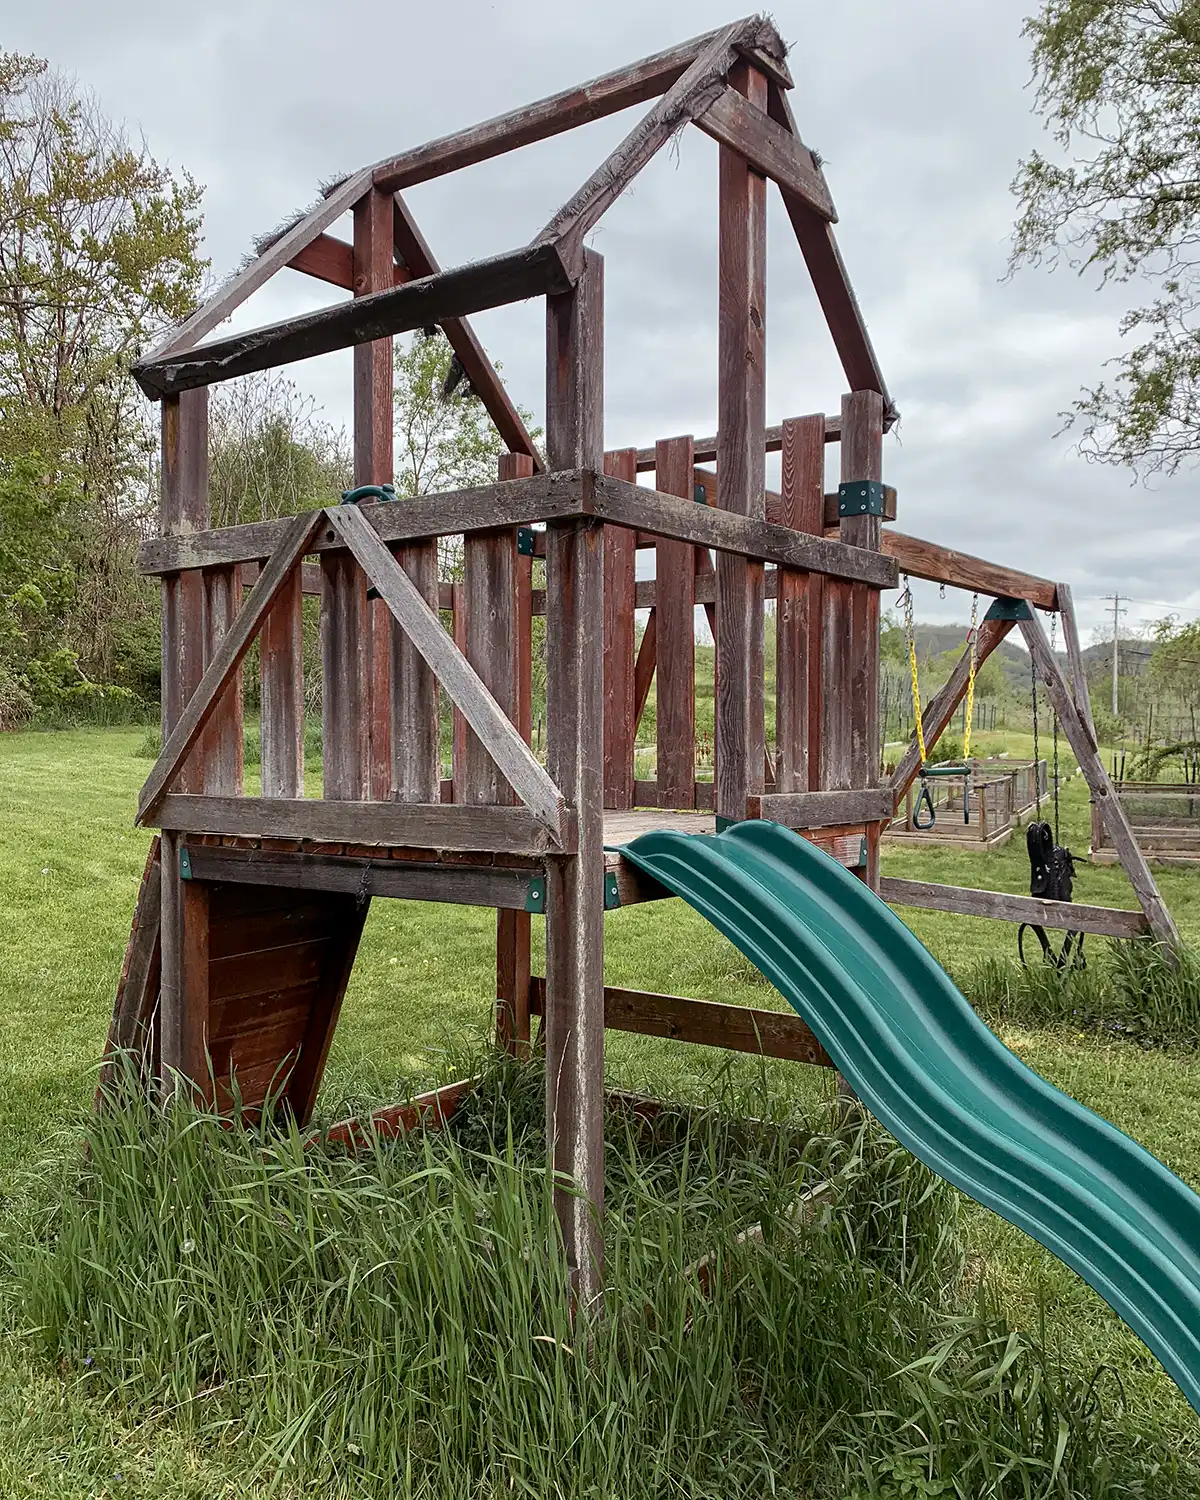
The Current State Of Our Free Playground
Here she is in all her unglamorousness. Although, these pictures are a year old. I took them last summer when we thought that we could get to the playground refinishing. But alas, it did not happen. Just envision the same playground with just a little bit more wear and tear. Oh, and no swings.

Before we put together our playground plans, we took time to figure out what our kids love and use on the playground. We did consider their requests. But sometimes what they say and what they do are completely different.
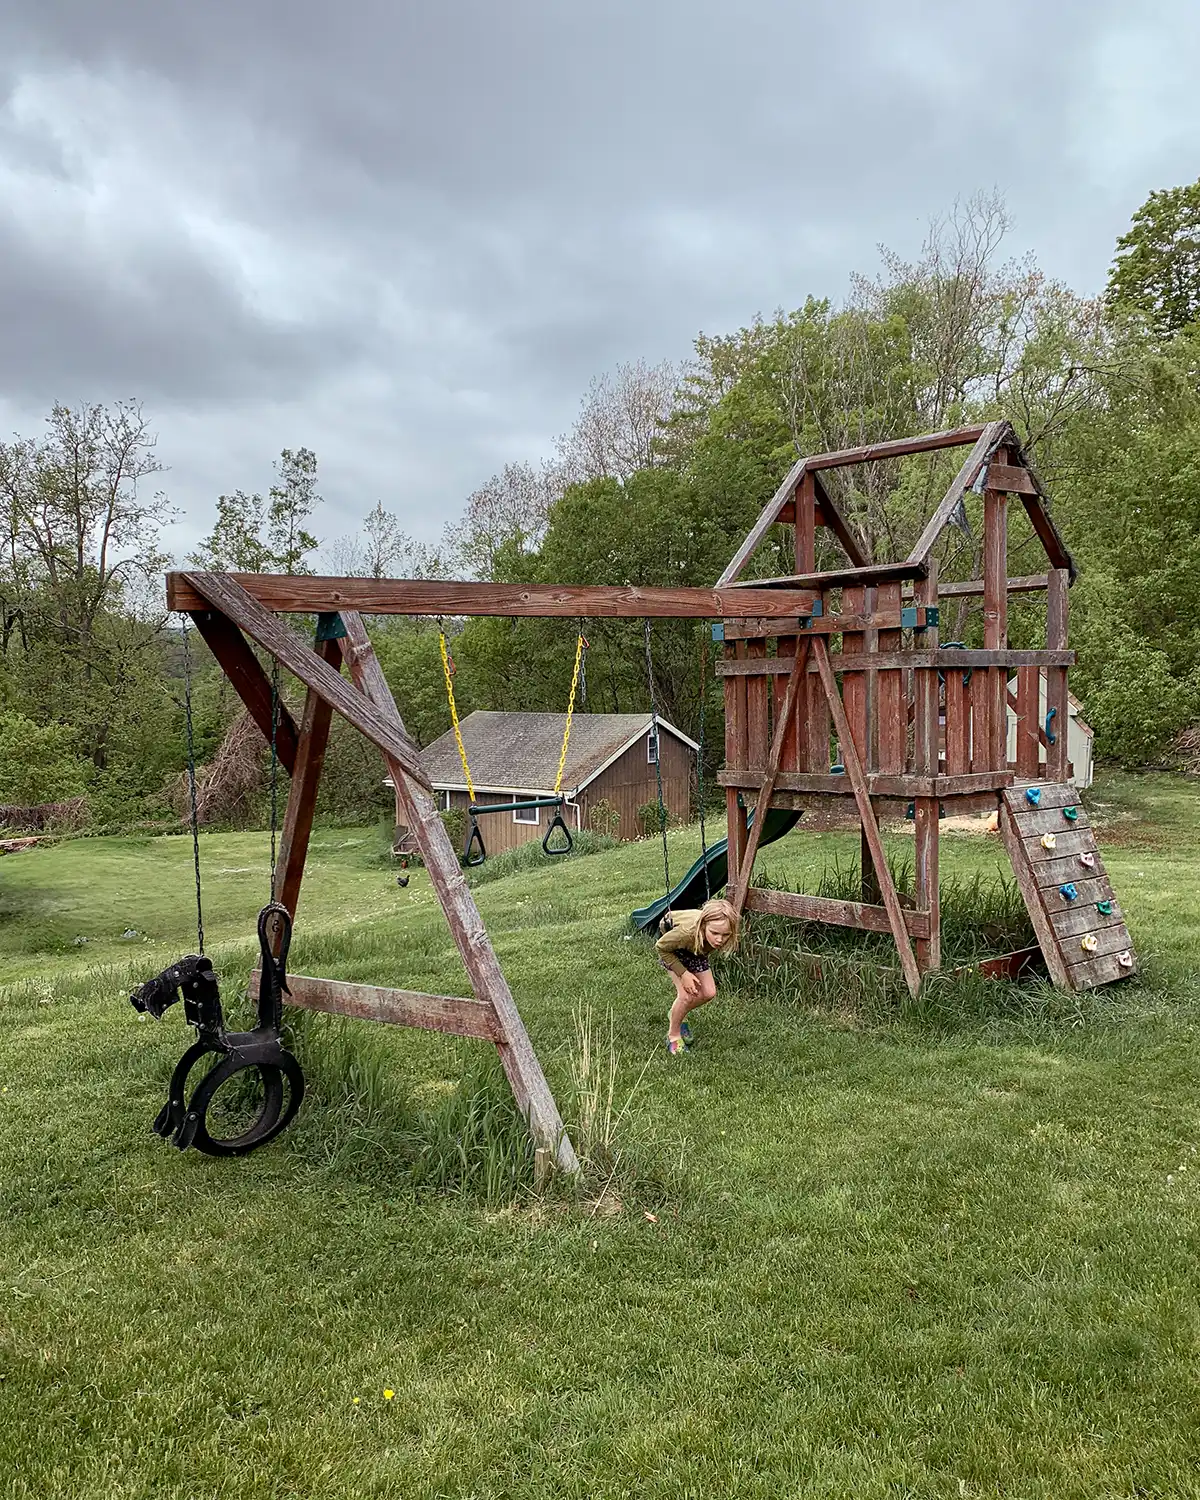
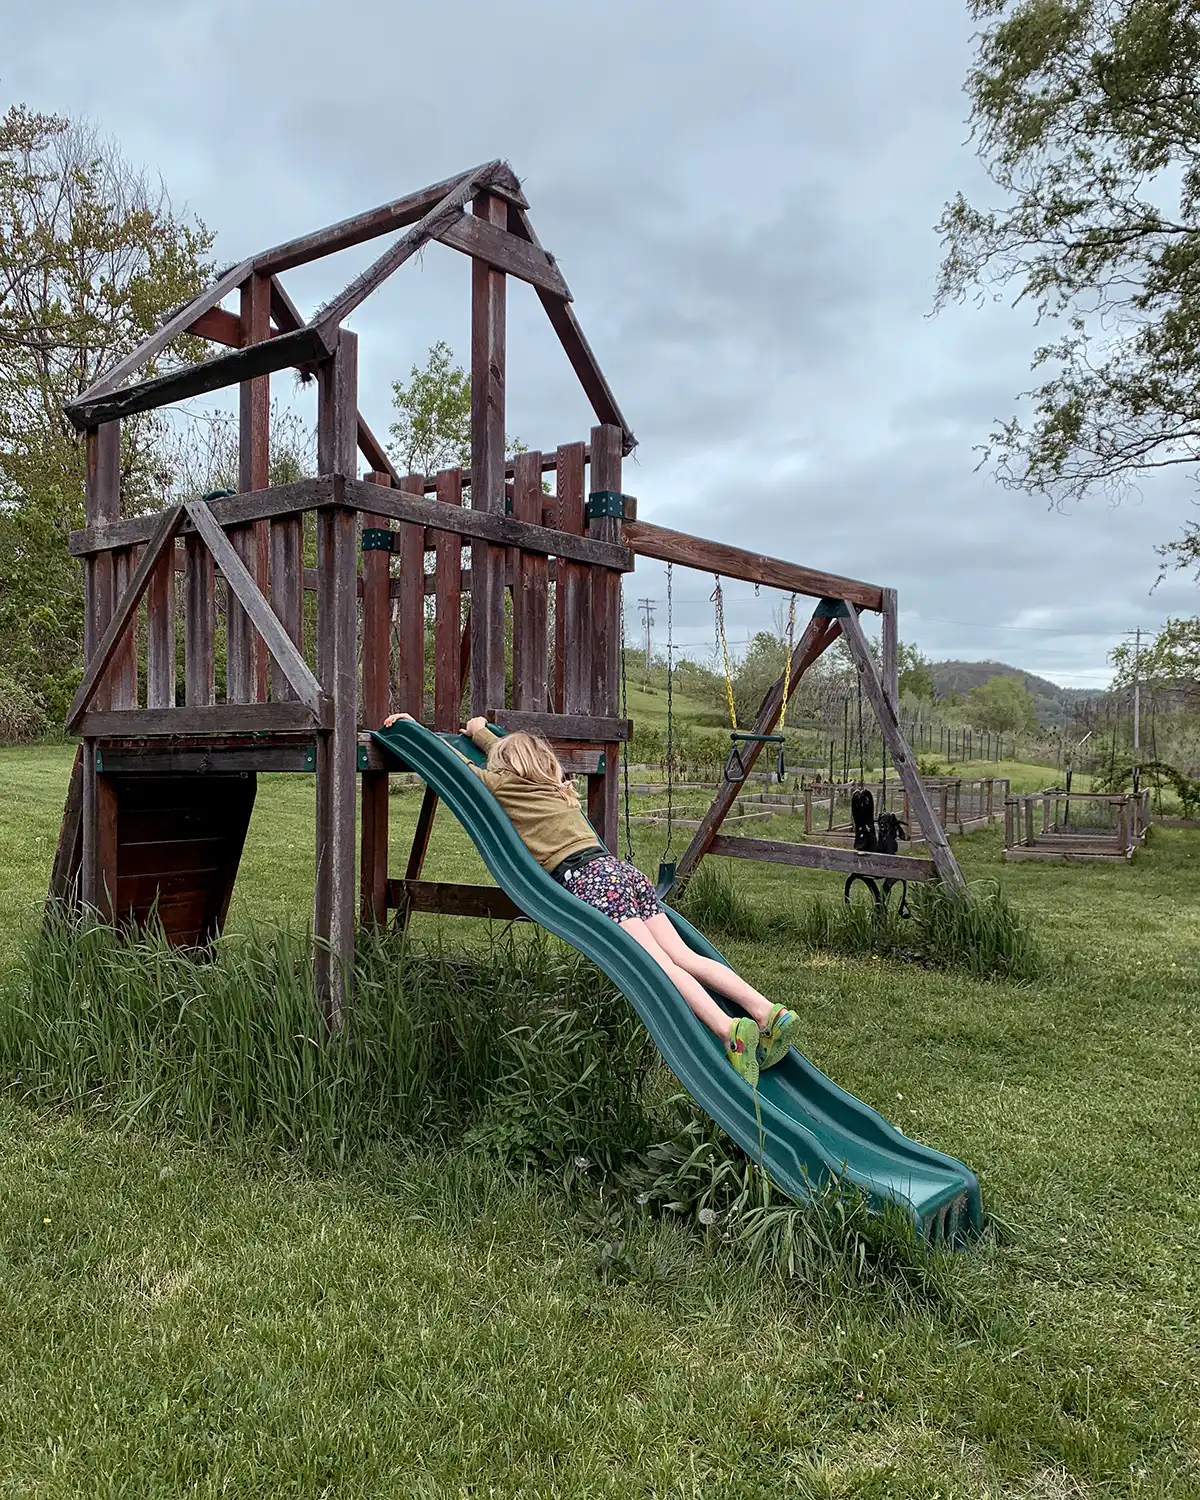
The playground keepers (aka the things the kids play with): the tire swing (another family hand-me-down), swings, trapeze bar, deck area for pretend play, and the slide.

The playground stumbling blocks (aka the things the kids avoid): the rock wall and the space underneath the playground deck. They mostly don’t play underneath the playground because it’s always filled with grass that needs good mowing.
I want to take a moment to talk about rock walls on play structures. I feel like just about every playground has one and (my personal opinion) I don’t think they’re always age-appropriate for the kids. Hear me out.
When our kids are/were little, they can’t climb the rock wall but love the slide. So we often repeatedly pick them up and place them at the top of the slide.

Then when they’re older and can climb the rock wall, the slide is no longer as appealing because it’s so small. They prefer climbing UP the slide as opposed to DOWN. I feel like the poor rock wall is pretty useless. To each their own, it may be great for you, but it’s been a bust for our children.
The Children’s Playground Modification Requests
I touched on this when we shifted last year from modifying and building onto the playground to turning an old shed into a playhouse. The biggest requests from Rowan, our eldest at age seven, are for monkey bars, a deck so she could have “rooms,” and a hammock for reading underneath the deck.
Bea, currently age 2, has no requests but the girl does love to dig in the dirt of my raised garden beds. Since they’re filling up fast and I fear for my seedlings’ safety, a sandbox is high on the priority list of playset plans.
Custom Backyard Playground Plans
After much deliberation, measuring, and toiling away in SketchUp (Colby…not me…I prefer the likes of Photoshop), I present to you our DIY playground plans.

Random sidenote. We couldn’t figure out for the life of us how to add a slide and swings to the free version of Sketchup. Just pretend they’re there!
Let’s break down the playground design and dive into the modification plans.
Adding A Deck With A Ladder
One of Rowan’s big requests was to add a deck to the playground. It’s a solid request and I support it. Watching them play, they spend most of their playground time in the structure and as they grow, it’s getting tighter. A little more room to play will be beneficial.
We plan to add some new wooden posts and install deck boards the same size as the existing structure. Thus, when it’s all painted it will look seamless.
The rock wall has to go as well. The kids don’t like it and I don’t like lifting them to bypass the rock wall. I want kids of all ages to climb up and use the slide and replacing the rock wall with a simple ladder is our plan.

There will be fencing around the deck for the two sections without the ladder or monkey bars. I still haven’t decided if we’re keeping the fencing between the inside part and the deck. I’m leaning towards removing it but probably won’t decide until I see how much space is available and what we’re doing for a roof in terms of what support is needed.
Monkey Bars Extending From The Deck
The other big ask was the addition of monkey bars. I tried to talk Rowan out of it, but it’s been almost a year since she asked for monkey bars, so we will make it happen.
When we go to the public playgrounds she has so much fun swinging and traversing across the monkey bars so why not add some to her own playground? It is a great option for a playground addition and we have the space for it.
For monkey bar supplies, we considered finding metal piping the right diameter for small hands with brackets to hold the piping. But then I found extra-long monkey bars on Amazon for a reasonable price that will work for the playground. Easy for the win! Although, have you seen these pink monkey bars?!

Building A Sandbox And Bench Underneath The Playset
Underneath the existing playset structure is a prime space for ground level play. Bonus, it’s perpetually shaded. Since Bea loves to dig in the dirt, we thought this would be a great place for her to dig without disturbing the garden.
The initial sandbox plan is to build the basic box, install a weed barrier, and build a cover for it. I saw some genius sandbox covers for wooden playsets that fold into benches. I love that idea, but the way they work means about a quarter of the sandbox would be unusable. But Colby thinks he has an alternative idea. Stay tuned.

Hammock Underneath The Deck
Rowan may take after her mama and one of her favorite pastimes is lounging in the hammock and reading books. I love this age! But now we fight over Mama’s precious hammock. One idea she had that I’m 100% behind is hanging a small children’s hammock underneath the outdoor playset.
The idea is that a hammock will go underneath the deck, right beside the sandbox. Like this playground hammock inspiration pic. She got a travel camping hammock for Christmas which I’m 98% certain is too big for the space. There may be a hammock DIY in the future.
Replacing The Roof
Once upon a time, there was a fabric roof on this old, outdoor play structure. It’s long gone but remnants of its existence still stand. We plan to replace the roof but the jury is still deliberating how we will replace the roof.

Option one is to add a fabric roof. For the record, I love this idea but Colby hates it. Think, outdoor fabric in a fun awning stripe color that adds a punch. It’s the easiest way to add a cover to the upper level.
Option two is to add a wooden roof with shingles. Colby loves this idea because he thinks it will stand the test of time and last the longest. He’s not wrong.
In the meantime, we’ll be duking it out until the last possible moment. However, this striped wooden roof might be a good compromise.
Modifying The Swingset Section
We’ve waffled over extending the wooden swing set section for more swings or keeping it the way it is but landed on keeping it the same with slight modifications.
We have the space for four swings on this structure. Three on the main part of the beam and one where the beam extends past the supports. Currently, an old tire swing made to look like a horse hangs on the end. To use it, I need to push the girls sideways.
First, we’re planning to move the legs of the swingset to the very end. It’s an easy move just taking the brackets off the main beam and moving them to the end. We may replace one of the legs while we’re at it since it’s a little too rotten.
Then the end part of the swing set is getting a modification so we can turn the old tire swing around so it can swing in the direction it was meant to. We’ll add some more wood framing to support the swing and have a place to hang it, attached to the structure in two spots.

Under the main part of the swing set, we plan on a simple swing for each child, likely heavy-duty belt swings. We don’t want kids fighting over the swings anymore so each having their own swing is important.
We briefly considered building a DIY swing, like these wooden swings hung by a rope. I think it would be really cute. But I’m the only one who likes the idea and the rest of the family voted me off the island.
Between the two swings will be the trapeze bar which is one of the few existing items on the playground that’s still usable and in working order.
The Playset Accessories
Ah…the accessories! My favorite part. There are so many adorable ideas for adding accessories to a backyard playground.
We plan on keeping the steering wheel that’s currently there. Bea loves it, Rowan hates it. Thus, it stays for now but maybe detached later on.
Some other playset accessories we’re considering are a dinner bell, telescope, obstacle course spinner or swinging disc, solar lights, window boxes, and whatever else my children request between now and when the playground is complete.

There was a brief discussion about a bucket with a pulley for bringing things up from ground level to the upper level. Then Colby said, “You know Rowan will try to put Bea in the bucket, right?” Hmmm…he’s not wrong. Let’s just put a pin in that idea.
Sources:
- Solar Lantern (Amazon)
- Megaphone (Amazon)
- Dinner Bell (Amazon)
- Spinner (Amazon)
- Solar Firefly Lights (Amazon)
- Telescope (Amazon)
- Window Box (Amazon)
Painting Vs. Staining Plan
The great painting vs. staining debate. What to do, what to do?
Growing up, our family had a pressure-treated wood playground. It was a fabulous playground and we logged many hours out there. Along with many splinters as the playground aged.
If this was a brand-new playground, I would lean towards staining and sealing the wood. Wood is beautiful.
But since we’re dealing with different wood types, old vs. new wood, painting the playground feels like the best option. We can repair any damaged wood with our favorite wood repair product, sand it down, and paint the entire structure.
The other great question is, what color should we paint the playground?
If it were up to my daughter, it would be bright colors. The brighter the better! But if it were up to me, it would be more neutral to support the bright colors of the playground accessories.
We currently don’t have a huge budget for this project since we’re trying to save for new windows. So we’re going with the cheapest paint route which means using the white exterior paint that’s sitting in our basement.
The paint color is White Dove by Benjamin Moore and it’s leftover from last summer’s house painting adventures. Although we do have more house painting to do this summer but we’ll use what we have on the playground.
Playground Refurbishment Next Steps
So let’s break out the circular saw and power tools and get this DIY playset remodel underway!
In my mind, it won’t take us much time to remodel. Which means, it will probably take us precisely one million hours. Isn’t that the way it goes?
The hardest part is over, finalizing DIY playset plans that everyone loves. Both children, who are at vastly different ages development-wise at ages 2 and 7, are both on board with the plans, along with mom and dad.
When it’s done, we’re one step closer to having a backyard play area zone for the kids with an updated playground, the playhouse next to it (when we finish that too), and we did add a trampoline for the kids this spring. They’re all in a triangular area of our outdoor space, right next to my vegetable garden. So hopefully, it will serve as the kids’ home base for outdoor play while I garden away.
Our next step is to make a cut list, sort through the lumber pile, and figure out the wood we need before putting in an order at the local lumber store. We were hoping to make all the modifications to the playground this past weekend but alas, Mama Bear was down for the count with a fever. But I’m on the mend and hopefully next weekend is the one where we make playground dreams come true.
Posts You May Also Like