What a labor of love it is to have our small bathroom renovation project done! A DIY bathroom remodel is a big endeavor and boy does it feel good to be on the other side of this DIY project. I’ll have so much more to share about this bathroom renovation DIY adventure, but for today it’s all about the project reveal. Let’s get started, shall we?!
Before we dive in, here’s the list of all the bathroom sources in case you’re looking for the link to something.
Our Old Bathroom
As a reminder, here is what our old bathroom looked like in the very beginning.
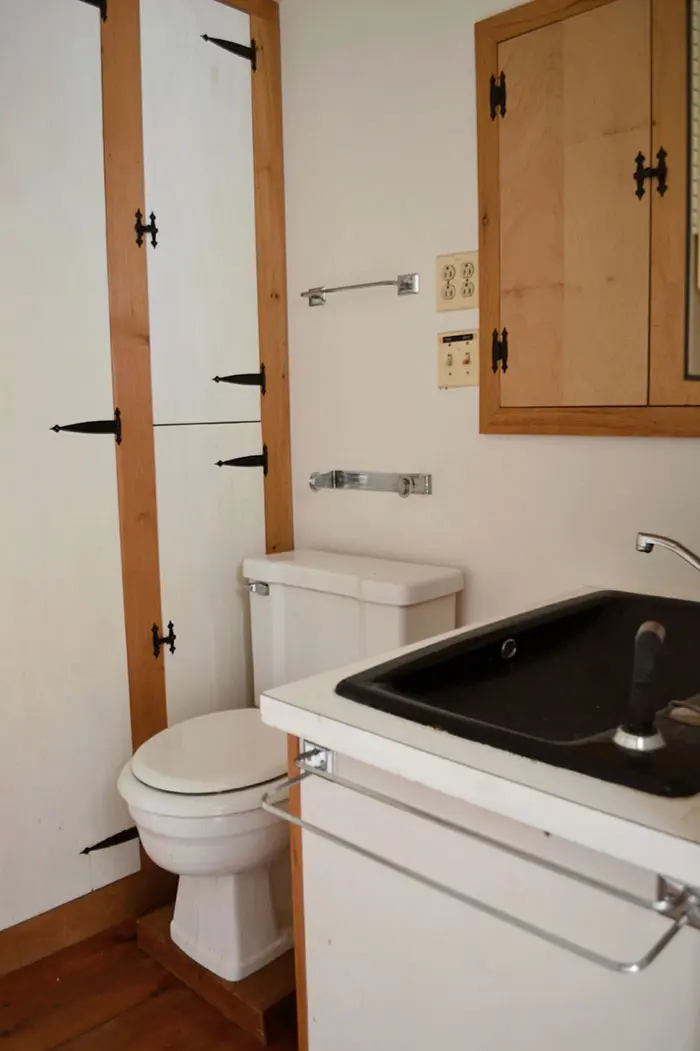
You can see more pics in our move-in day house tour or this DIY bathroom renovation kickoff post.
The only existing materials from our original bathroom were the wooden floor. And no way were we ever going to replace the bathroom flooring since it’s the original wide pine floors in our circa 1781 country home. While yes, if I was starting from scratch or building a new home, I prefer a tile floor in the bathroom but we love our vintage wood floors.
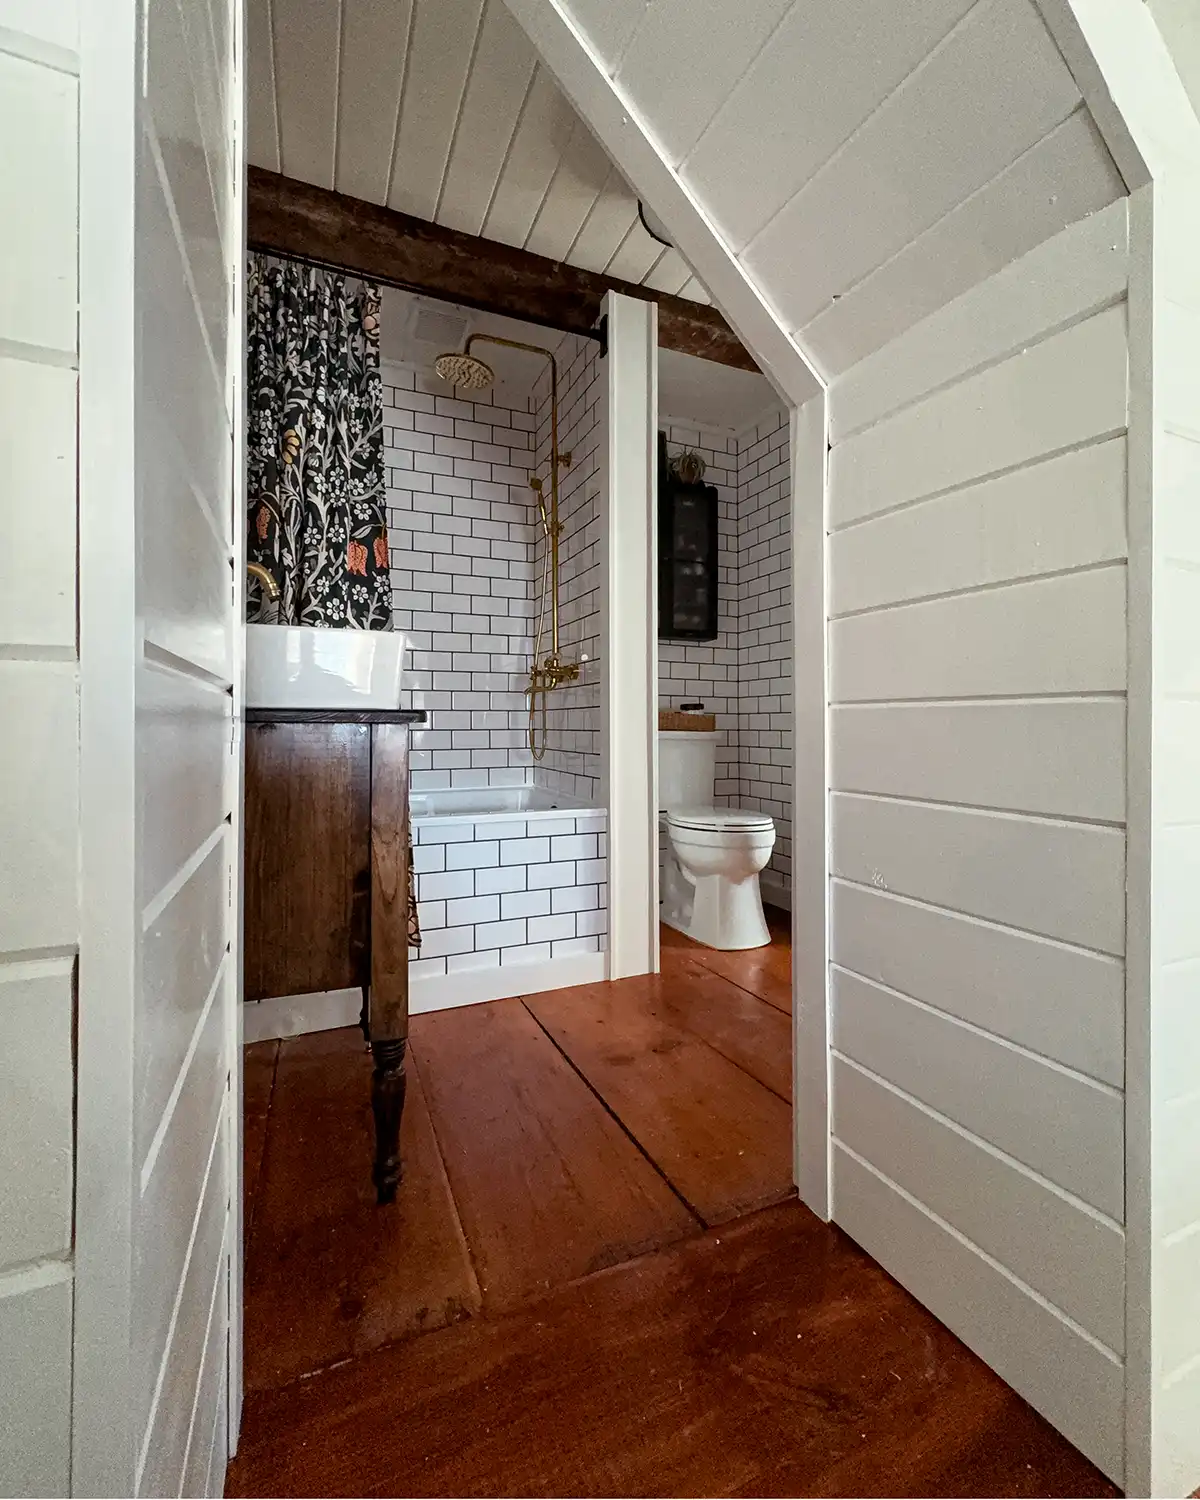
This bathroom renovation DIY project was a full gut job of the small space and one of those slippery slope projects. You know the ones. Six years ago we started by taking out the closet and before we knew it we were creating a walk-in attic closet off the bathroom and fully renovating a bathroom. It happens to the best of us.
Bathroom Layout
Let’s talk about the bathroom layout for a moment (more layout details here). This was one of the hardest parts to nail and the first thing we figured out for this bathroom renovation DIY project.
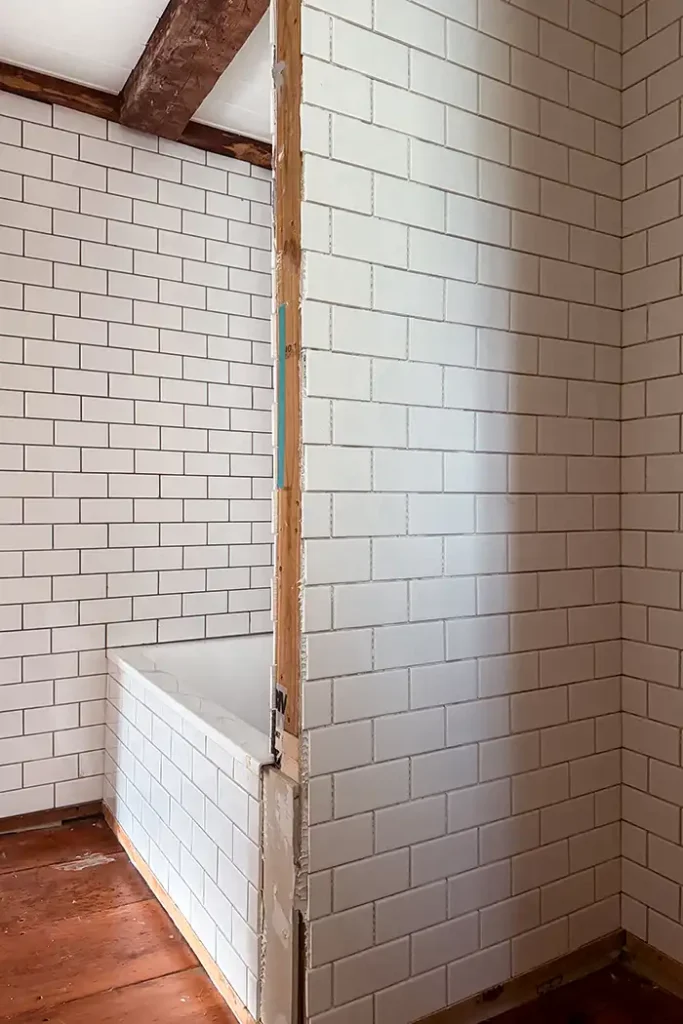
The layout was tricky because of three things. One, turning an already small half bath into a full bathroom. Two, working around two doors in the space. One door from our primary bedroom into the bathroom and a second door from the bathroom into our walk-in attic closet. And three, keeping the bathroom plumbing out of the exterior walls. Two of the four walls in this bathroom are exterior walls.
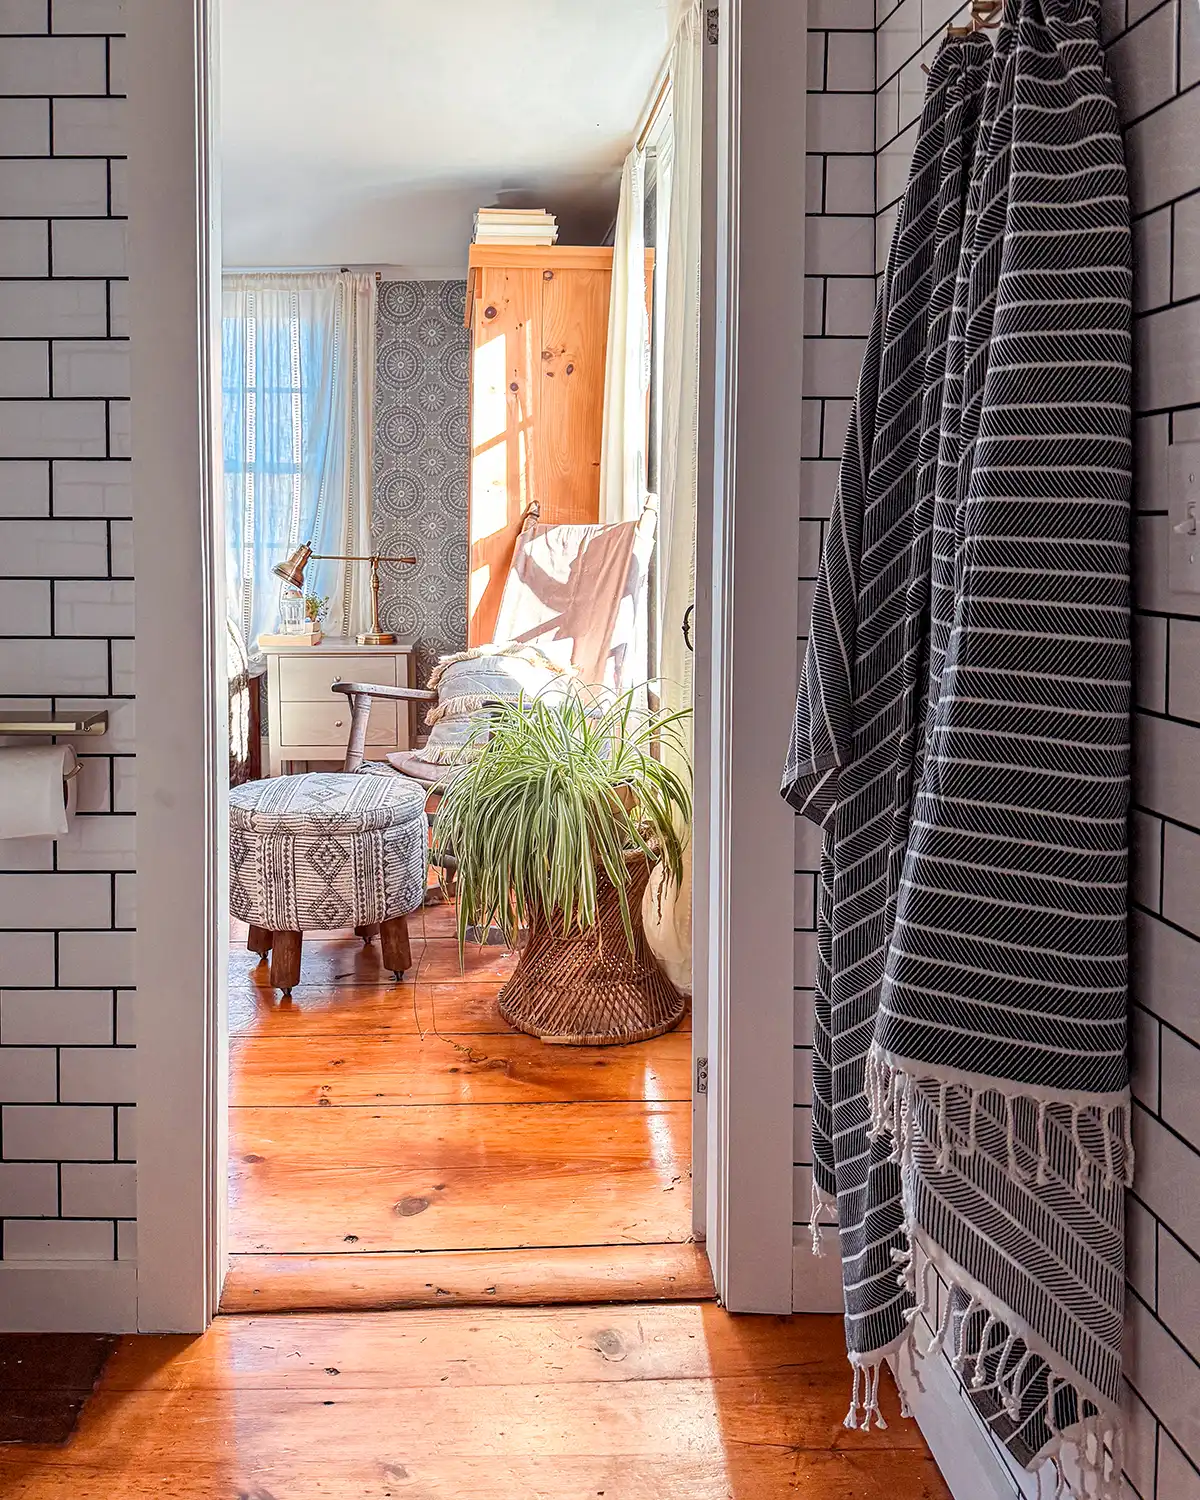
Here’s the doorway from the attic closet to the bathroom:
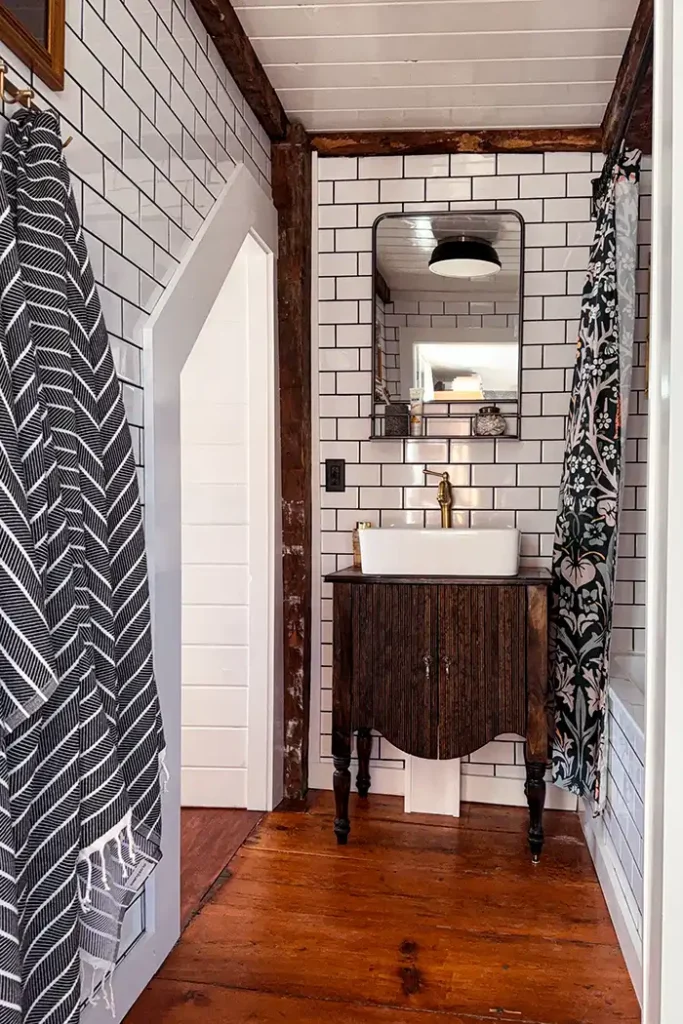
These layout issues meant we had to make some concessions. For example, the DIY bathroom vanity. It sits partly in front of the attic door, which isn’t ideal, but it works for us. I would rather place sink plumbing in the wall and install a wall-mounted sink but alas, this wall is an exterior wall. Our second floor isn’t well heated (old home problems) and we often have frozen pipe problems upstairs.
We also tried to hide the pipes coming up out of the floor under the bathroom vanity. I was hoping the curve on the vanity doors would mask the pipes but it’s still very obvious. So we built a cover. It’s not my favorite, but I like it better than exposed Pex pipes!
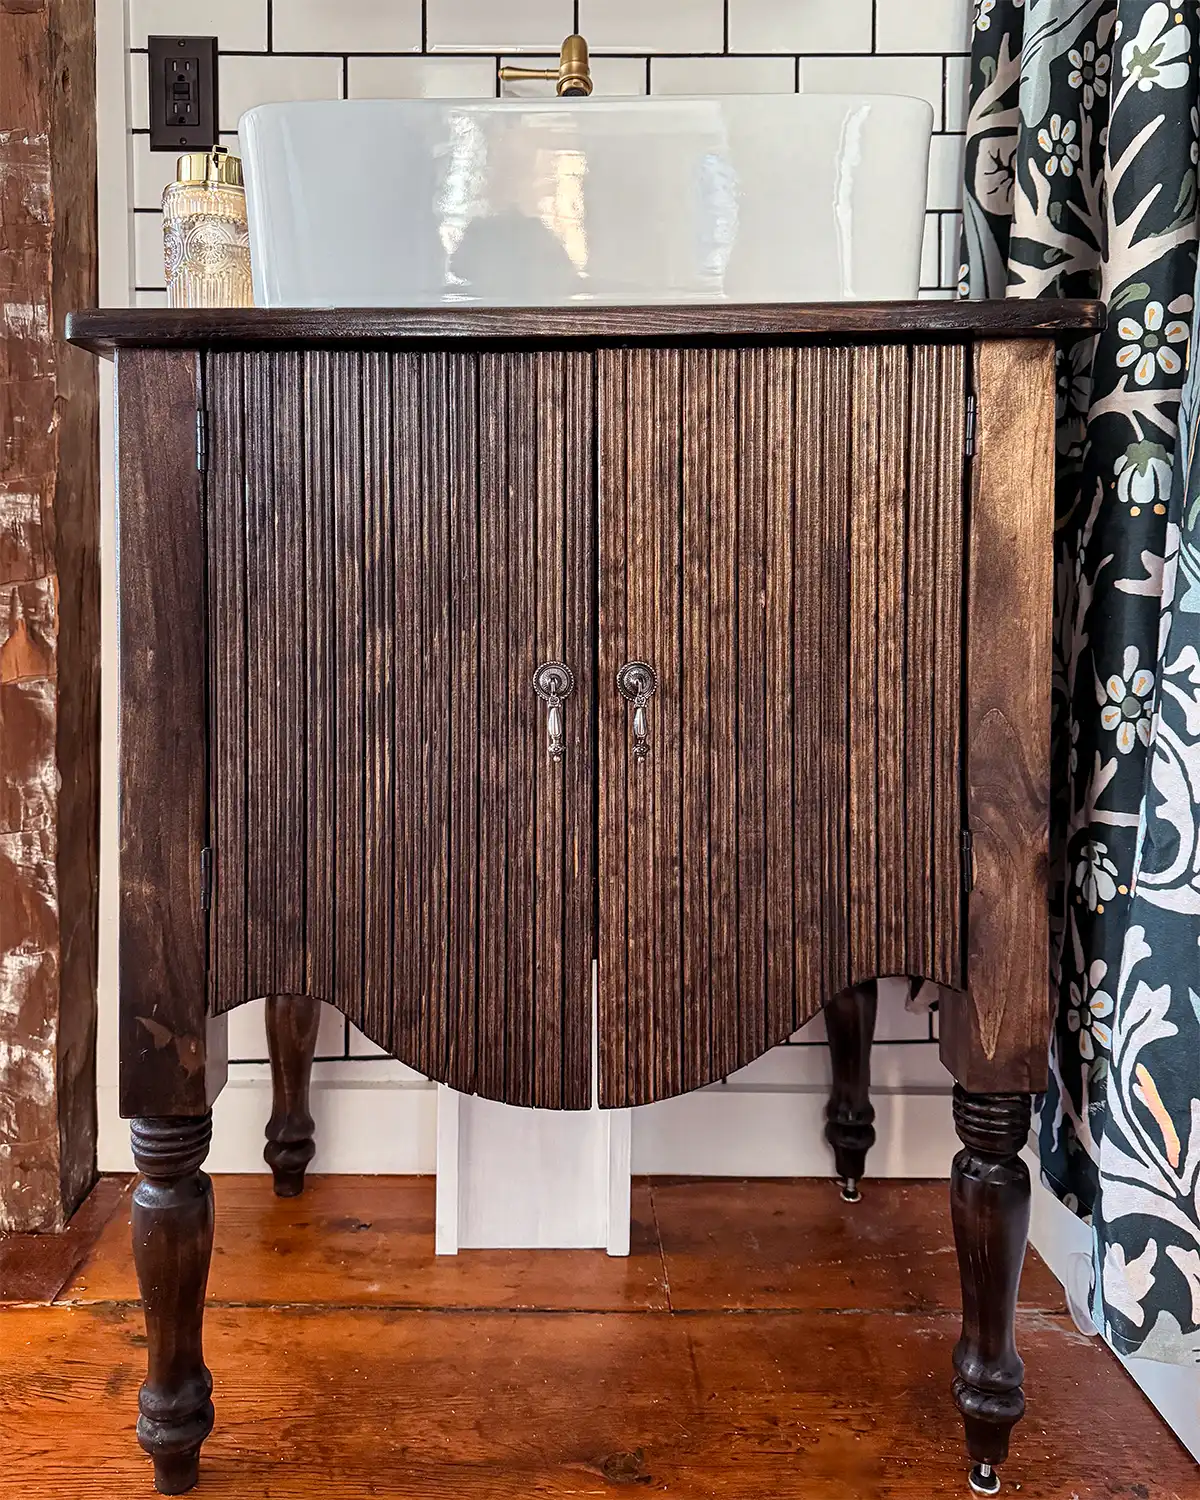
Random sidenote, I’m fairly certain a vanity partially in front of a doorway would not be up to code in most places. So check with your local building code offices if you want to do something similar.
Bathroom Walls
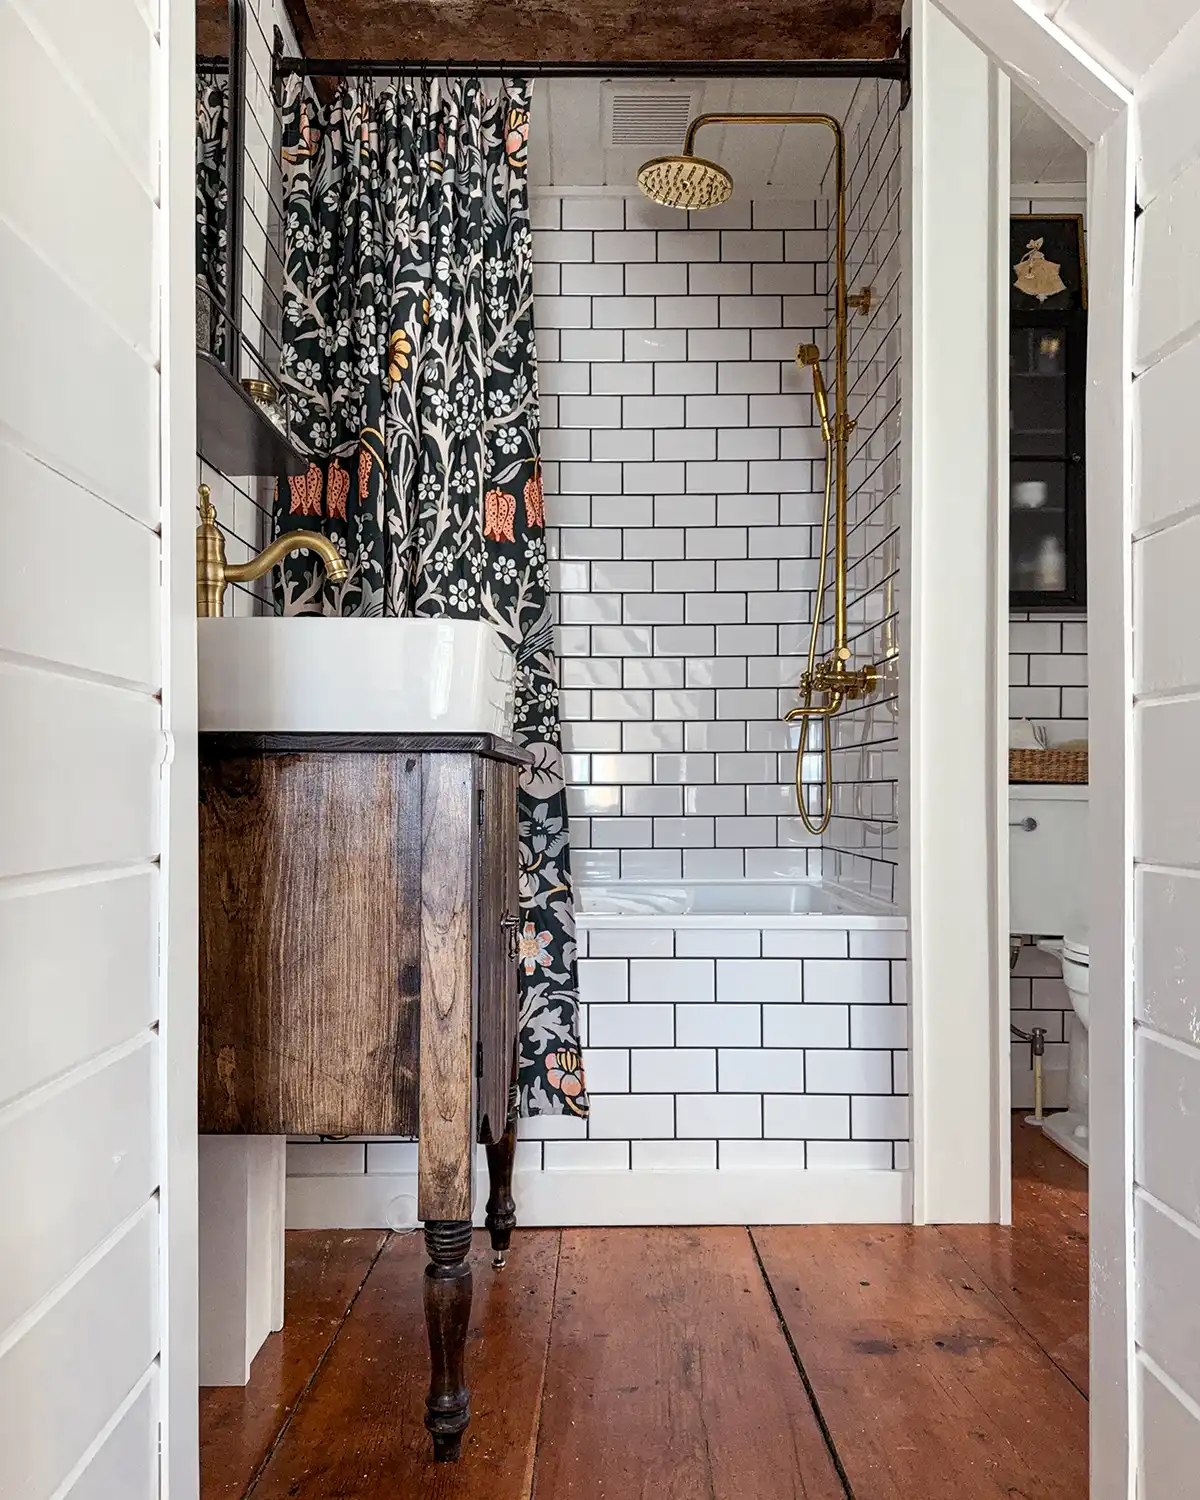
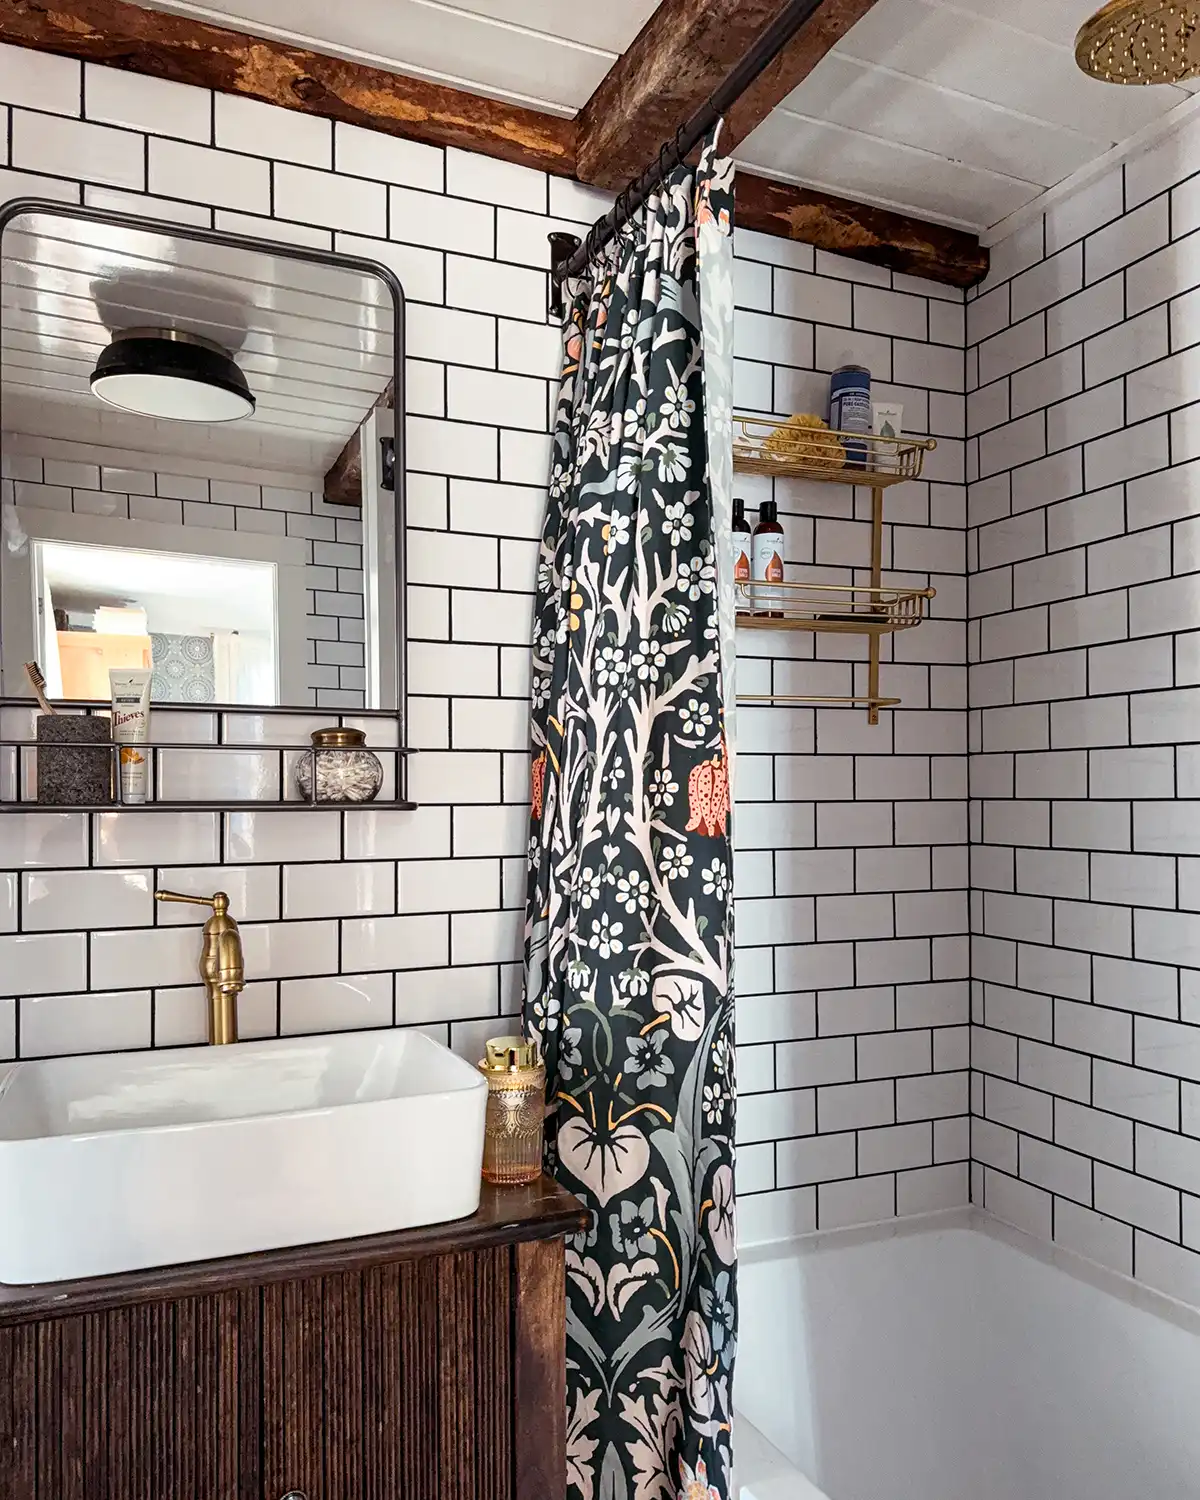
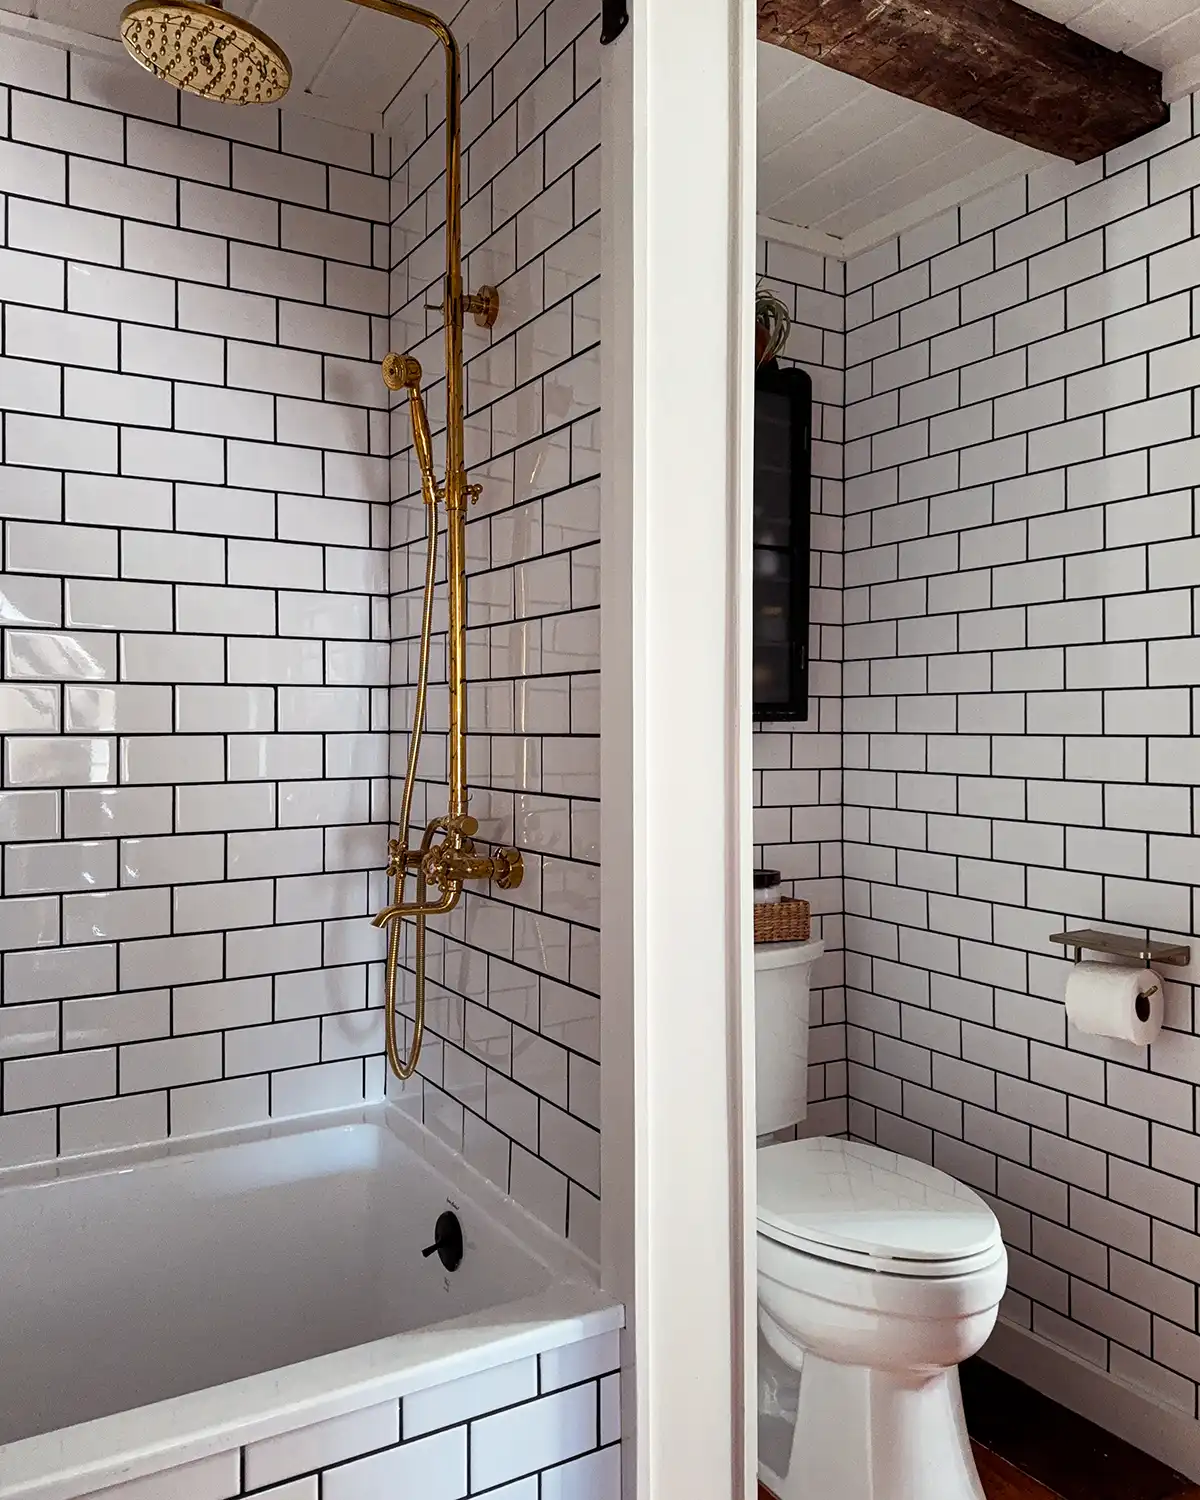
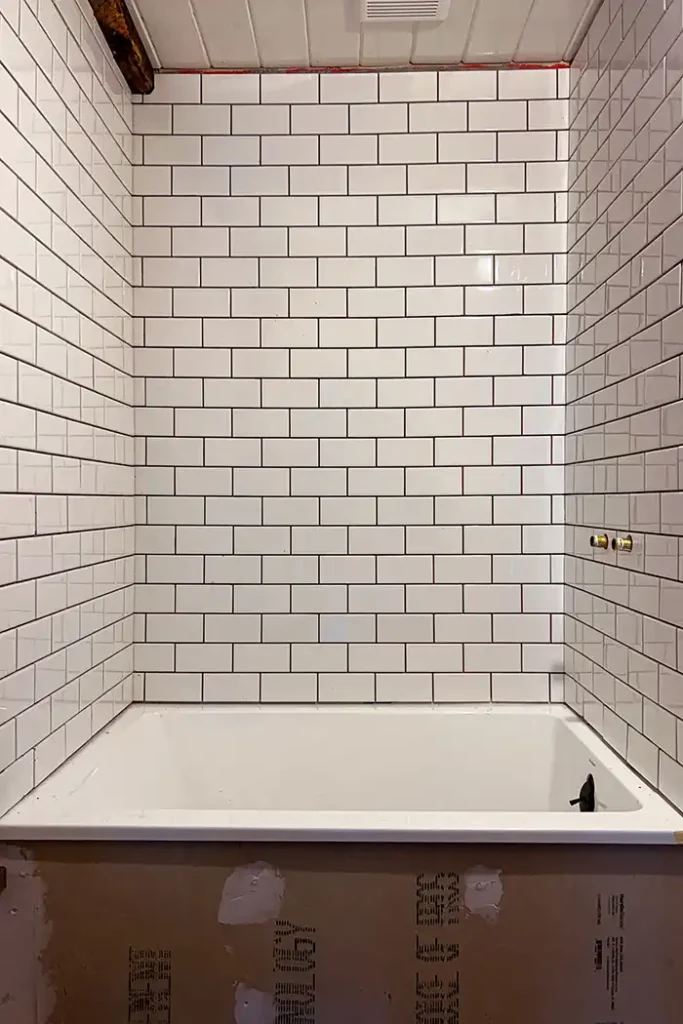
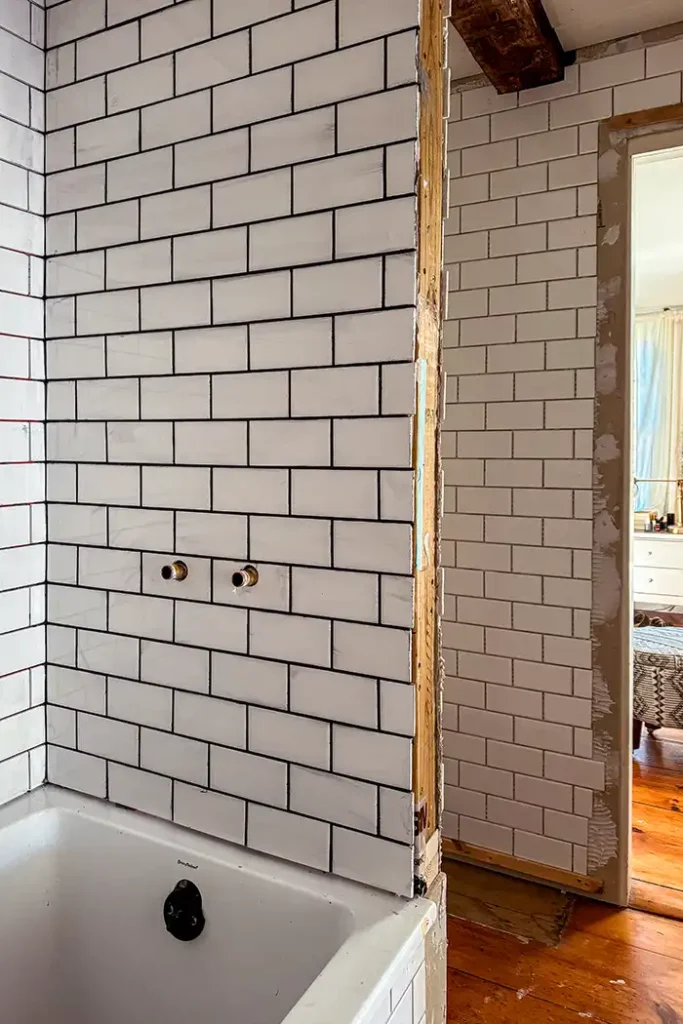
Enough about the challenges, let’s dive into the good stuff. Like what a looker a whole bathroom of white subway tile with black grout is! My my, what a stunner!
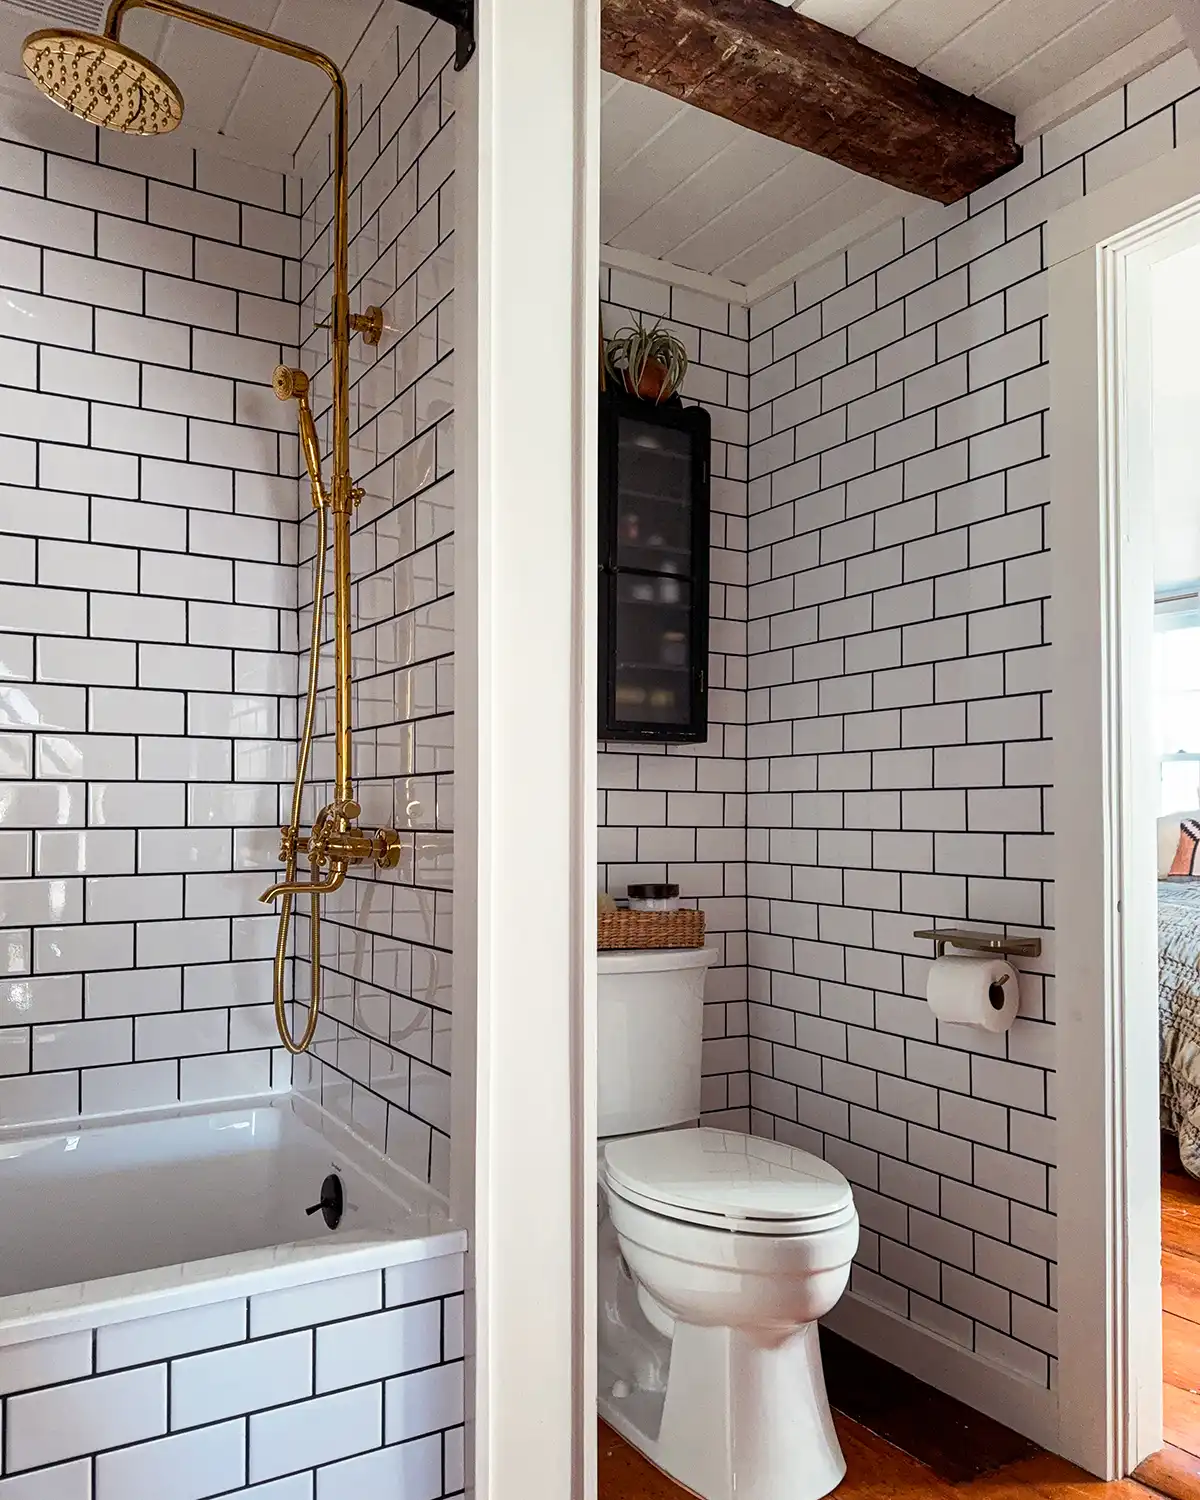
I have been wanting to do a whole wall tile like this for years. Scratch that, it’s been at least a decade and a half by now. I’m talking about a full bathroom of tile walls, wall-to-wall, floor-to-ceiling ceramic tile.
Shortly after we moved into this home, I came across this image on Pinterest of a bathroom with a wooden floor, white subway tile, and black grout. That image stopped me in my tracks. It looked so simple but had such a big impact. I knew I wanted to steal this look for one of our two upstairs bathrooms since they both have the original wide pine wood floors.
I was too intimidated to tackle this full bathroom wall tile look for our first bathroom renovation. So when it came time to tackle our primary bathroom remodel, I knew exactly where to start.
I’ll share more details about how we installed all this new tile on our bathroom walls, but I will leave you with this. Tiling an entire bathroom with subway tile isn’t complicated. But it is TIME CONSUMING!
Just installing all the cement board and prepping for tiling took us weeks of working on it consistently. Tiling alone took almost 19 hours. Yes, I kept track. Grouting was another 9 hours. It’s a lot. Now that we’re on the other side of all the tiling, I’m glad we did it, but in the moment I questioned if it was a good idea and if I would ever not be tiling anymore.
One last shot of the gorgeous wall tile before we move on.
Shower Area
Let’s look at the shower area for a second, shall we?!
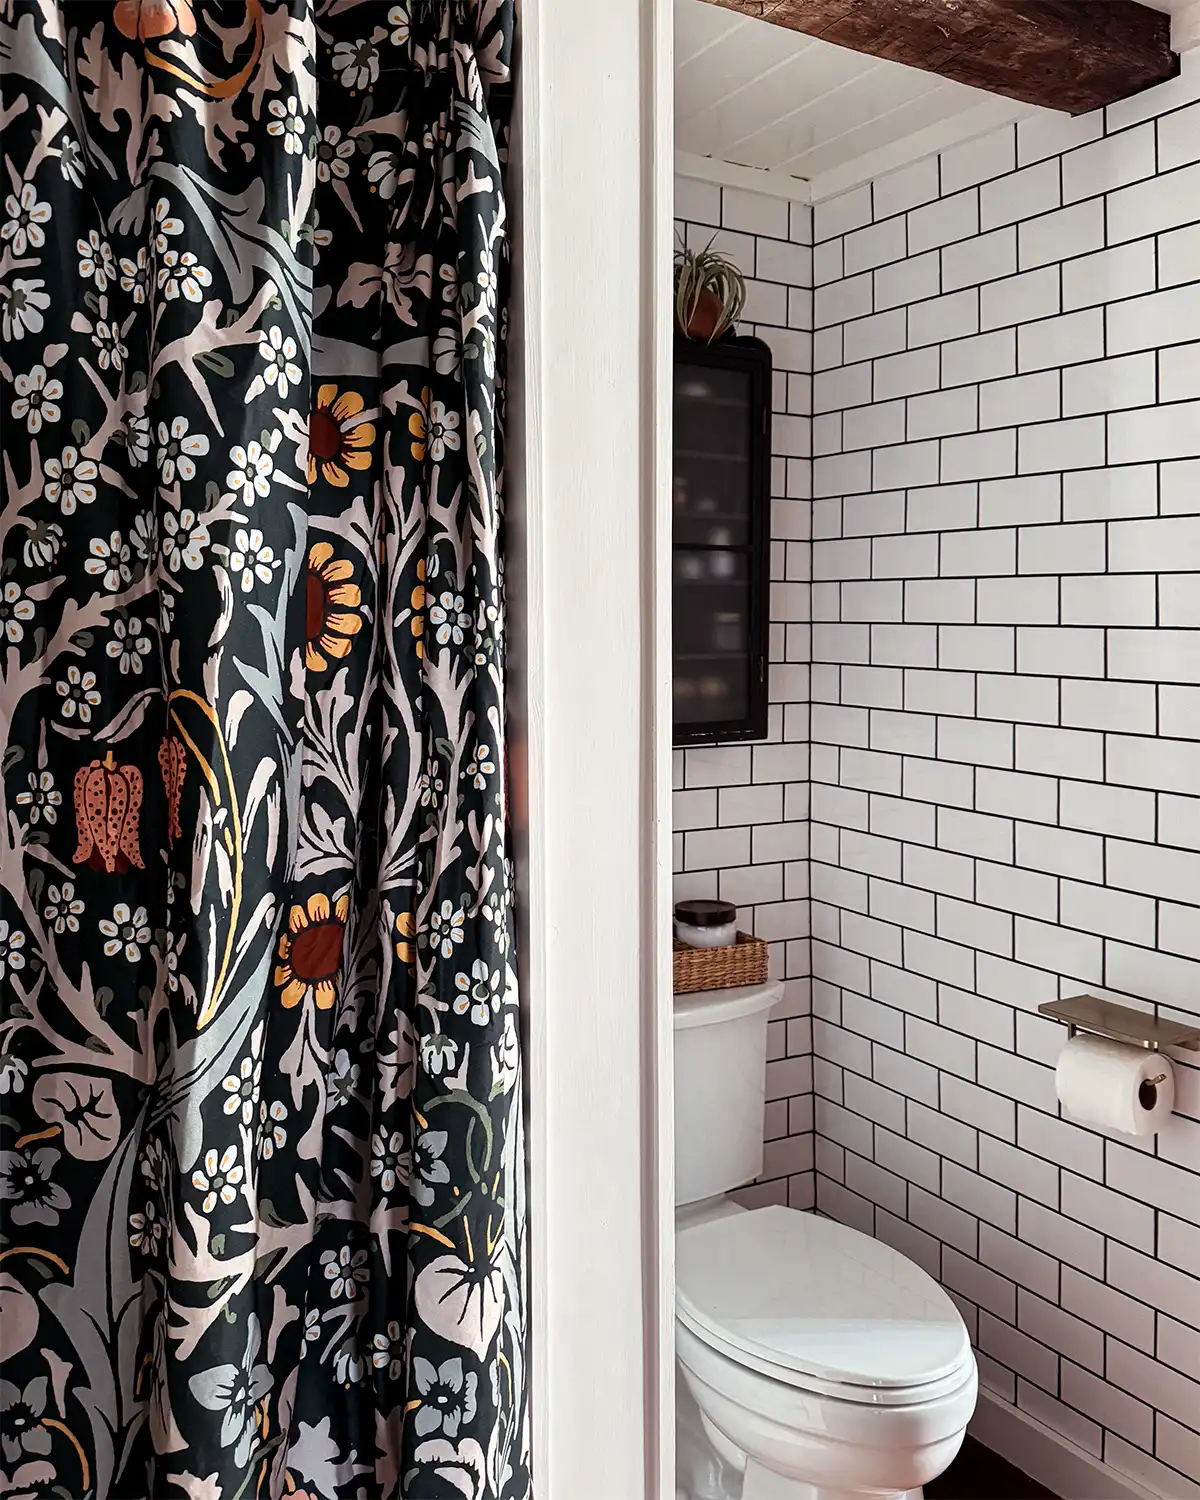
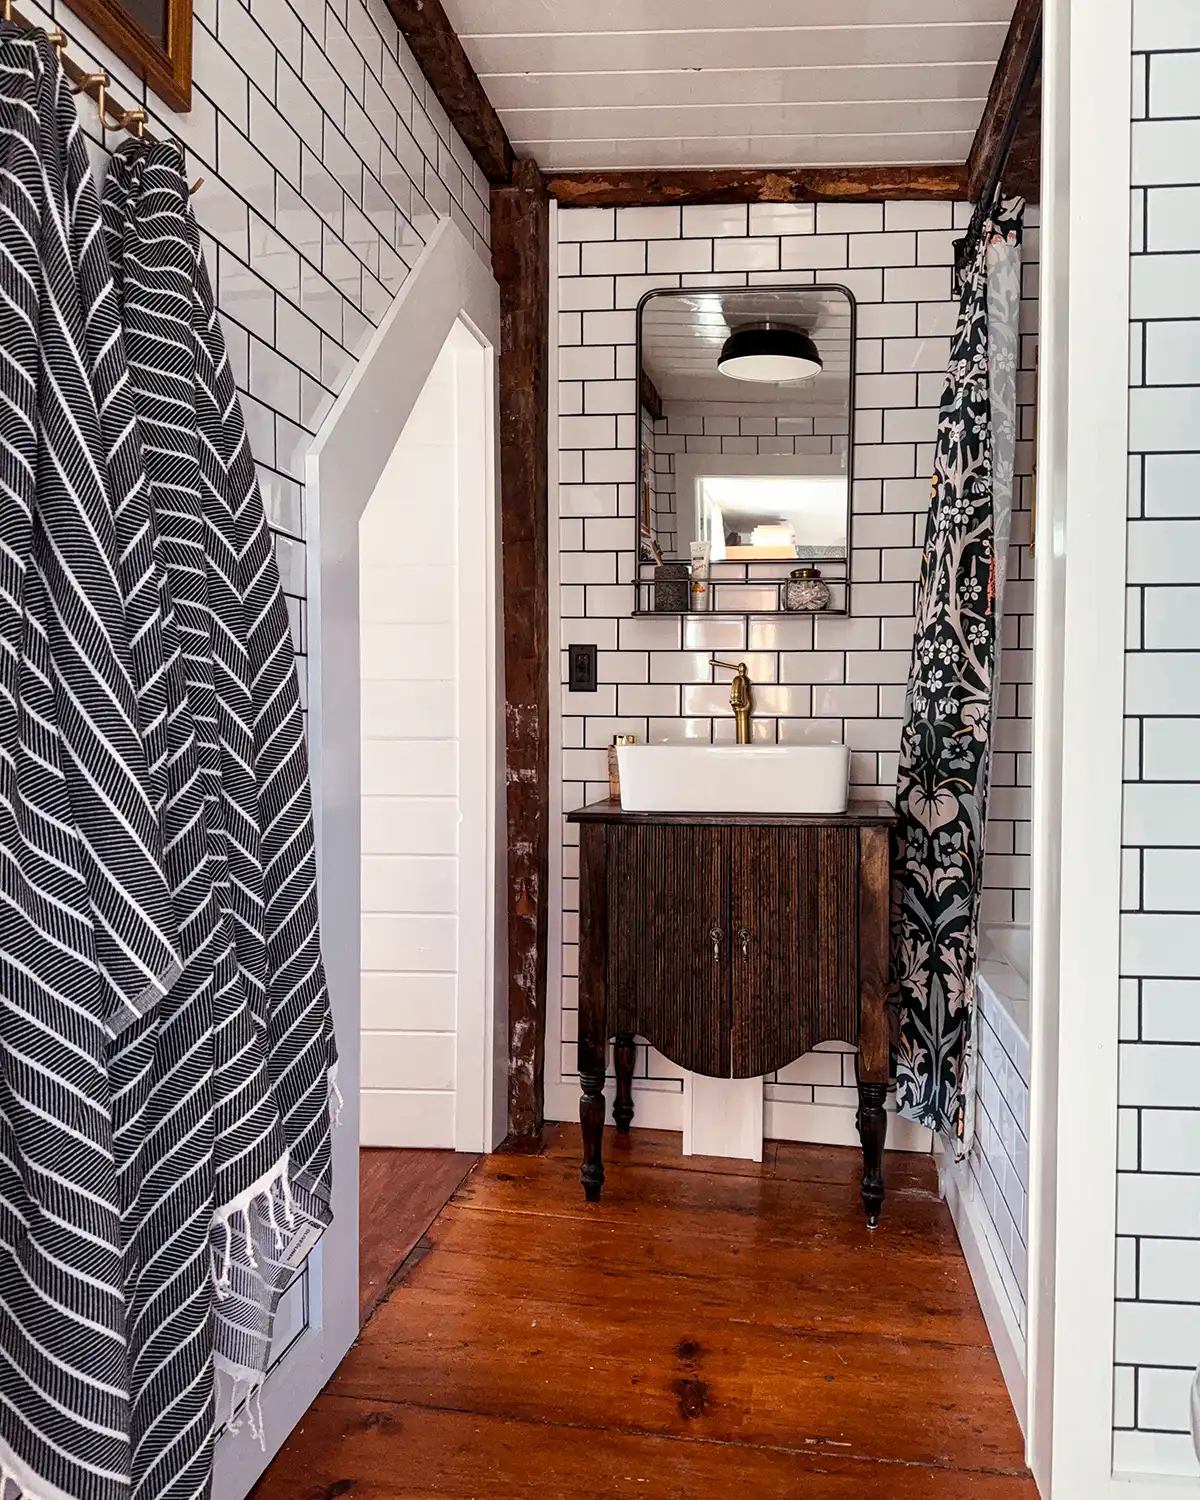
With a basic white subway tile surround for the compact tub and the entire bathroom, it was a pretty neutral backdrop for a punchy shower curtain. The shower curtains from Anthropologie are my favorite! This one is the House of Hackney Printed Shower Curtain.
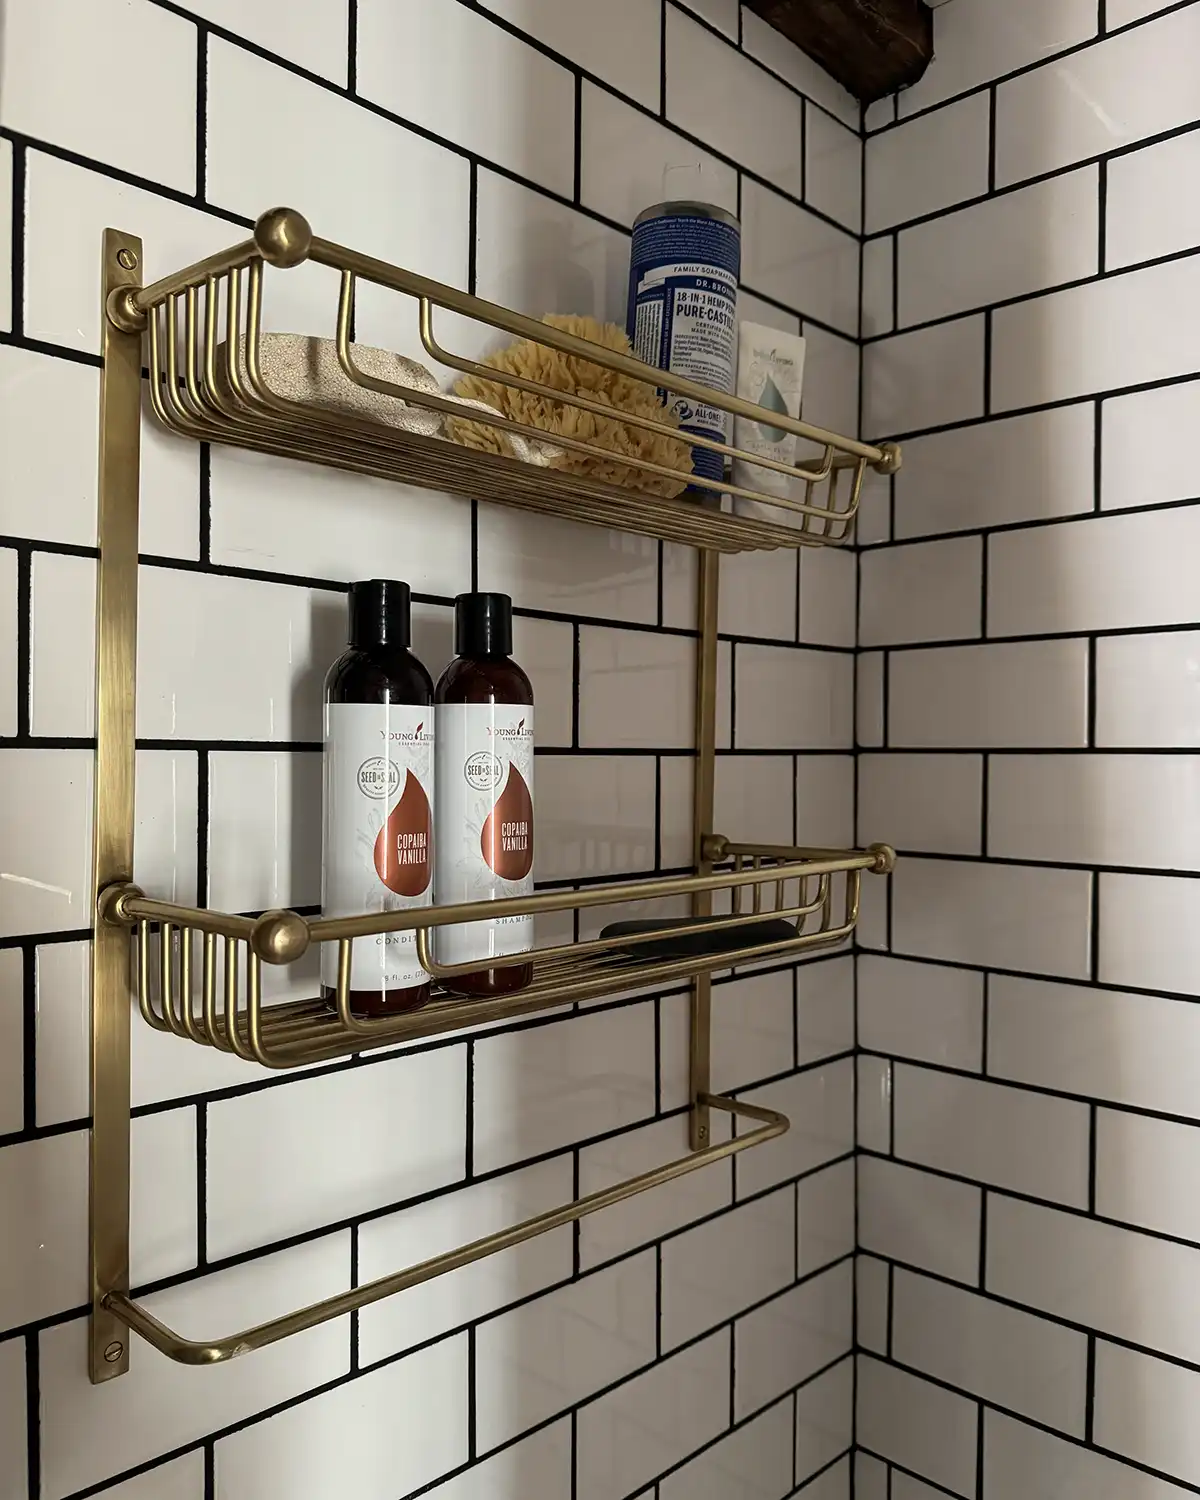
We also added the Maison Two-Tier Bathroom Shelf from Anthropologie as a shower shelf. It’s not technically a shower shelf but it’s gorgeous and here’s hoping it lasts for a very long time in a wet area. It’s a risk I’m willing to take.
We also need to discuss the new shower hardware. After deciding to tile our entire bathroom, the second decision I made was on the shower hardware. I have long wanted a shower with exposed pipes like this, but most shower systems I found were way out of budget. Like thousands of dollars. I was surprised to find an Amazon shower system in gold for $158 (at the time of purchase in 2021…I told you we started this bathroom remodel a while ago).
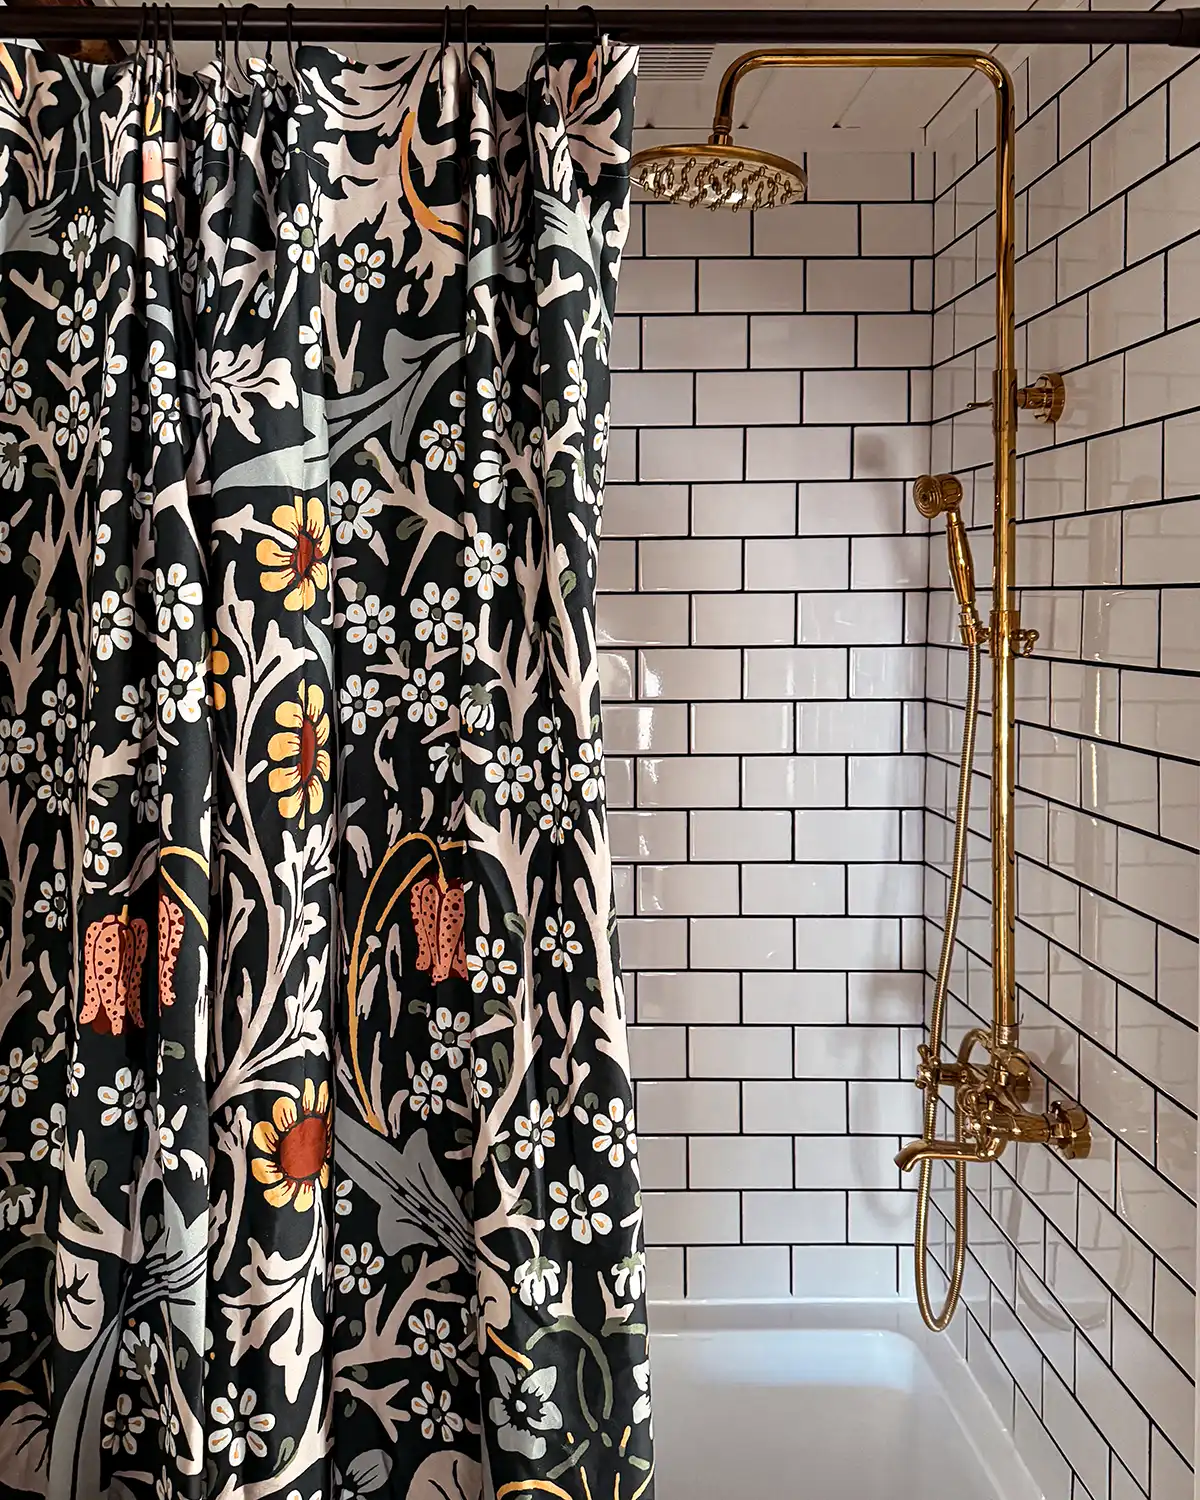
I love the look of the hardware, although I would have preferred a brushed gold finish to a polished gold finish. BUT according to Colby our resident plumber, this shower hardware was a little tricky to install. We knew this going in because the reviews were suspect, but we were able to make it work thanks to a few extra trips to Home Depot to find some weird fittings.
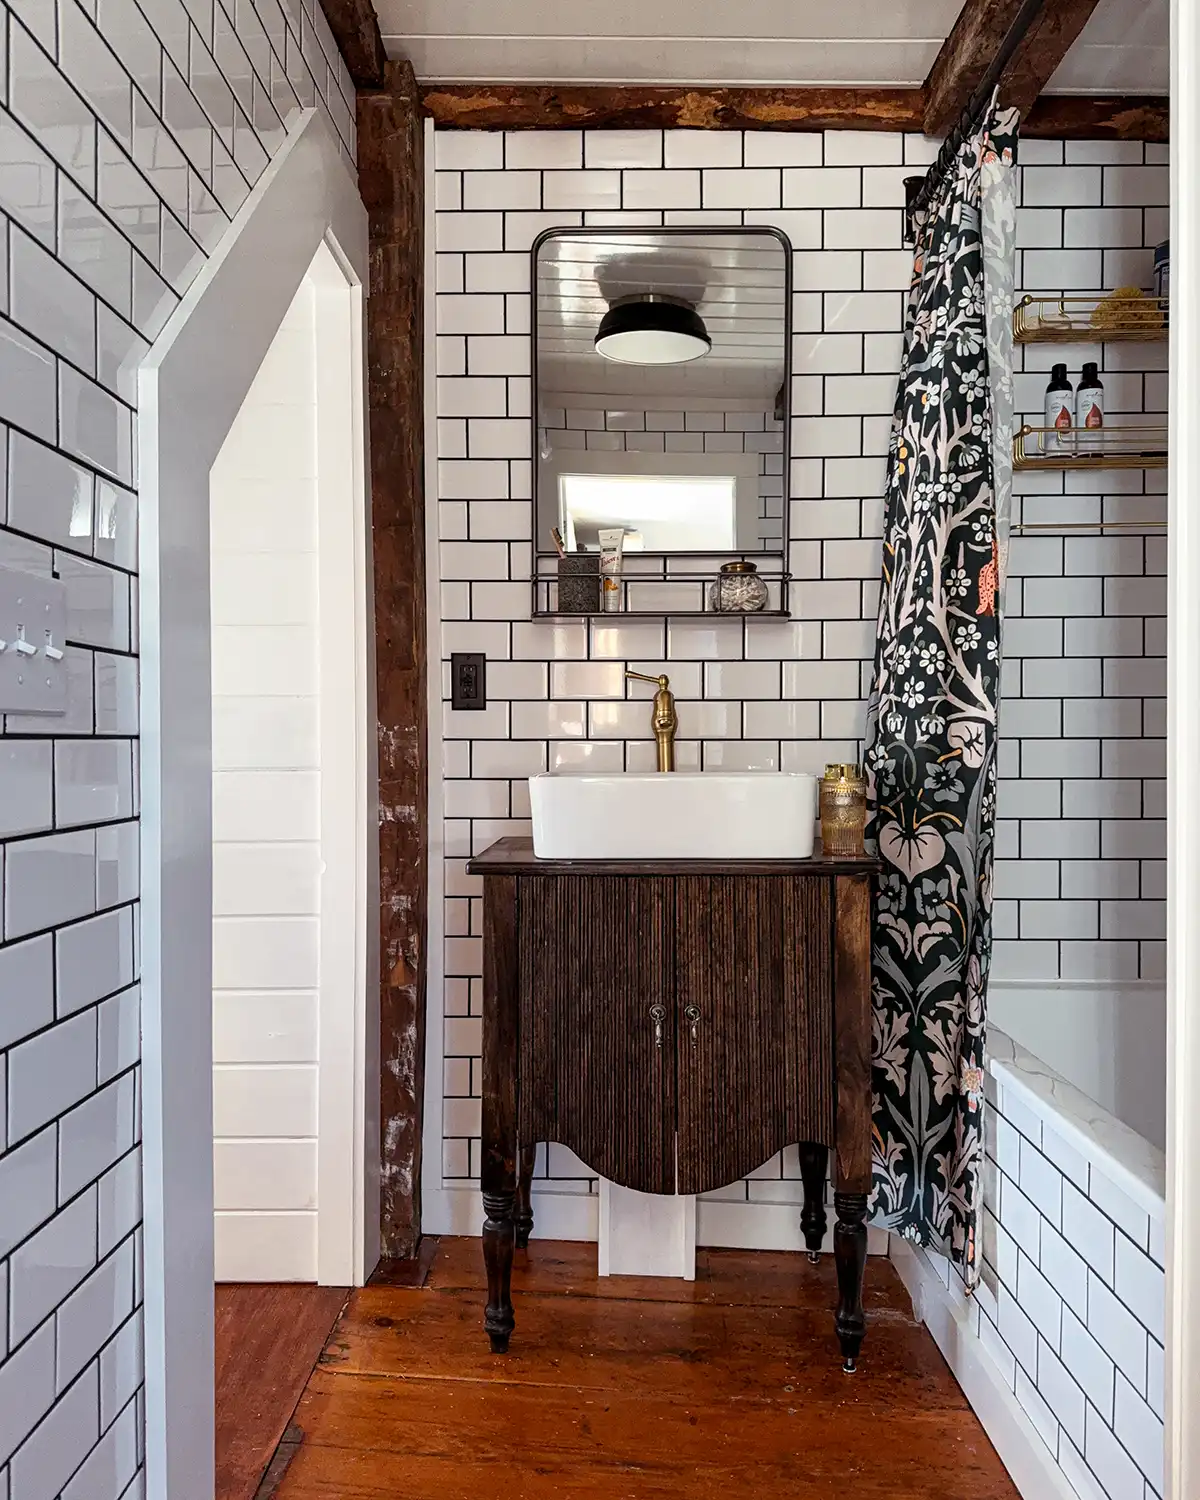
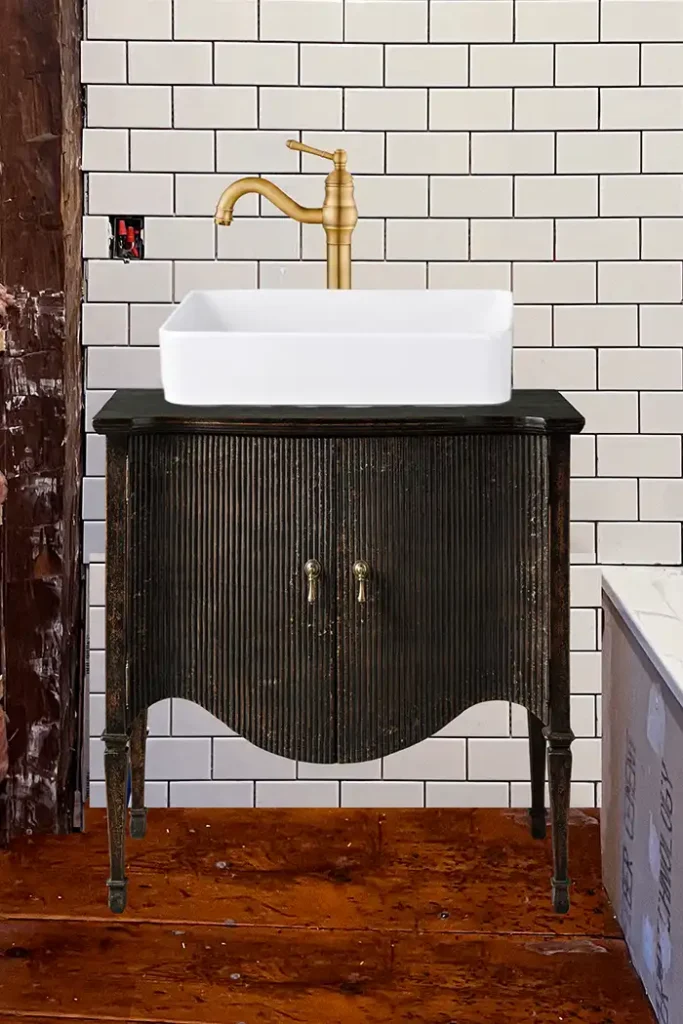
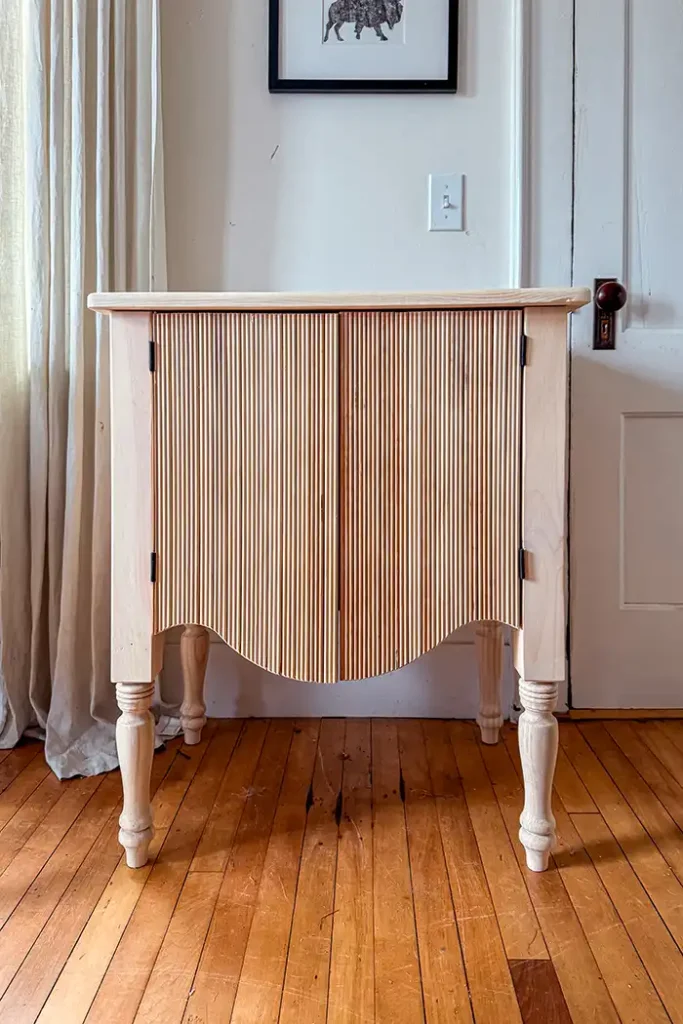
New Vanity
I’m going on the record to say two things. One, this bathroom renovation is the most amazing project we’ve ever completed. And two, Colby outdid himself in building the bathroom vanity. And he’s no stranger to vanity building. He built one for our then guest bathroom which is now the kids’ bathroom.
I looked extensively to find an old dresser or side table that would work as a bathroom vanity. But everything I found was just too big to fit the space. So Colby and I designed a bathroom vanity to look like the Arhaus Conrad line of furniture.
Nailed it. Pun intended. I’ll write up a tutorial soon on how we built and finished this bathroom vanity. In the meantime, isn’t she pretty?!
This bathroom has been such a mess for so long, pretty much from move-in day, that we’ve never actually stored our things in here. For example, shower stuff is in the girls’ bathroom, towels are in Rowan’s room, my makeup is in the attic closet, my deodorant and hair care are in our bedroom, and my toothbrush is in the downstairs bathroom. I cannot wait to consolidate all these things into one space and do all my getting ready here.
Vanity Fixtures
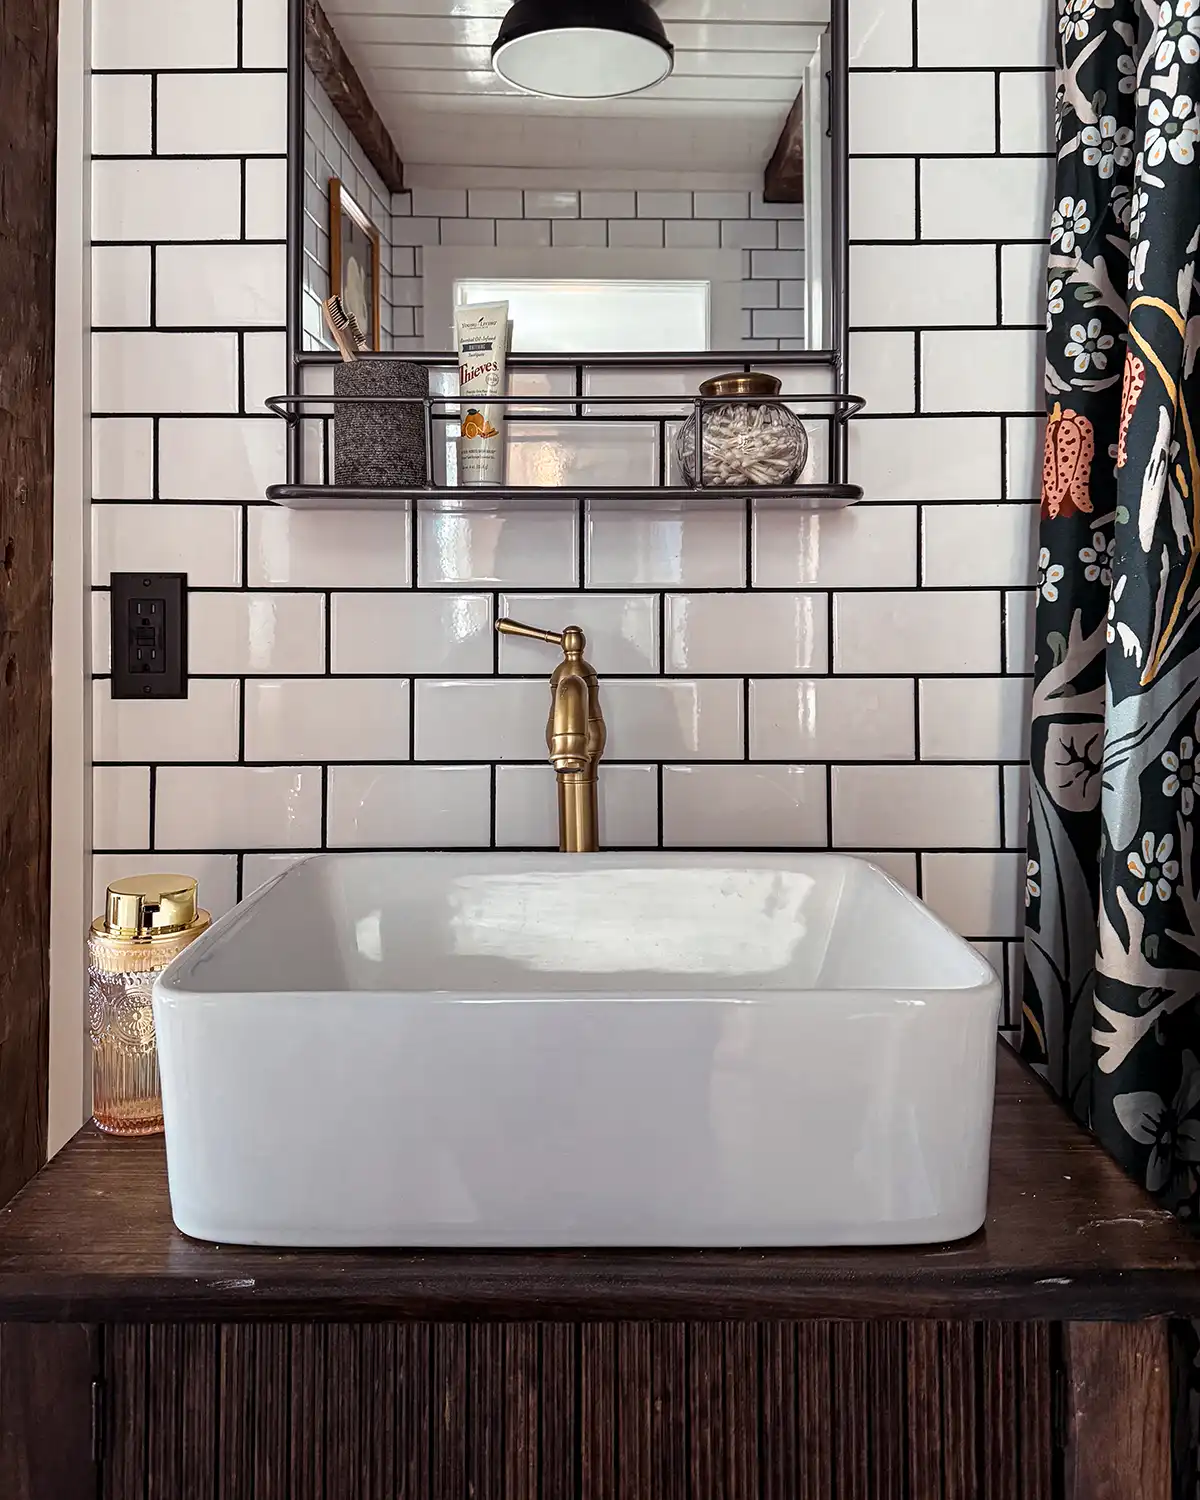
The new hardware for the vanity was one of those painful lessons learned. I always find it challenging when doing a big renovation and you have to make all the decisions at once. It’s so easy to miss a detail. The sink faucet was one of those misses.
When I bought the hardware I didn’t factor in the height that the faucet needed to clear the vessel sink. The original faucet we bought was too short. We considered building a platform for the faucet to sit on but ultimately decided to buy a new faucet. Unfortunately, the cost to return the old faucet was almost as much as what we paid for it. So we will probably sell it or donate it to the ReStore.
Toilet Nook
Creating a toilet nook behind the shower wall was another course correction we made during a renovation break. It almost didn’t happen but I’m so glad we switched it up and enclosed the toilet nook.
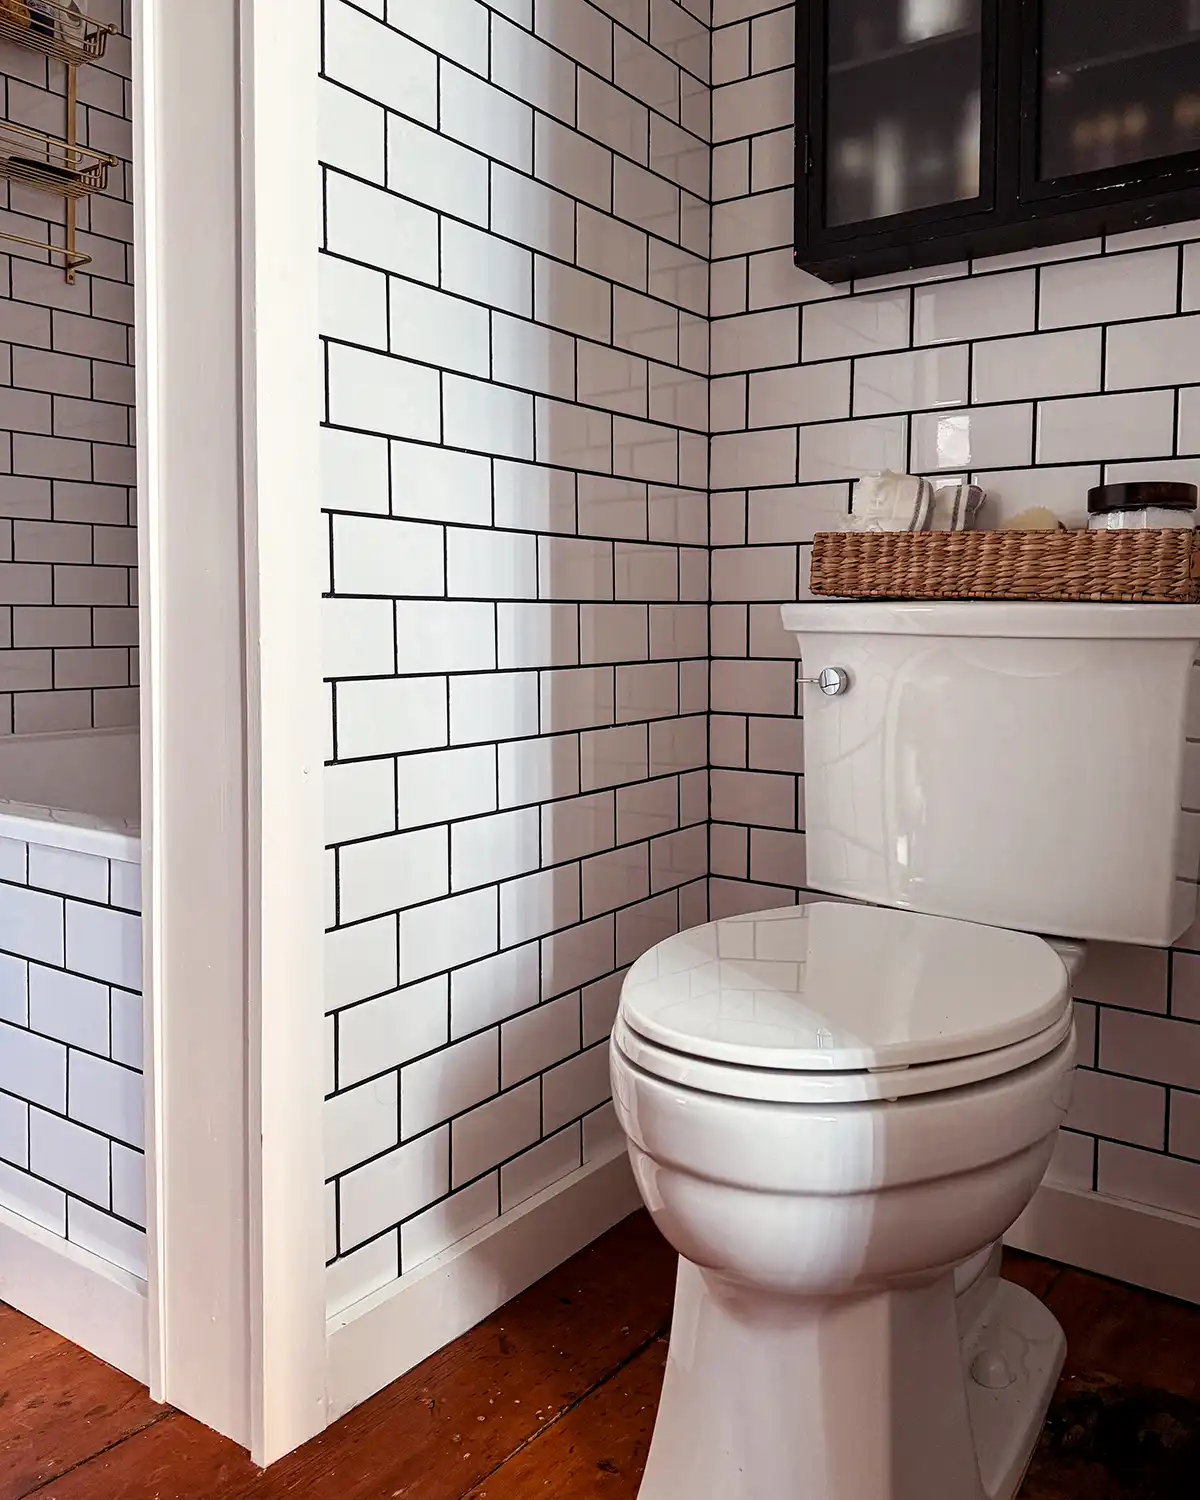
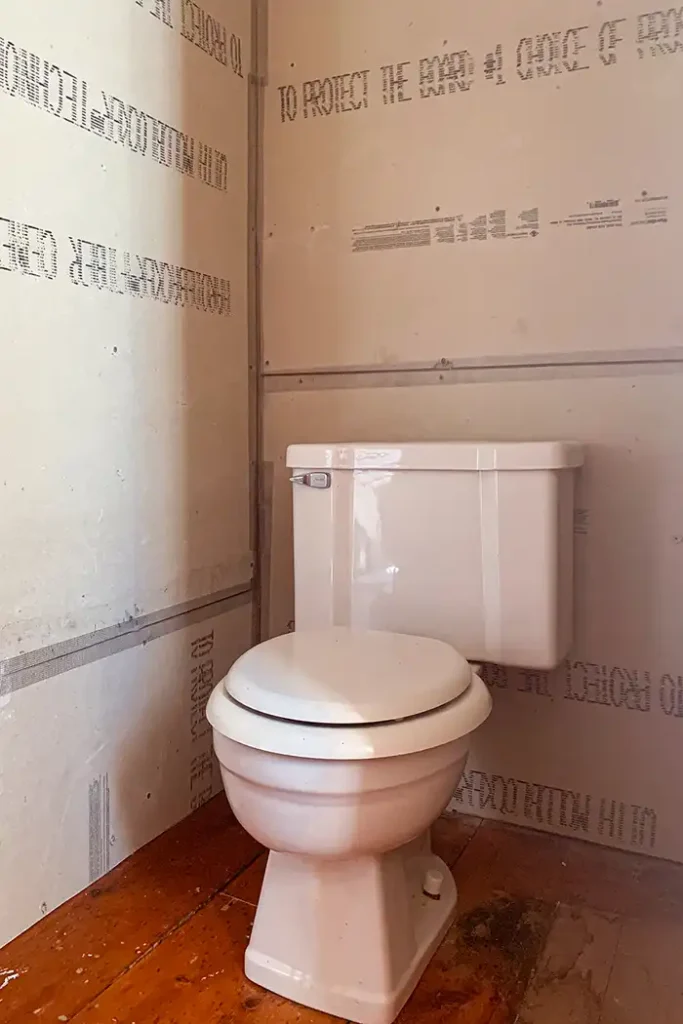
We did end up buying a new toilet for this bathroom. While I could think of hundreds of ways I would rather spend $250 than buy a new toilet, I’m glad we did it. It was time after repeatedly replacing the old toilet’s components.
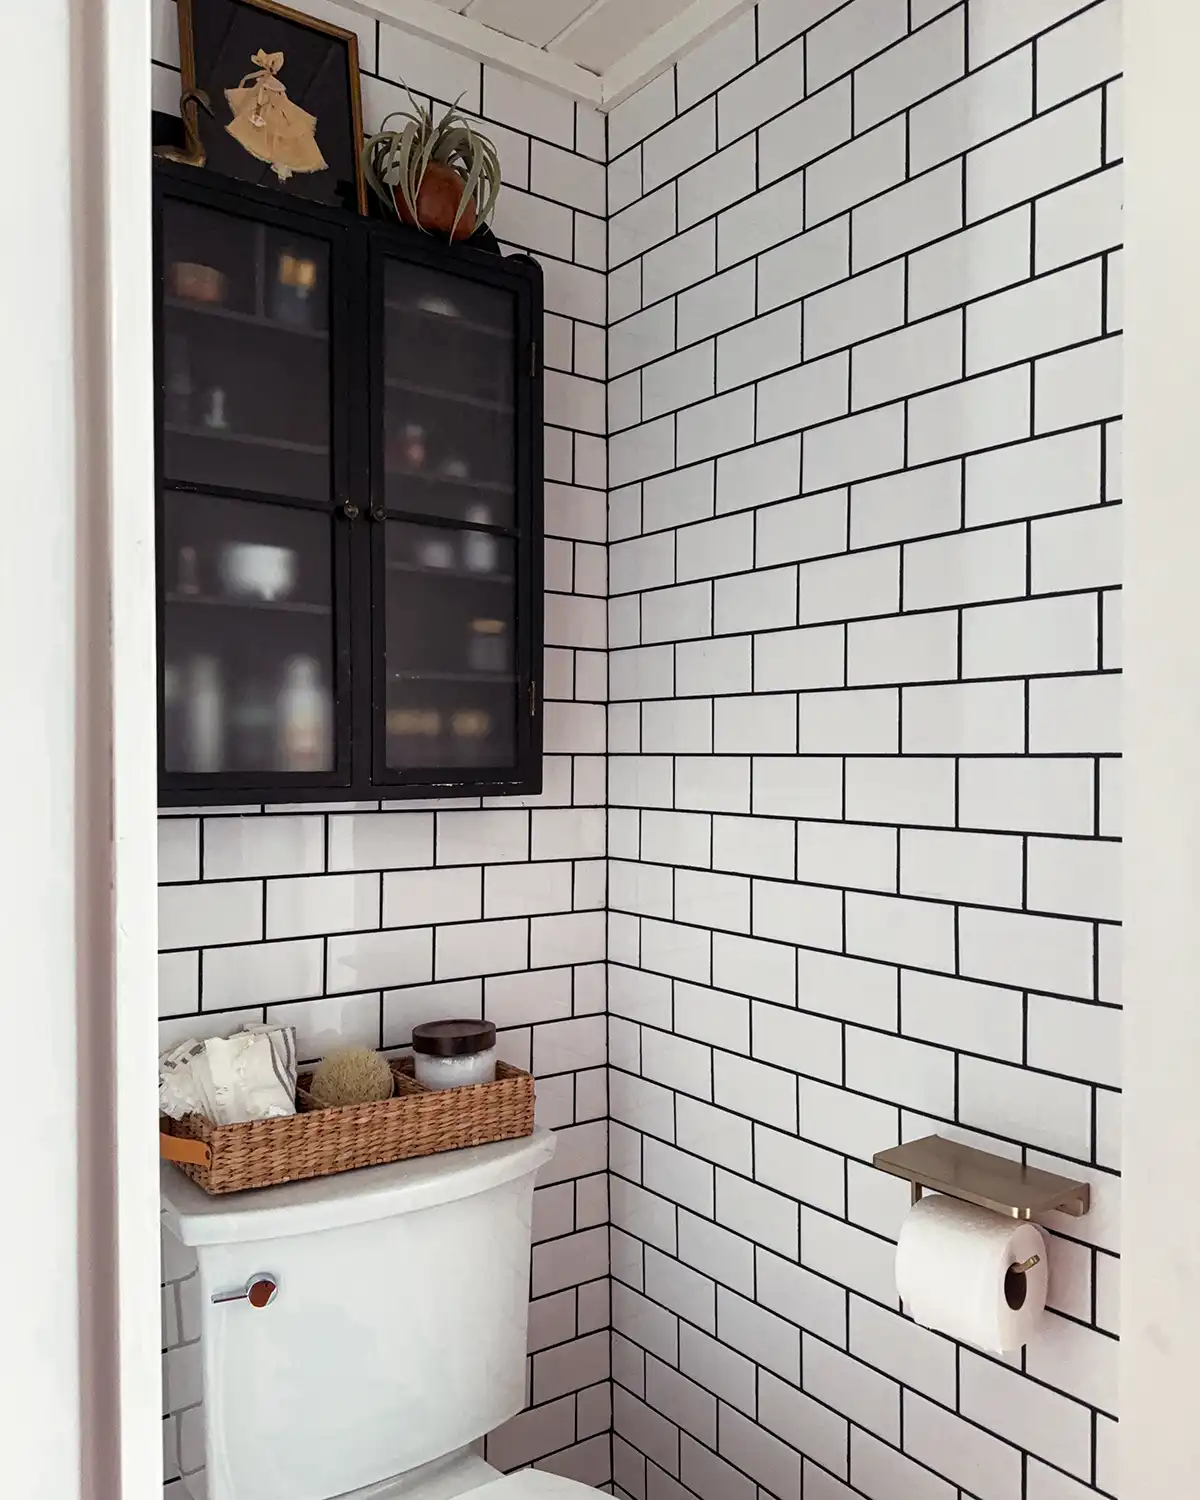
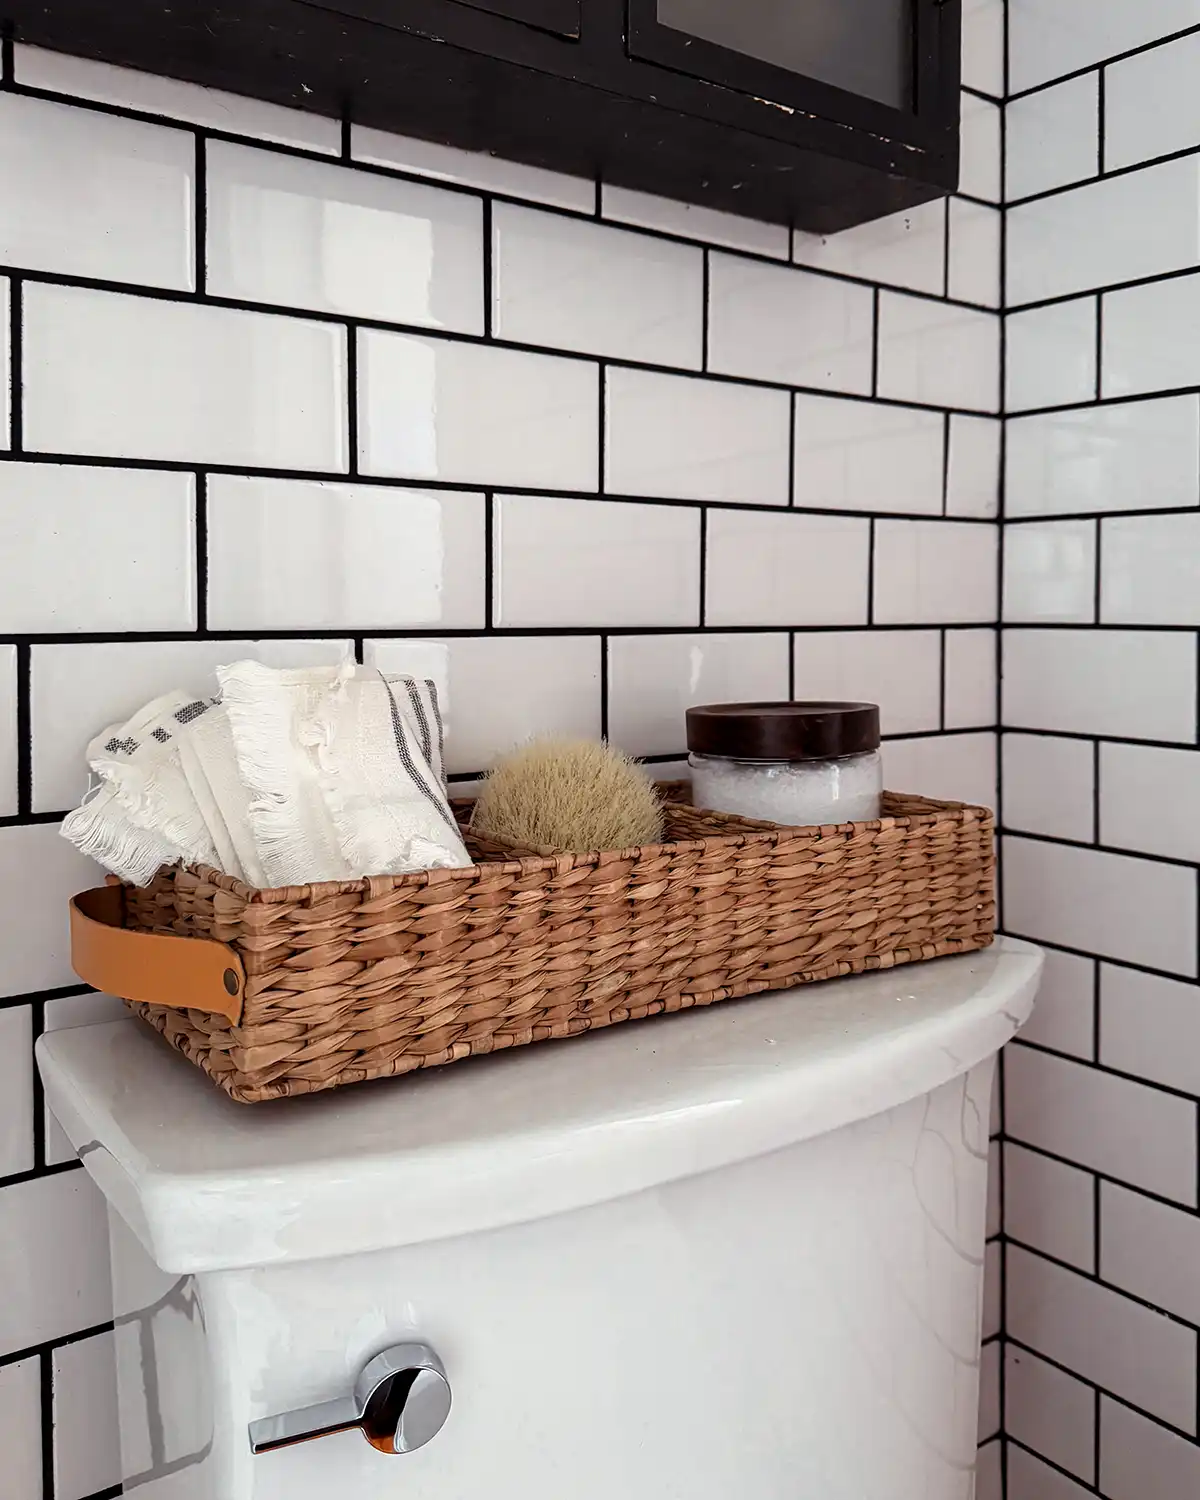
With such a small bathroom, it’s a good idea to store useful things on top of the toilet tank. I found this cute toilet basket from Target and loaded it up with washcloths, my dry brush, and a jar of Epsom salts. Things I use fairly regularly although I’m sure this will get switched up once we start using the bathroom.
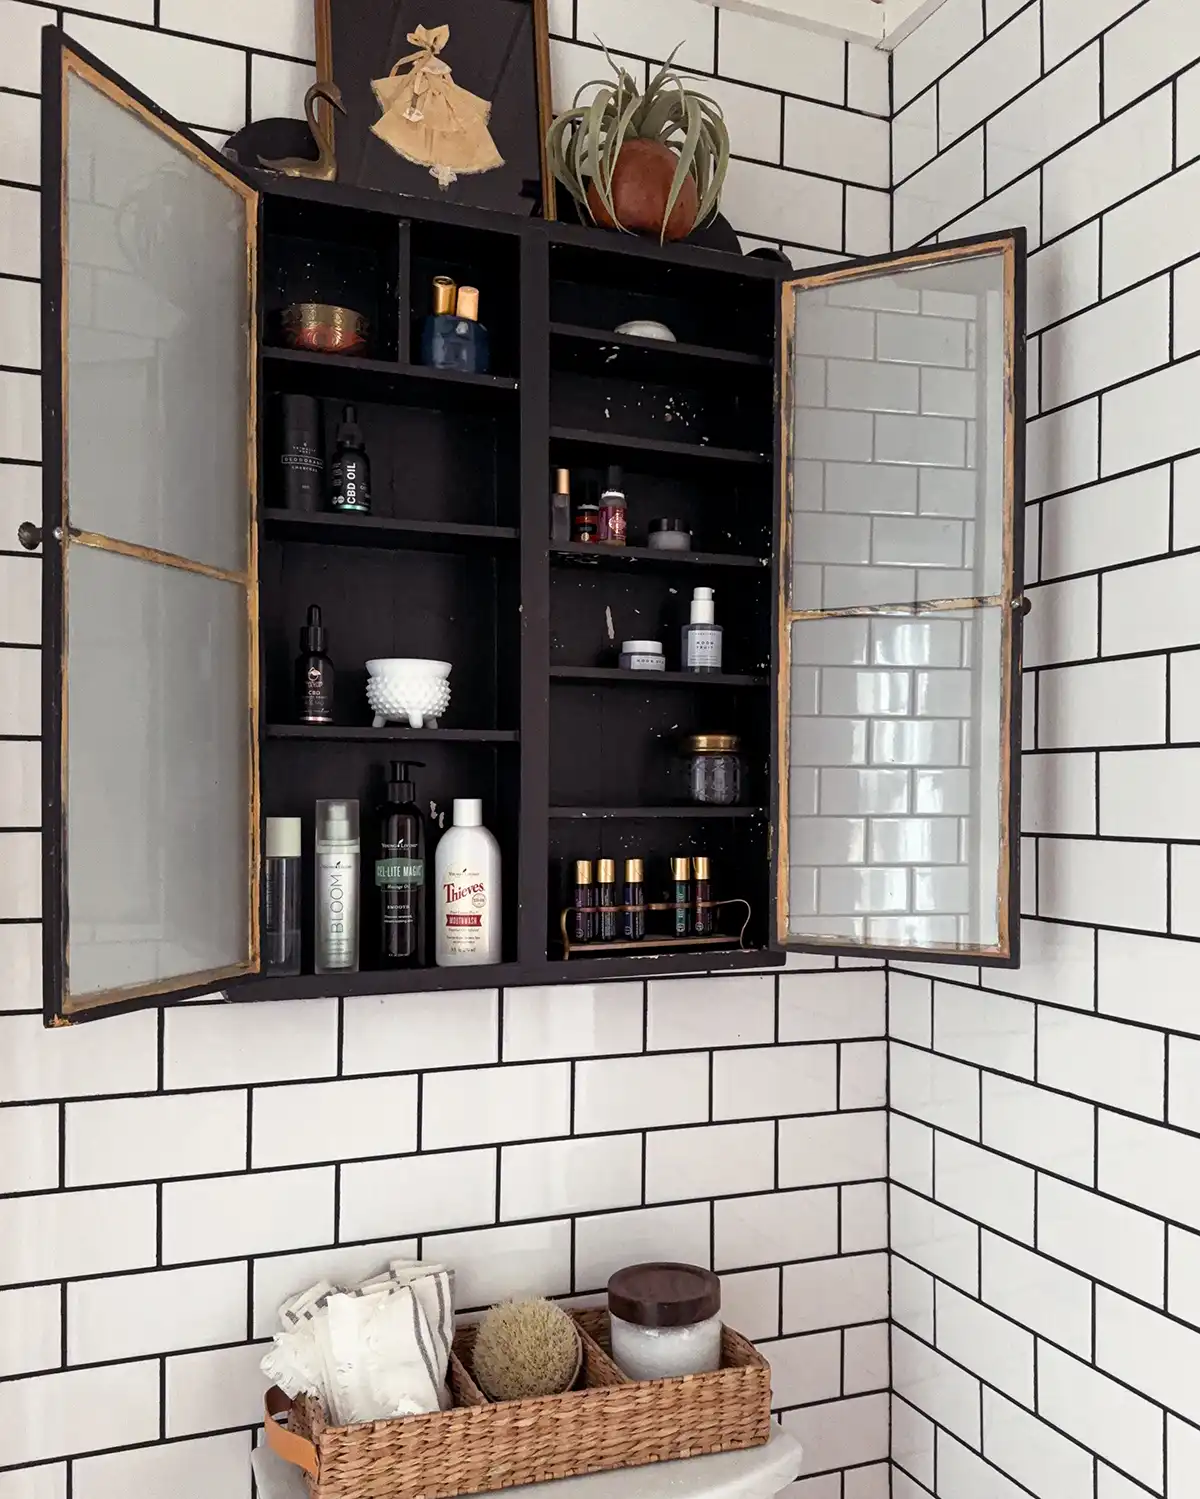
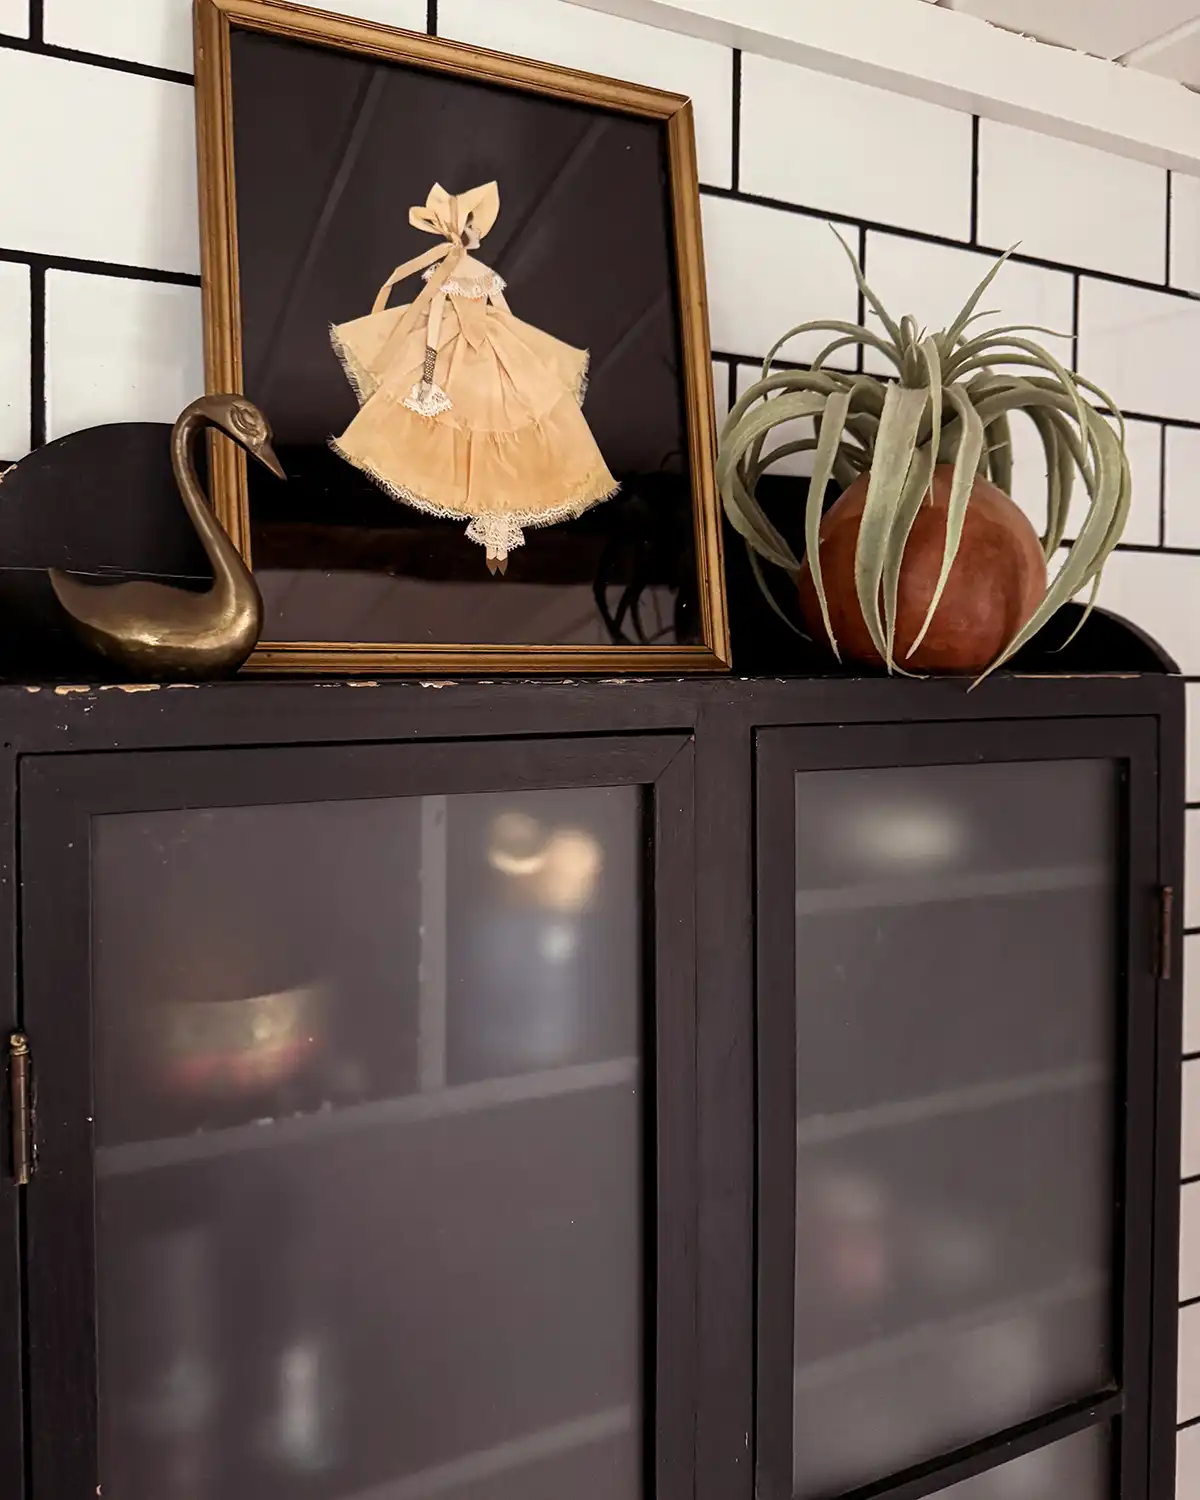
Can we talk about the vintage cabinet hanging above the toilet for a second?! I feel like every room needs something vintage, even bathrooms. Vintage pieces give a space character and soul that a mix of all brand-new materials and finishes just doesn’t have.
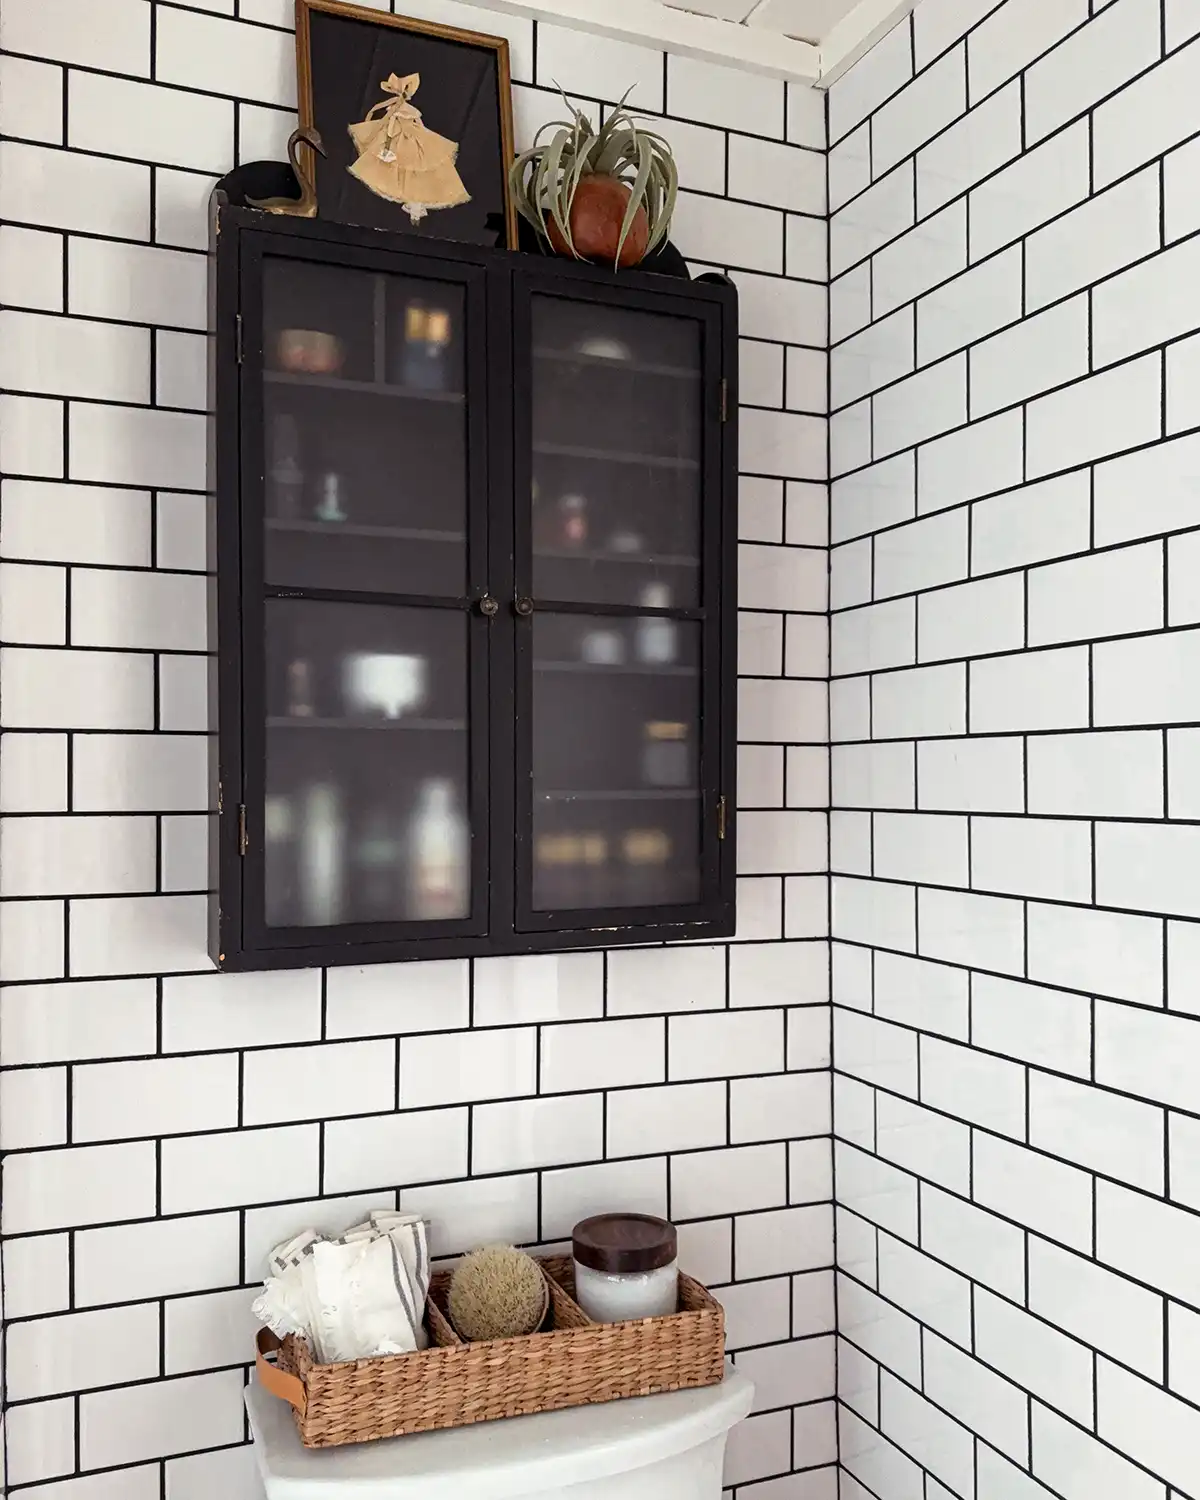
My mom bought that piece for me years ago as a birthday present when we were exploring a flea market. It’s been in our attic ever since awaiting its day in the spotlight in our renovated bathroom.
I thought I might want to hack it, move some shelves around, or at least paint it. The cabinet is in pretty rough condition. I might still paint it, but now that I started loading it up with some things I would like to store in here, I like it more as is. But I reserve my right to chalk paint if I change my mind. Hashtag chalk paint all the things.
Towel Hooks
Just across from the toilet nook is our towel hook bar. There was a big blank wall here and thought it would be the perfect space to hang our towels. It’s a bit away from the tub, so I may hang a hook on the trim between the toilet and the shower but I’m undecided until I take my first shower in this space. The hooks are from Amazon.
Also, can we just pause for a second and appreciate how daunting it is to drill into tile to hang said towel hooks and art? But we did it! Go us!
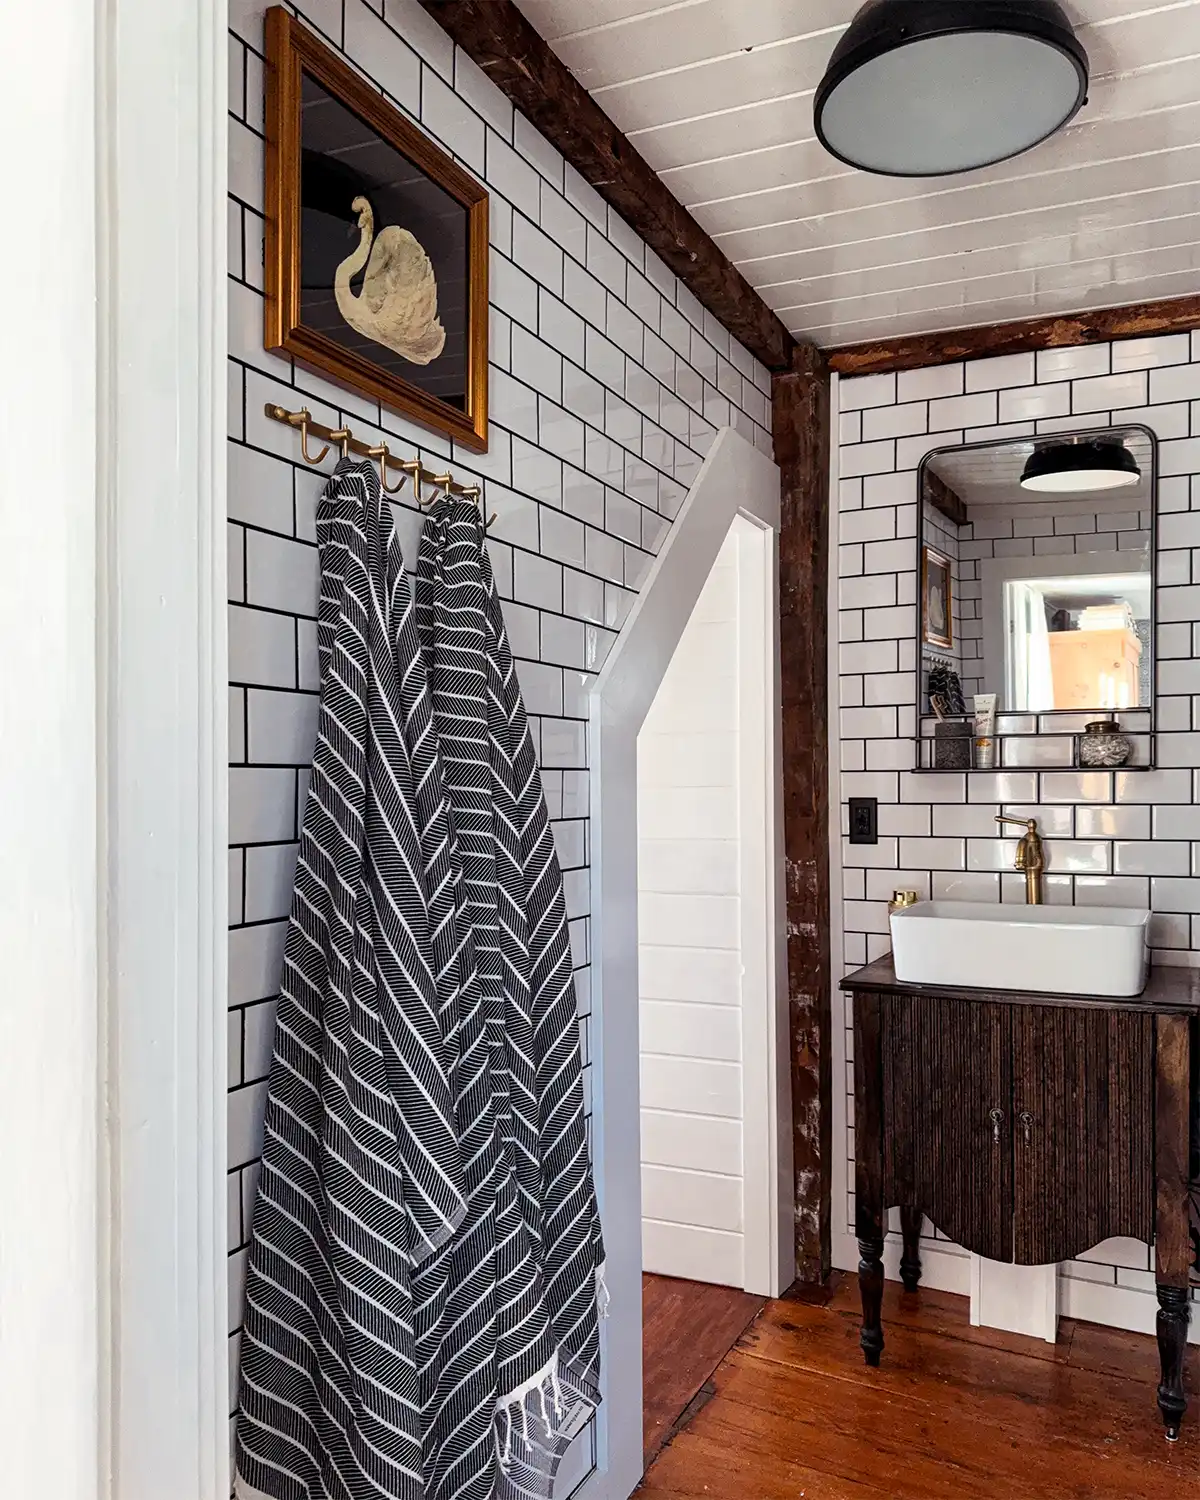
I added a swan print from the Juniper Print Shop above the hooks. It’s been a longtime favorite print of mine from the shop, which is right up there with thrifting and Etsy for my favorite places to source art.
I know hanging art in a bathroom is controversial because of the moisture. My position on the issue is if the art isn’t precious hang away! Never would I ever hang a family heirloom here.
The towels in our bathroom are also new. I bought some pretty inexpensive Turkish towels from Amazon for our last bathroom makeover and liked how thin and absorbent they were but their quality wasn’t the greatest. You get what you pay for.
With such a small bathroom I wanted something compact for storage, like a Turkish towel. I searched for a better quality towel and came across Olive & Linen. The ones I bought are the Cloud Soft Turkish Towel Throw in black. I’m excited to try them and order a few more if we like them.
Color Scheme
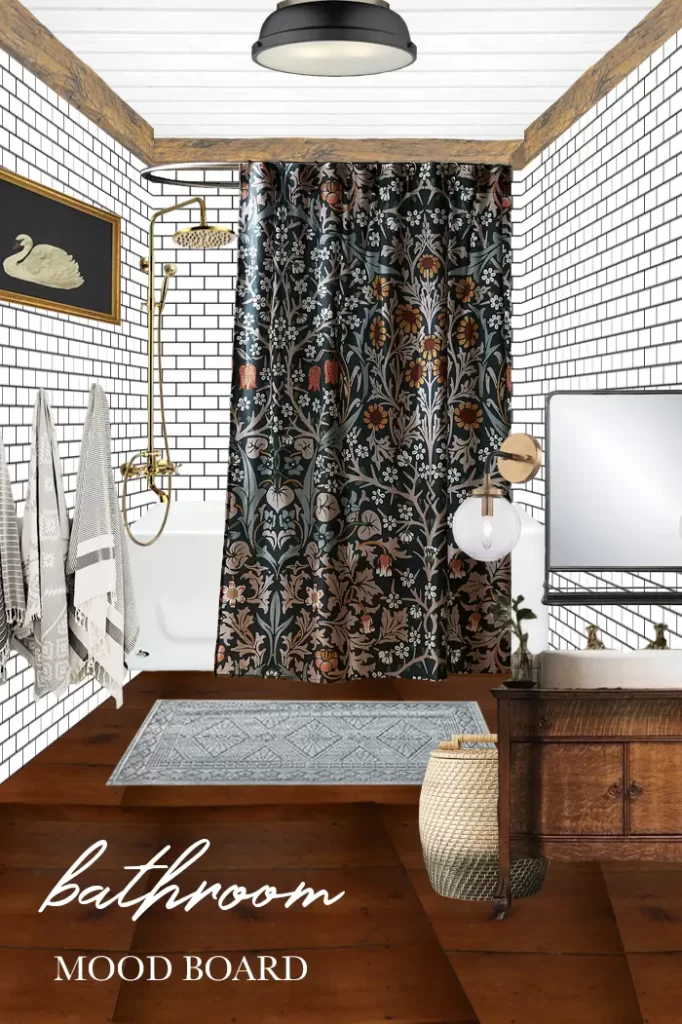
It’s almost comical to bring up the color scheme for our new bathroom. Black and white with warm wood was what we were going for. Pretty basic.
We don’t have many paint colors in here. There’s a single, solitary paint color, Benjamin Moore’s White Dove in a semi-gloss finish. We gave all the trim and the planked ceiling a fresh coat of paint. It’s the same warm white we’ve used throughout our home, even the house exterior is White Dove.

The stain colors are another story. The vanity is stained Minwax Dark Walnut, a dark brown wood stain.
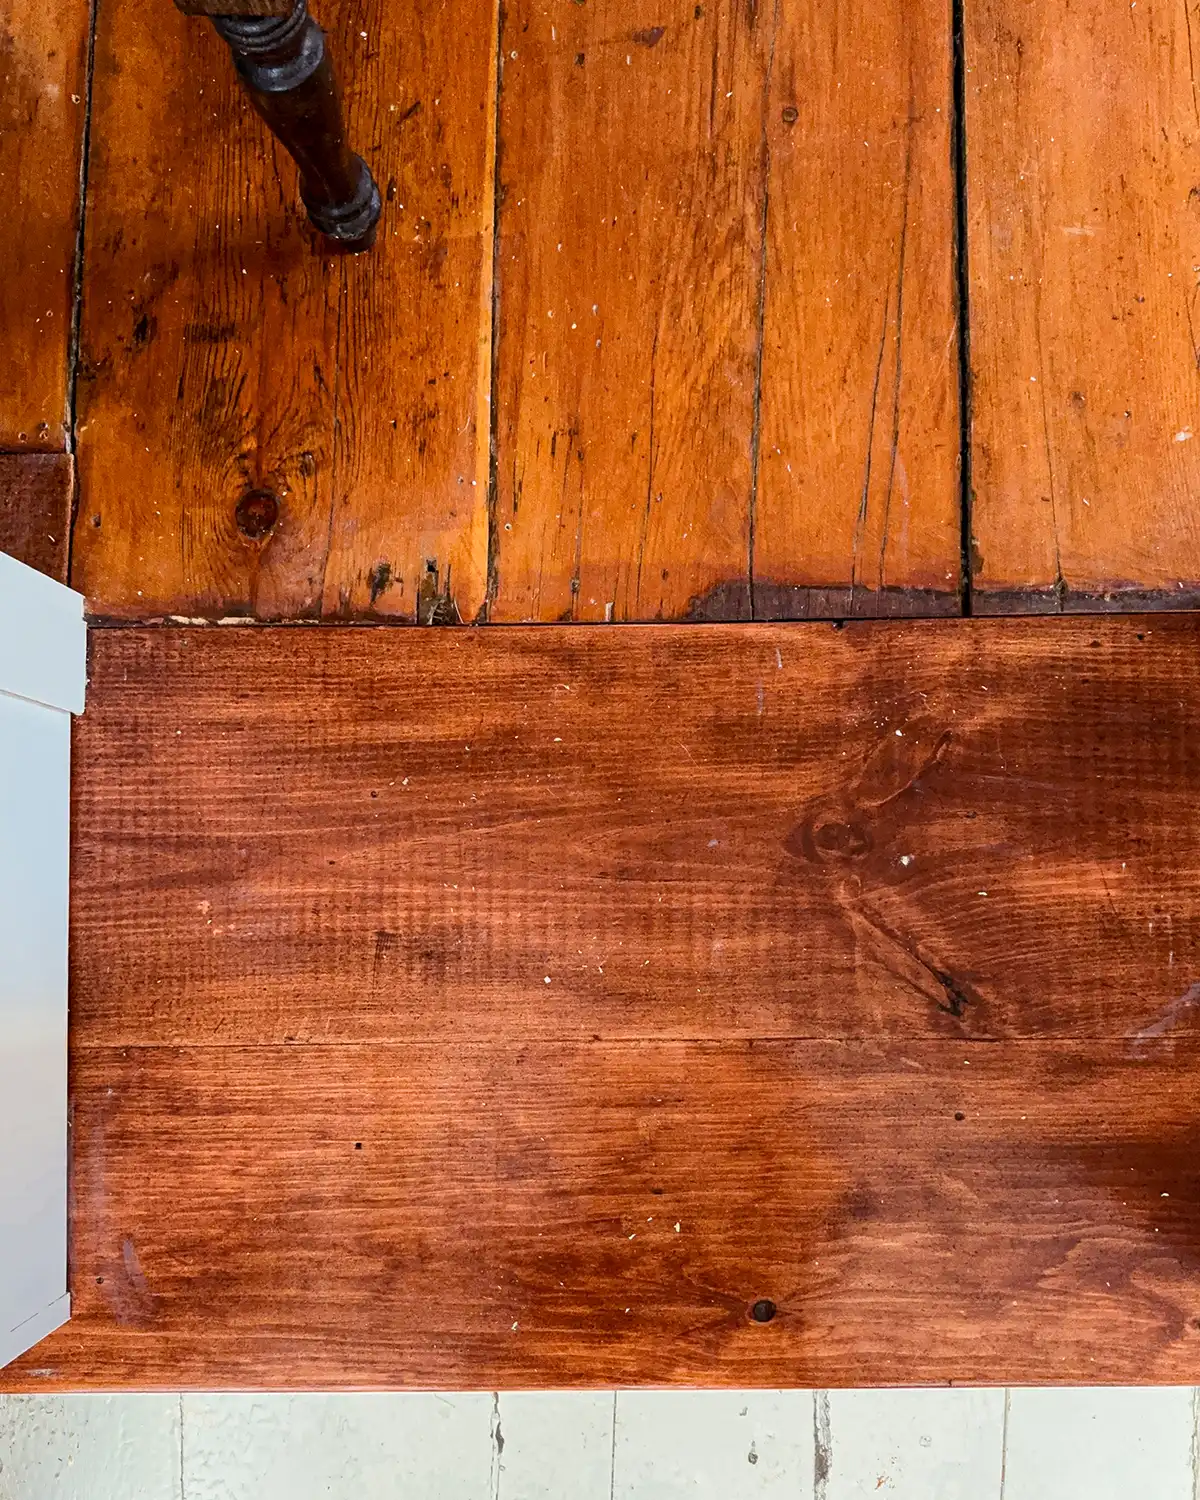
I also stained the floor between the attic closet and the bathroom. Colby built a beautiful pine transition that sat flush with the bathroom floor. We waffled for the longest time on whether we should paint it white, like the closet floor, or try to stain it to match the bathroom floor. Staining won.
Choosing the stain color is an upcoming post because oh goodness, that was a learning experience! It took four trips to the hardware store, six stain samples, and lots of trial and error. I don’t think the floor stain is a perfect match. It looks pretty close in the daylight but off under artificial light. I just don’t think you can match 200-year-old wood flooring with all the patina.
The stain combination I landed on for the pine floor transition is Minwax Wood Stain in Gunstock and Minwax Polyshades in American Chestnut.
New Fixtures
While we already talked about the shower head and the new hardware on the bathroom vanity, we also got new light fixtures. Well…more like a new light fixture, singular.
The overhead light is a simple flush mount from Home Depot in a black finish. Because white on black on white on black until the end of times here in this bathroom.
Originally, we also wanted vanity lighting with a pair of sconces flanking the mirror. While technically they fit on paper, once we got the electrical roughed in and the cement board up, it just looked way too tight. It’s one of the reasons we took an extended break on the bathroom renovation. We needed some time to course correct and figure out a few things that weren’t working instead of just plowing through.
I’m so glad we took out the sconces. I can’t imagine them here. There’s just so little space to work in vanity lighting.
Hardest Part Of This DIY Bathroom Renovation
Bathroom renovations aren’t just rainbows and butterflies. Hardly ever! This bathroom renovation had us testing our DIY skills and stretching in new areas.
One of the biggest challenges was the new plumbing with adding a bathtub. Colby is our plumber. I’m so thankful that he’s learned plumbing especially here in rural Vermont, where plumbers are extremely hard to come by.
But working with our existing plumbing while trying to add a bathtub and move the sink plumbing across the room, all while trying not to ruin our vintage floors was a challenge. He ended up taking up each floorboard individually, plumbing the bathroom, and reinstalling the floor. Talk about a labor of love.
In general, having a small master bathroom footprint to work within was a challenge in itself. It’s so tight in here. I’m not sure that it comes across that way in pictures but it’s hard for two of us to be in here at the same time.
Finding storage space and working without much space was a challenge. It’s why we chose a mirror with a shelf since the vanity provides no counter space. Or why we hung a cabinet above the toilet to give us just a little more space.
We did have one project that we abandoned because it felt too hard. This was building a shower niche instead of using a shower shelf. I adore shower niches but the perfectionist in me wanted the niche to line up perfectly once tiled. We struggled trying to do the math and worried about being off by 1/4″ (or more) because that mattered. In the end, we scrapped it.
Total Cost
Bathroom makeovers aren’t cheap. We’ve done two very inexpensive ones in the past (be sure to check out how much our kids’ bathroom renovation cost). We weren’t trying to do this bathroom on a tight budget but we didn’t want to spend a lot of money. Essentially, we wanted a certain look and were willing to spend money to get that look but we also wanted to value engineer some things.
Random sidenote, as a salesman, Colby HATES the term “value engineer.” Colby, if you’re reading this, I threw that term in just for you. I love you!
I’m still gathering all the receipts and tallying all the expenses to write up a big “this is how much we spent” post, but it’s around the $3700 mark. Expensive for us who typically DIY on a super low budget, but a far cry from how much the average bathroom renovation costs.
It’s amazing how much you save thanks to no labor costs! DIYing is such an affordable way to renovate an entire bathroom for less.
Is The Bathroom Done Done?!
Let me respond to this question with a question. Is a room ever really done?! No. Never.
I’m less than six hours since “completing” the bathroom renovation and I’m already compiling a list of things I want to tweak. From little things that went wrong, like a crooked cabinet. Lesson learned, just because the top of the vintage cabinet is level doesn’t mean the bottom is level. To things we missed like silicone on some of the trim.
Missing Trim
We do still have some small trim pieces we want to install along the ceiling that we didn’t get to. They’re super thin, like a pencil, and they help cover the gap between the edge of the tile and the beams in particular. It hides those rough edges.
Finish Caulking
Most things are caulked but we did miss caulking the top of the tiles in the shower/wet area to seal it from splashes. There are also a few spots where the trim could use some caulking. When your bathroom isn’t level or square, caulk can be your best friend to help hide the uneven gaps.
Cabinet Refinishing
While I don’t think I want to remove the shelves anymore in the cabinet, I think it would look good if I refinished it with chalk paint. And there’s a part of me that kind of wants to fill the top of the cabinet with some fake plants. When there’s no natural light in a room is about the only time I’m accepting fake plants.
Turn On The Water
One big thing that’s not done is that none of the plumbing currently works. Oh the irony of a finished bathroom that’s not usable. Hear me out.
Colby just has to hitch up the sink before he can turn the water on to the bathroom. But his Pex crimper has disappeared from his plumbing tool bag. I blame a certain toddler and expect we’ll find the tool in a boot or at the bottom of the toy basket. It seems silly to buy a new tool when we’ve misplaced ours, but if it doesn’t show up soon we’ll replace it so we can finally use this bathroom.
Painting Trim
There was also a snafu with the trim paint and a mix-up at the hardware store. Let’s just say that all the trim got painted with eggshell and not my usual semi-gloss. I didn’t notice until I was already a full day into trim painting, starting coat two, and the trim felt like chalk instead of its usual smooth, glossy self. Back to the paint store I went.
One Room Challenge Fall 2023
This project was part of the Fall 2023 One Room Challenge, where bloggers and designers challenge each other to makeover one room in their home over eight weeks. Tackling this bathroom renovation was my project for the challenge. It’s the second time I tried to renovate this bathroom for the challenge and I’m beyond excited to have completed it (with just hours to spare before the deadline…doh!)
Be sure to check out all the other room reveals on the One Room Challenge blog. There are some seriously spectacular ones out there.
And catch up on my weekly bathroom renovation updates:
- Week One: Design Plan
- Week Two: Bathroom Renovation Schedule
- Week Three: Shower Tiling
- Week Four: Vanity Design
- Week Five: Progress Report
- Week Six: Progress Report
- Week Seven: Progress Report
Now, to clean up the house. Because behind every great DIY home renovation is a great mess.


Well done! You two should be very proud.
Thank you so much! We are certainly proud of the results and now…we rest…haha!
I love it! I’ve been following along. It came out great, you are so inspiring.
Thank you so much for the sweet comment!
Love it, great project and terrific results!
Thank you!!! We’re so happy with how it turned out too!
I just love the new bathroom remodel. You two are so clever!
Thank you for the sweet comment!
Where is the swan painting from?
It’s a print from Juniper Print Shop. Here’s the link: https://juniperprintshop.com/products/swan